All posts by Simon Todd

My Observatory MkII

After deciding to move my equipment from the farm to home, to make my imaging tasks a bit easier, I decided I was going to design and build a roll-off roof oberservatory this time, this will allow me to possibly automate the roof later on, so for this I first had to dig down by 3ft in order to build the base for my Pier, inside this 3ft was also re-inforced bar going out to different angles to the surrounding earth and also straight down into the ground below the 3ft hole, it was then poured with concrete and the template for the steel pier bolts placed resulting in the following:

1434124682

The base was an 8ft x 8ft base, but my observatory design was to be an 8ft x 6ft because I did not plan on being present in the observatory during imaging so I did not need that much space around the equipment, as you can see my garden slopes down quite a bit too.  The bricks around the outer edge were purely to allow me to pour concrete down the edges to get a smooth finish on the outside prior to be filling the whole base with concrete.

A few days later, the concrete arrived and was poured into the base resulting in the following image showing the concrete “Curing”

1434551516

After the concrete had cured, I used a thin film of leveling compound on the observatory base just to give it a much cmoother floor and allow me to paint it with a nice clean dark grey concrete floor paint, and once dried I started constructing my observatory which resulted in the final build below:

1438026075

As you can see from the above image and the image below, I still had my Astro-Tech AT8RC which I have parted with in favour for an F4 Quattro Reflector which is now my primary imaging scope

scope2

I am extremely happy with the observatory, I am working through a design to allow the automation of the roof as well.  In total the construction of this obervatory took me no less than a few days to complete, I hope this inspires you folks out there contemplating building your own to get out there and do it!

My Observatory

For those people who are looking to have a more permanent setup for their equipment an observatory is more likely to be on the cards, when I lived in Ireland I had my NEQ6 Pro on a steel pier covered by a special cover to protect it from the elements, when I moved back to the UK I had the perfect opportunity to build an observatory to protect the equipment and not have to keep remounting the camera and scopes for imaging, this is what my setup looked like in Ireland:

20130821_185321

When I originally moved back to the UK I had the observatory located on a familly farm where I built a “Bat Wing” style observatory, this took shape by digging a 3ft hole for the pier

20140809_154759

Then building the base around the Pier Concrete:

20140816_133559

Then constructing the double skin walls around the base:

20140817_175350

Once the base and sides were constructed, the per was put into place

20140817_195944

And the final result was this:
20140912_105418

20140921_171819

Since I built this observatory, I have now built another one at home with a roll off roof, which worked out better than the Bat-Wing style, see here for details.

Cooling a DSLR

In the days I used a Canon 500D to produce my Astrophotography Images I set upon a quest to reduce the amount of noise in my images, it would then allow me to capture less frames because there was less random noise to filter out.

In my quest I came across a blog post by Gary Honis on how to cool a DLSR Camera used for Astrophotography, so I followed the information and produced a cooler box.  The design by Gary is to cool the air around the camera whilst in a box.  I built my cooler box but could not yield any substantial results in effectively cooling the CMOS Sensor, so I decided to start from scratch.

Since I had done the Astro Mod to my camera previously, I knew the insides of the camera fairly well, so I thought to myself that there must be a much better and more efficient way of cooling the sensor a little more directly rather then cooling the air outside the camera, I remembered that there was an aluminium shield covering the back of the imaging sensor, so I started working on my cooling system, for this project I puchased the following:

  • A Plastic electronics Project Box with Lid
  • A 1 Square Metre sheet of Mylar
  • An Intel Xeon CPU Cooler
  • A Fan Speed Controller
  • A 20mm x 20mm aluminium block
  • 2x Silica Gel Moisture Absorbing packets
  • 1x 12v Converter for the Camera to replace the battery pack
  • 1x Thermal Heatsink Compound (Arctic Silver)
  • 1x Peltier Thermo Electric Cooler (TEC)

In order to allow the direct cooling of the sensor, it was neccesary to remove the rear LCD Assembly of the camera, which you would not be using anyway as the camera would be in side the box.

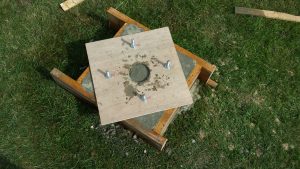
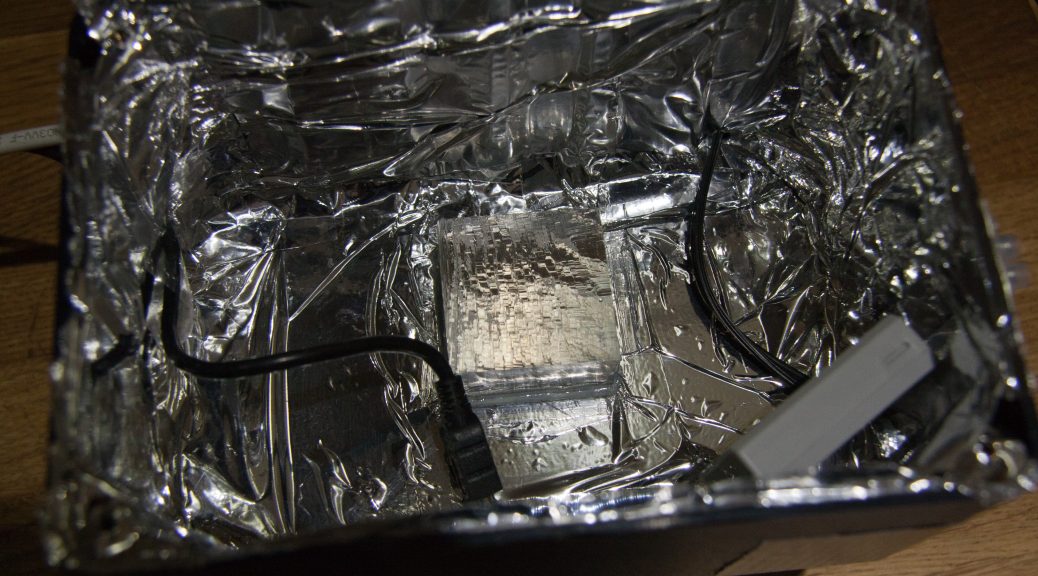
The following image shows the actual box assembly with the aluminium cooling block, you cannot see the TEC or CPU Cooler from this angle, but the CPU Cooler was spring loaded to prevent the cooling block crushing the sensor shield, in here you can also see the Mylar as well as the USB Cable for the camera and also the 12v battery convertor for the camera.

img_5158

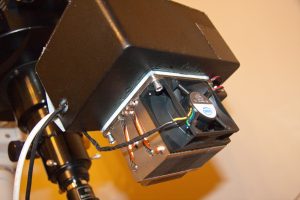
The next image you can see the camera cooling box next to the camera where you can see the aluminium shield that the cooling block will directly connect to in order to provide the direct cooling, I also placed some Arctic Silver Heatsink paste here to allow better thermal transfer

img_5160

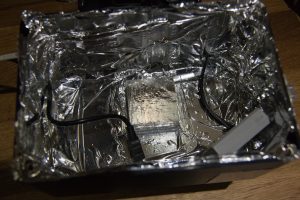
When the box was finally assembled, a couple of silica gel packs were included to absorb any moisture inside the box after the box was closed, there was no way for air to leak inside as all cable holes were sealed with sealant also, below is an image of the cooling system complete and attached to the telescope

img_5155

Since I used to use Backyard EOS to acquire my images when using my DSLR it would report the sensor temperature for each frame acquired and with this design I was able to effectively cool my sensor to at least -20 even with the XEON cooler fan set to minimum during the winter and medium speed during spring.

Since I moved to my CCD Camera a few years ago now, a friend bought my cooled camera from me and it is still going strong and working great