As promised, now that I have done some imaging with my new QHYCCD 183M Mono ColdMOS Back Illuminated camera here’s the second part of my review on the camera.
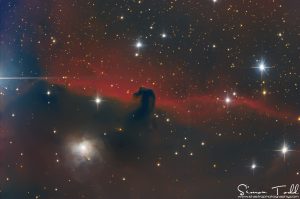
Pixel size:- The pixel size on the 183M is 2.4um which I absolutely love, on my Sky-Watcher 8 Inch Quattro F4 the camera gives me a field of view of 0.62 Arcseconds/Pixel, which is a fantastic resolution, I remember when I had my Atik 383L+ and my Astro-Tech AT8RC F8, that offered me a resolution of around 0.63 Arcseconds/Pixel, so I am now imaging at almost the same field of view but at F4 and at 20mpx, but let’s just put that into comparison on the same scope, the first image below is IC434 taken with the Atik 383L+ on the Quattro, and the second image below is taken with the QHY183M on the same telescope, you can see what impact it has on the field of view:
FOV on Atik 383L+ with 8″ Quattro F4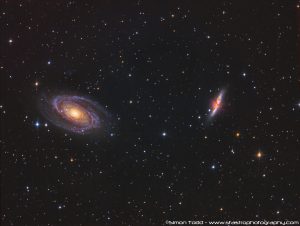
FOV on QHY183M with 8″ Quattro F4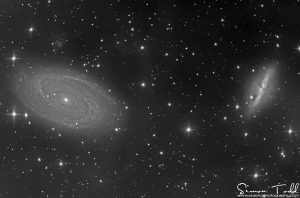
As you can see from the above two images the difference in the field of view due to the chip size.
Camera Sensitivity:- Since moving to the QHY183M I have had to make changes to how I image, having owned the Atik 383L+ for a good few years, I got used to imaging with it, so when I moved to the QHY183M I suddenly noticed that this camera was quite a bit more sensitive, the first image above consists of 300 second frames for the LRGB whereas the second image consists of just 150 second frames, yes 150 second frames!!!
When I first started imaging M81/M82 with the QHY183M, I immediately started with 300 Second frames, I ended up with the same amount of 300 second frames that I had with the Atik 383L+ but I just could not process it, after further analysis I noticed then that the lights were severely clipped, to put this into perspective, below is the Sequence Generator Pro Histogram for both the 300 second exposure (left) and the 150 second exposure (right)
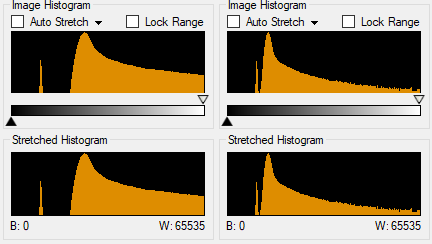 As you can see the histogram on the left for the 300 second exposure is severly clipped on the right side of the histogram indicating that the exposure was too long, the histogram on the right for the 150 second exposure is a lot better, there is still some slight clipping happening but this was a luminance frame, this clearly indicates that the 183M is much more sensitive than my previous CCD imager.
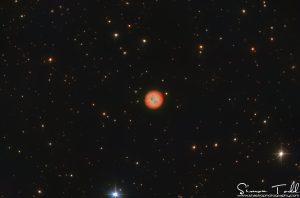
The following two images were produced with the 183M, firstly IC434 consists of 19×300 Second Exposures in RGB and the Second Image of The Owl Nebula consists of 27×300 second exposures in RGB + 25x600S in Ha
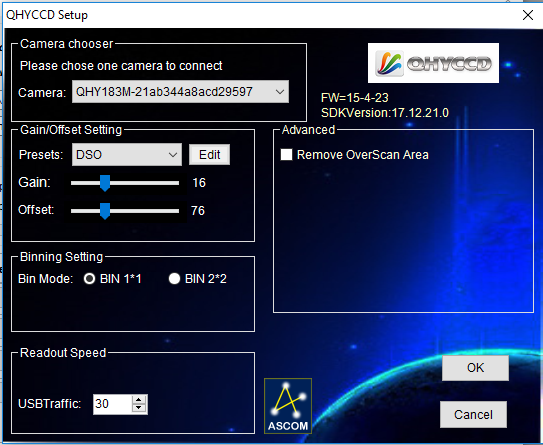
Software Integration:- As you probably know already, I use Sequence Generator Pro for my image acquisition and the integration with the camera has been pretty seemless, the ASCOM platform driver works pretty well, and I have the camera set to the default gain and offset setting that QHY have provided which is 16 of Gain and 76 for offset:
UV/IR Sensitivity:- I have read online that the 183M is a little bit sensitive to UV/IR Light, so I asked the guys at QHYCCD about this abd they informed be that the window on the senor is straight clear glass, so it also lets in UV/IR Light, which for me is not an issue as all of my Baader filters are UV/IR Blocked anyway, but it is something to consider if I ever change filters.
Conclusion
The camera has performed way beyond my expectations, had to change some of my approaches to image acquisition but that was to be expected, I am extremely happy with the camera and look forward to getting more data to compliment the Luminance for M81/M82 in the not so distant future.
If you are considering the QHY183M as an imaging camera, and would like to discuss, then feel free to reach out to me.
Clear Skies

24 thoughts on “QHY183M Review – Part 2”