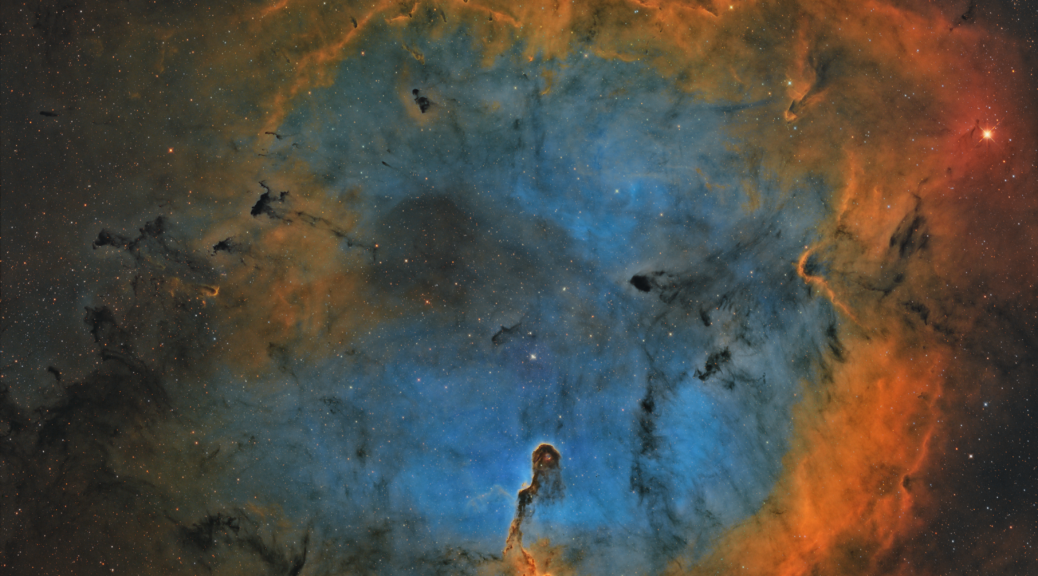
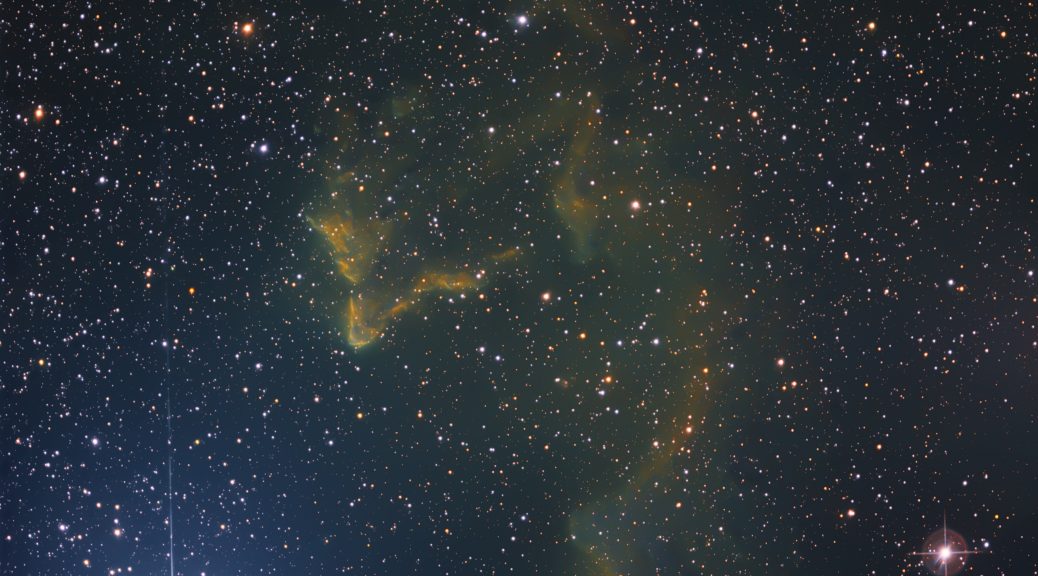
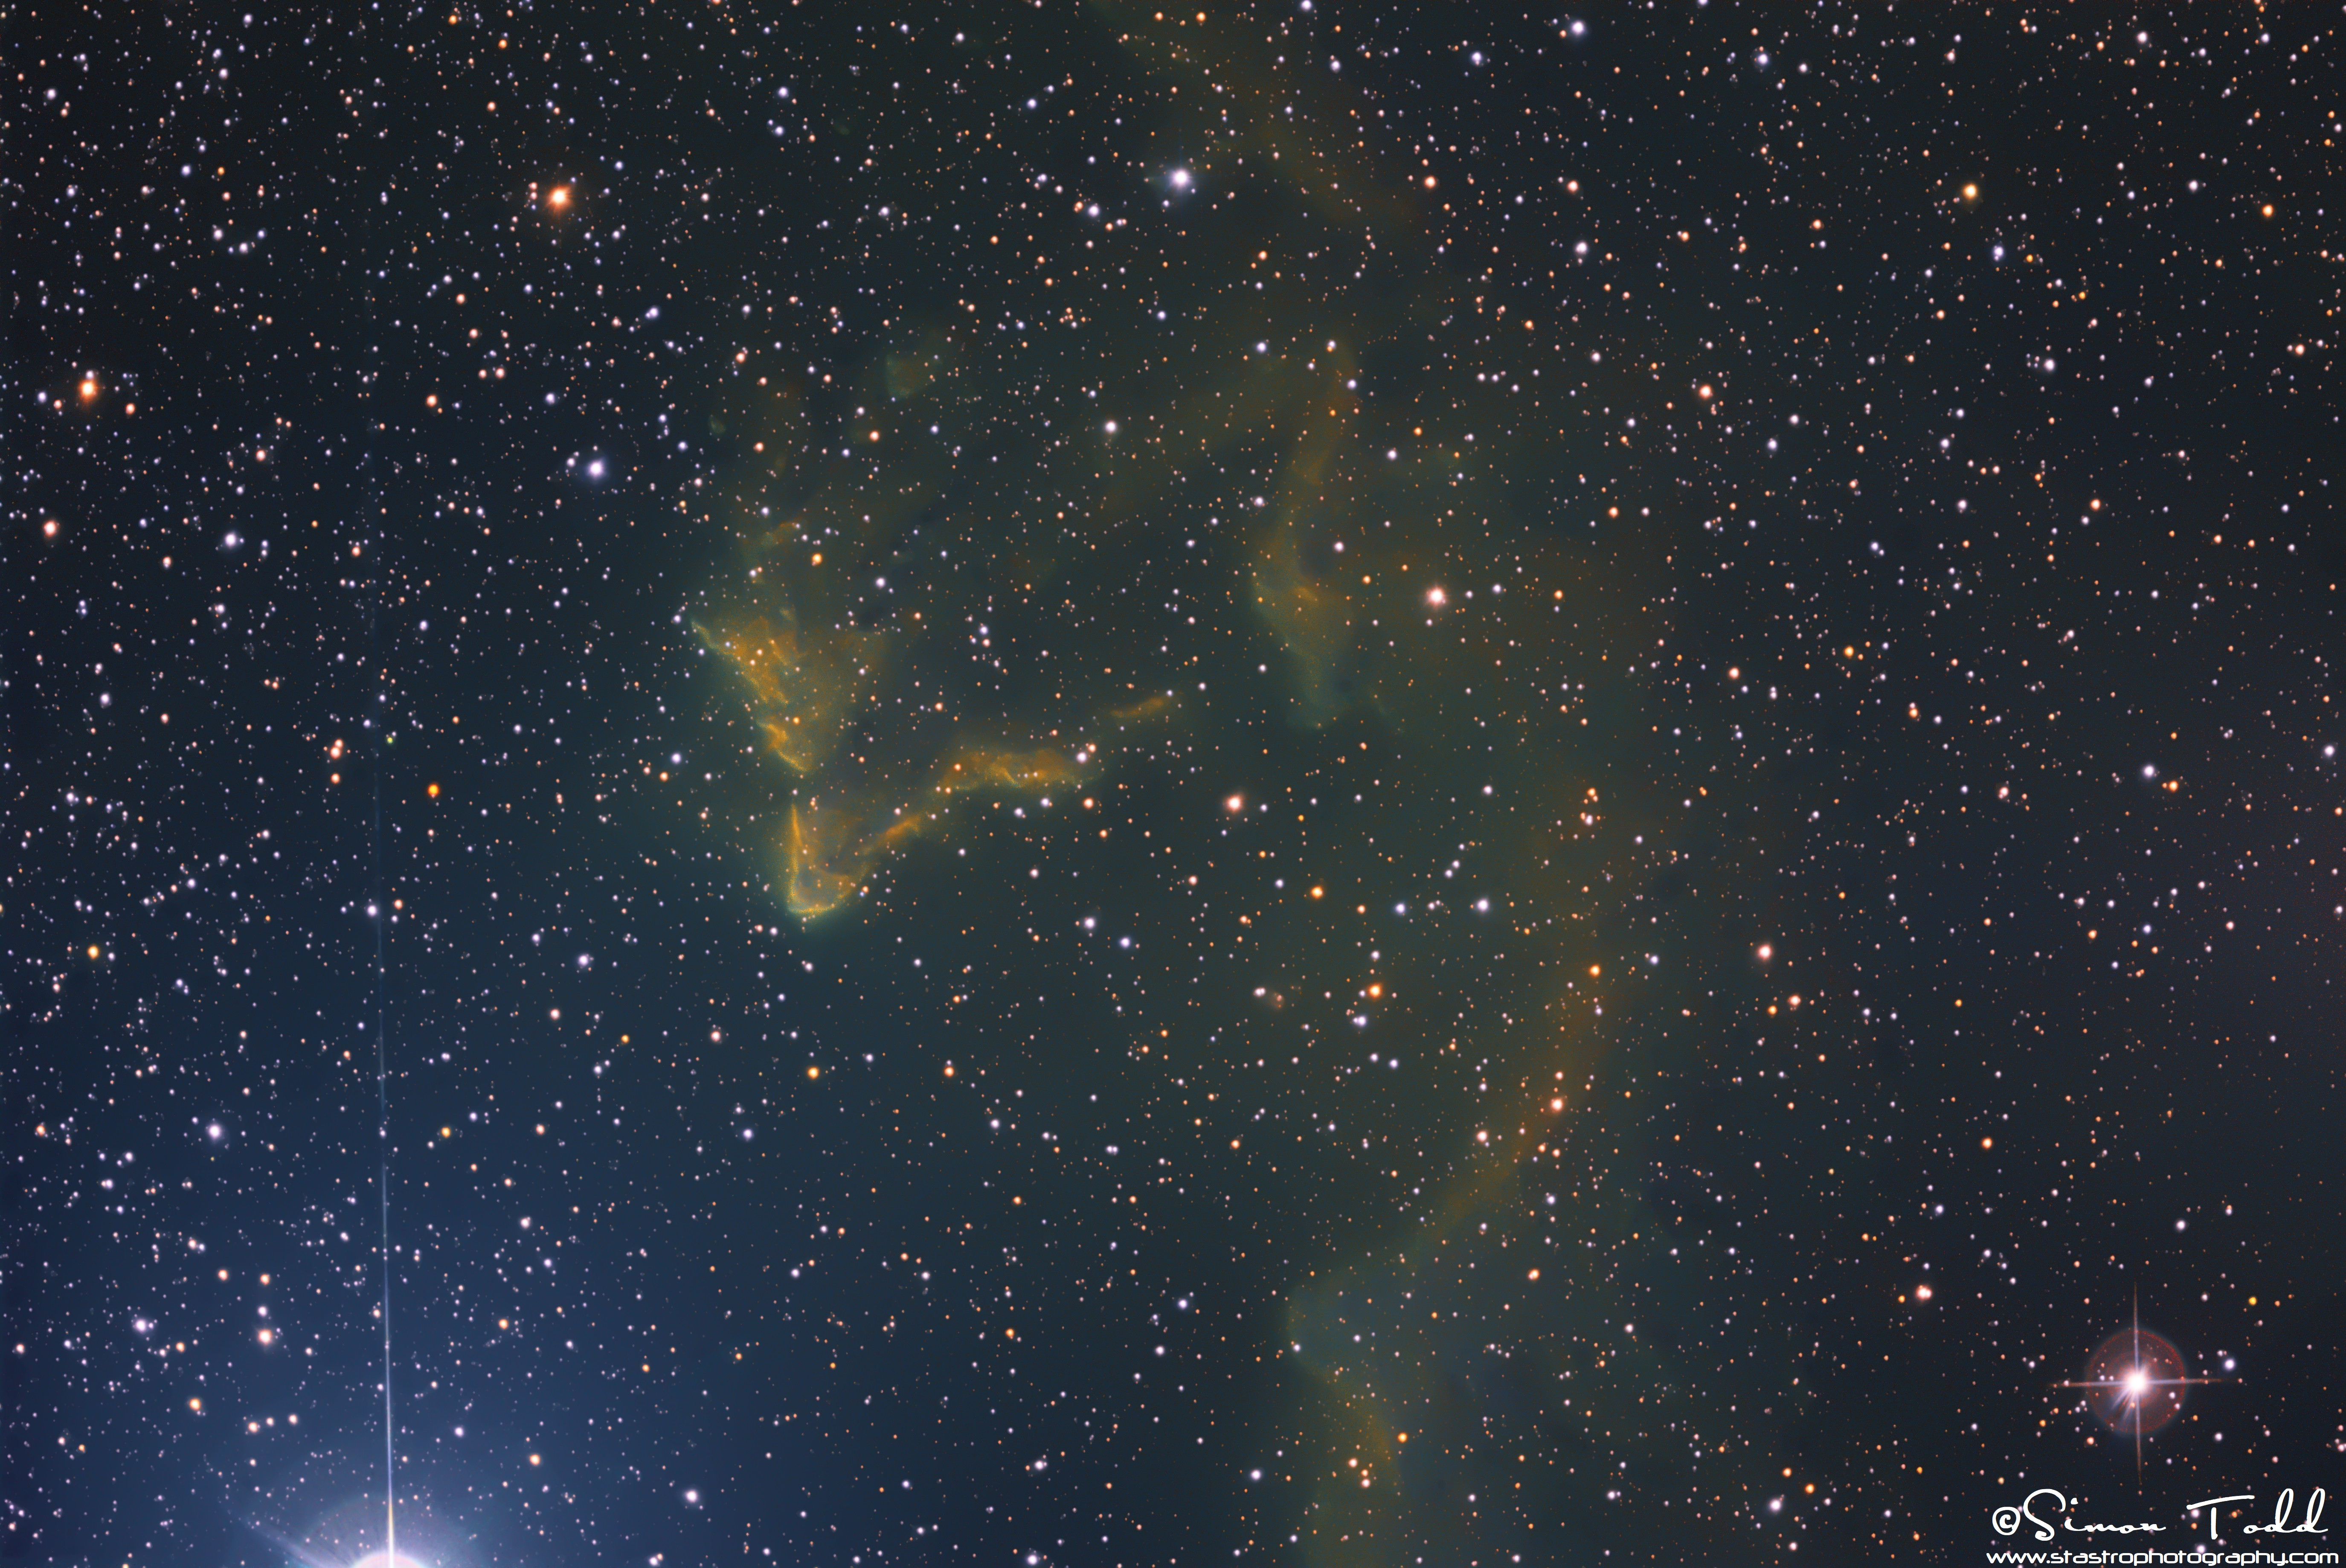
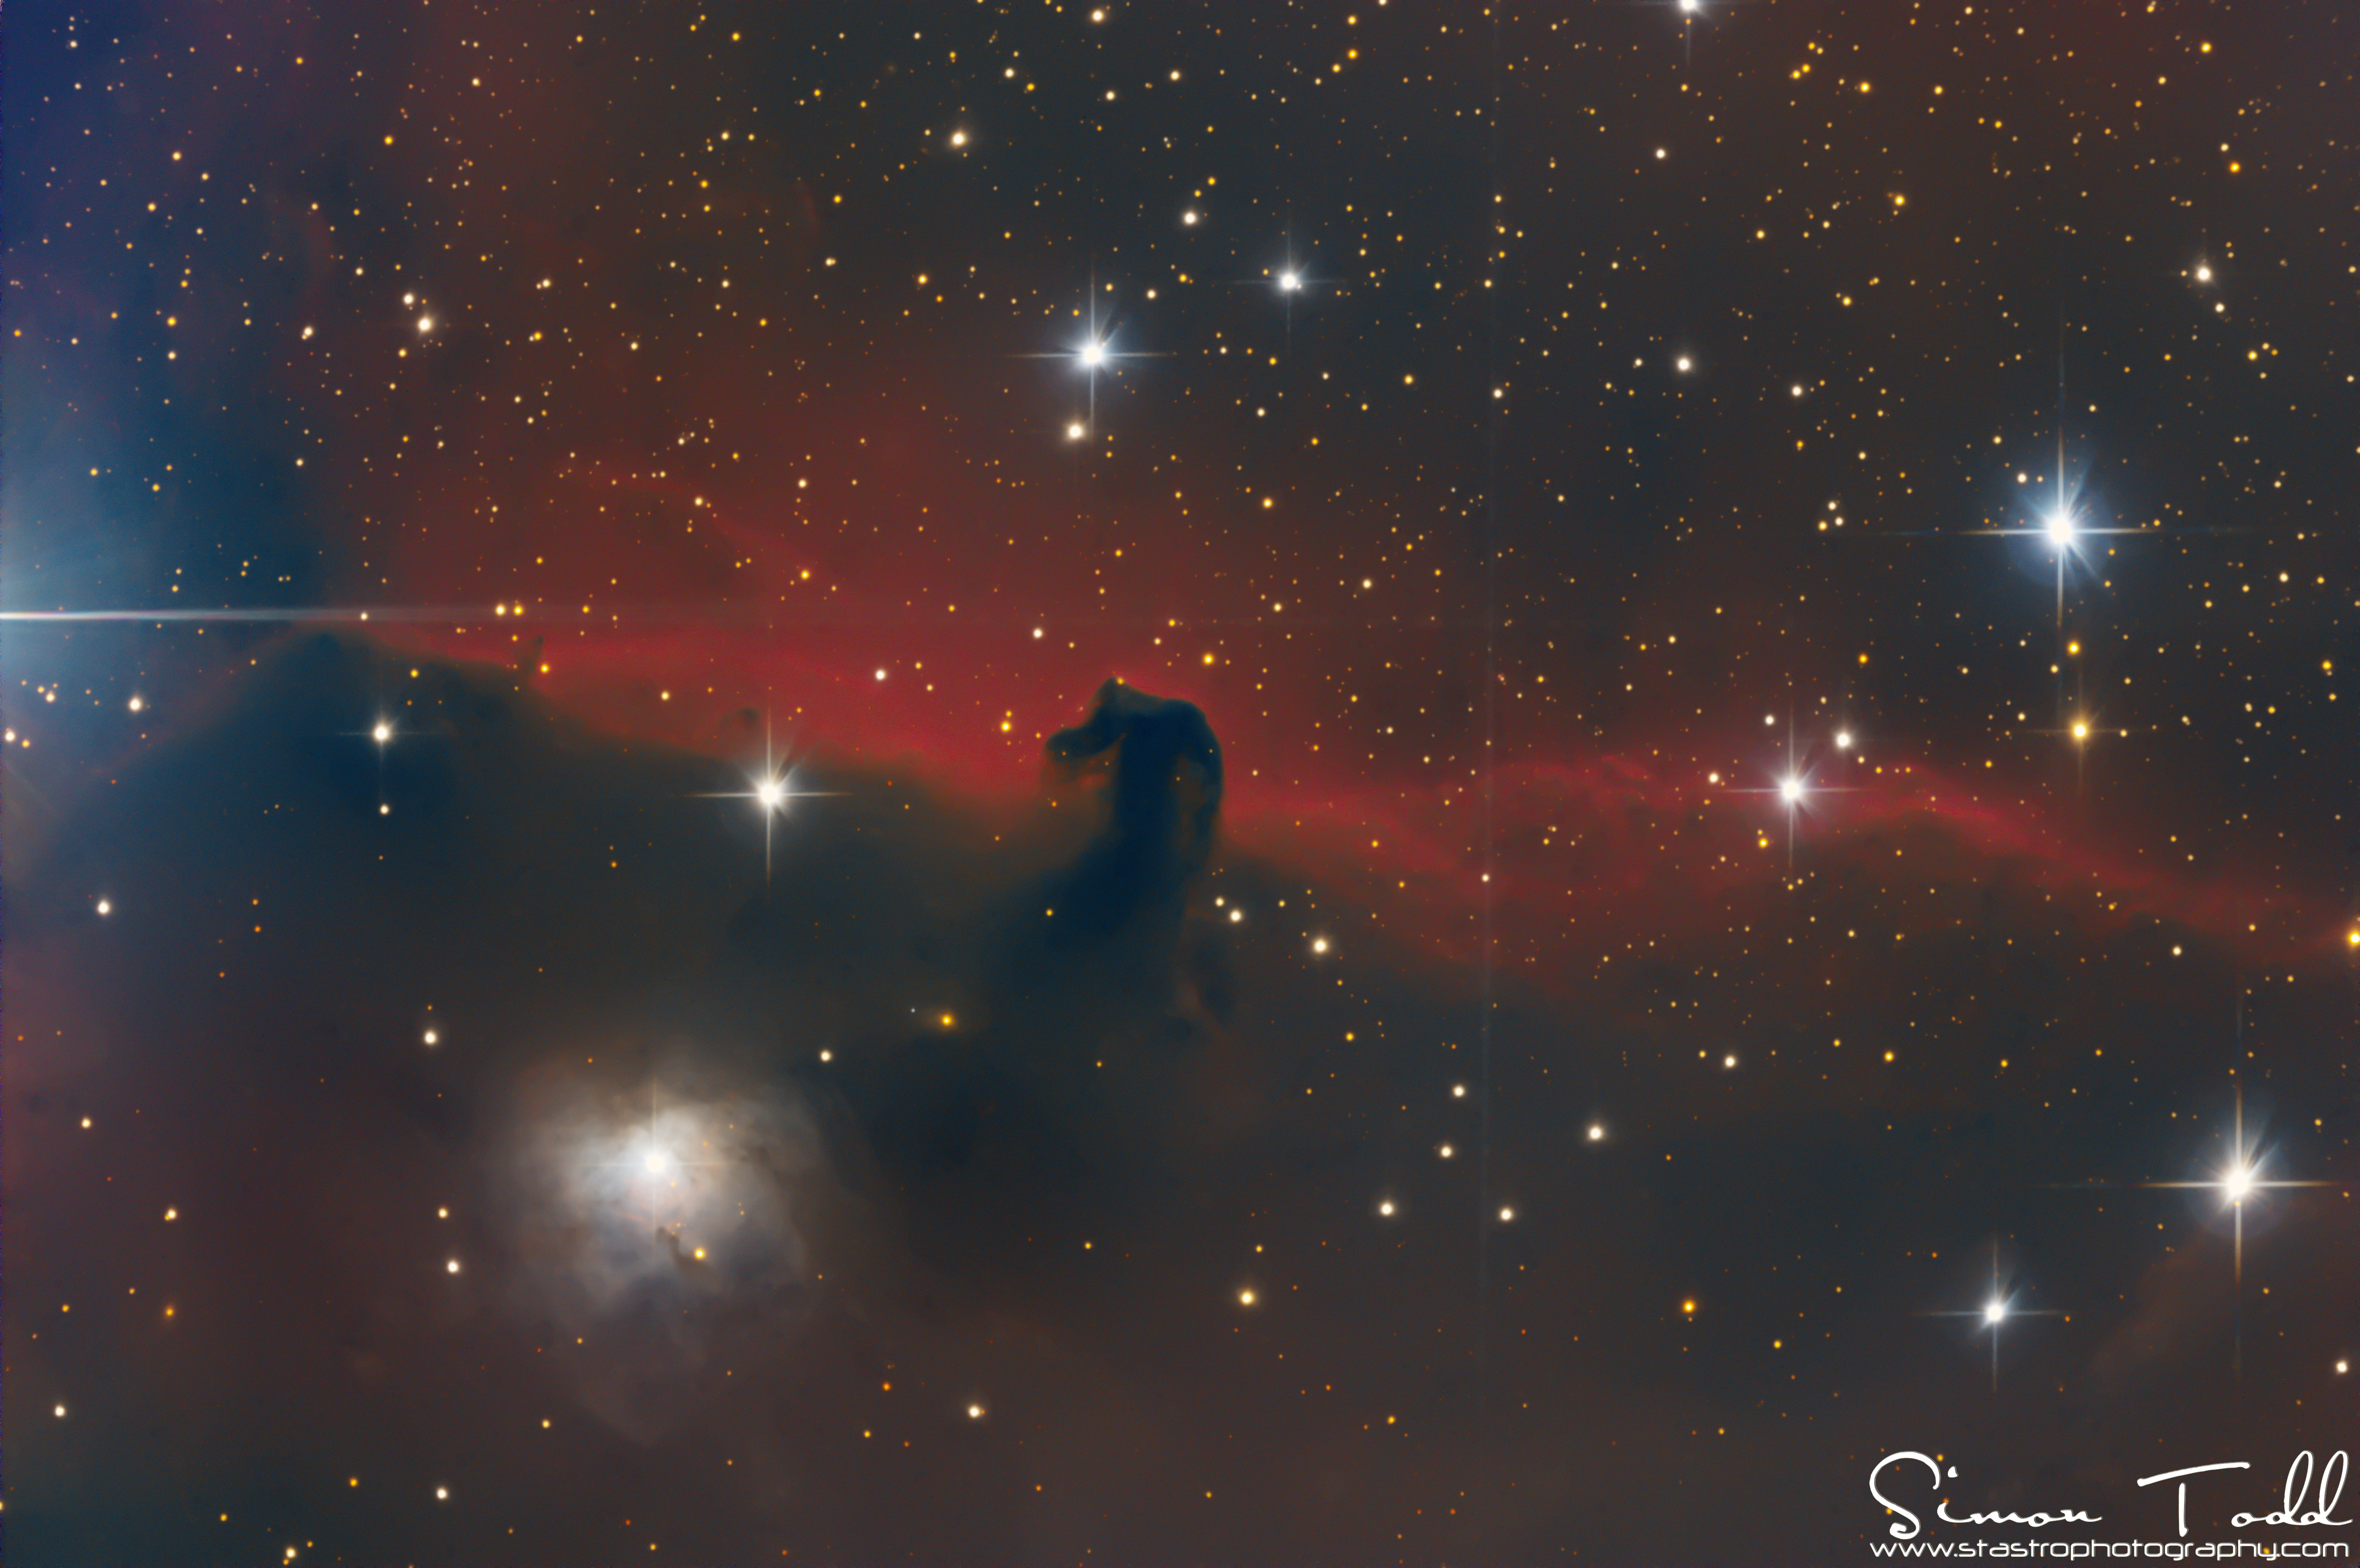
In the boundless theatre of the night sky, where celestial tales unfold across the eons, lies an ethereal masterpiece that has captivated the gaze of astronomers and dreamers alike. This image, a delicate two-panel mosaic, is a profound revelation of the Elephant’s Trunk Nebula, known formally by its catalog designations IC 1396A, nestled within the larger expanse of the IC 1396 complex in the constellation of Cepheus.
Crafted with meticulous dedication over the span of five months, this portrait of the cosmos was brought to life using a full-frame monochrome CMOS camera, a testament to the intersection of art and technology. The camera, acting as a modern-day alchemist, transformed the invisible into the visible, capturing the nebula’s intricate details and sweeping gas clouds that resemble an elephant’s trunk, reaching out into the void.
However, this image is more than a snapshot; it is a chapter in an ongoing saga dictated by the unpredictable whims of the UK’s weather. The journey to encapsulate the nebula’s full glory has been a dance with the elements, with many nights spent under the cloak of clouds rather than stars. Despite these challenges, the initial results have unveiled a stunning glimpse into the cosmos, showcasing the nebula’s haunting beauty and the vibrant activity within its star-forming regions.
Yet, the story does not end here. The image is a promise of what is yet to come, as there are plans to revisit the Elephant’s Trunk Nebula later this year. The aim is to deepen the exploration, to add more data to this cosmic tapestry, and to further refine the clarity and depth of this celestial phenomenon.
This endeavor, a blend of patience, passion, and precision, highlights not just the technical prowess required for astrophotography but also the enduring human desire to connect with the universe. Through this image, we are reminded of our place in the cosmos, a mere speck within the vastness, yet capable of capturing and celebrating its majesty.
The Elephant’s Trunk Nebula stands as a beacon in the dark, a symbol of the mysteries that await our discovery. With each photograph, we peel back another layer of the universe, bringing us closer to understanding the grand design of which we are a part. This image is an invitation to gaze upwards, to wonder, and to dream of the infinite possibilities that lie beyond our world.
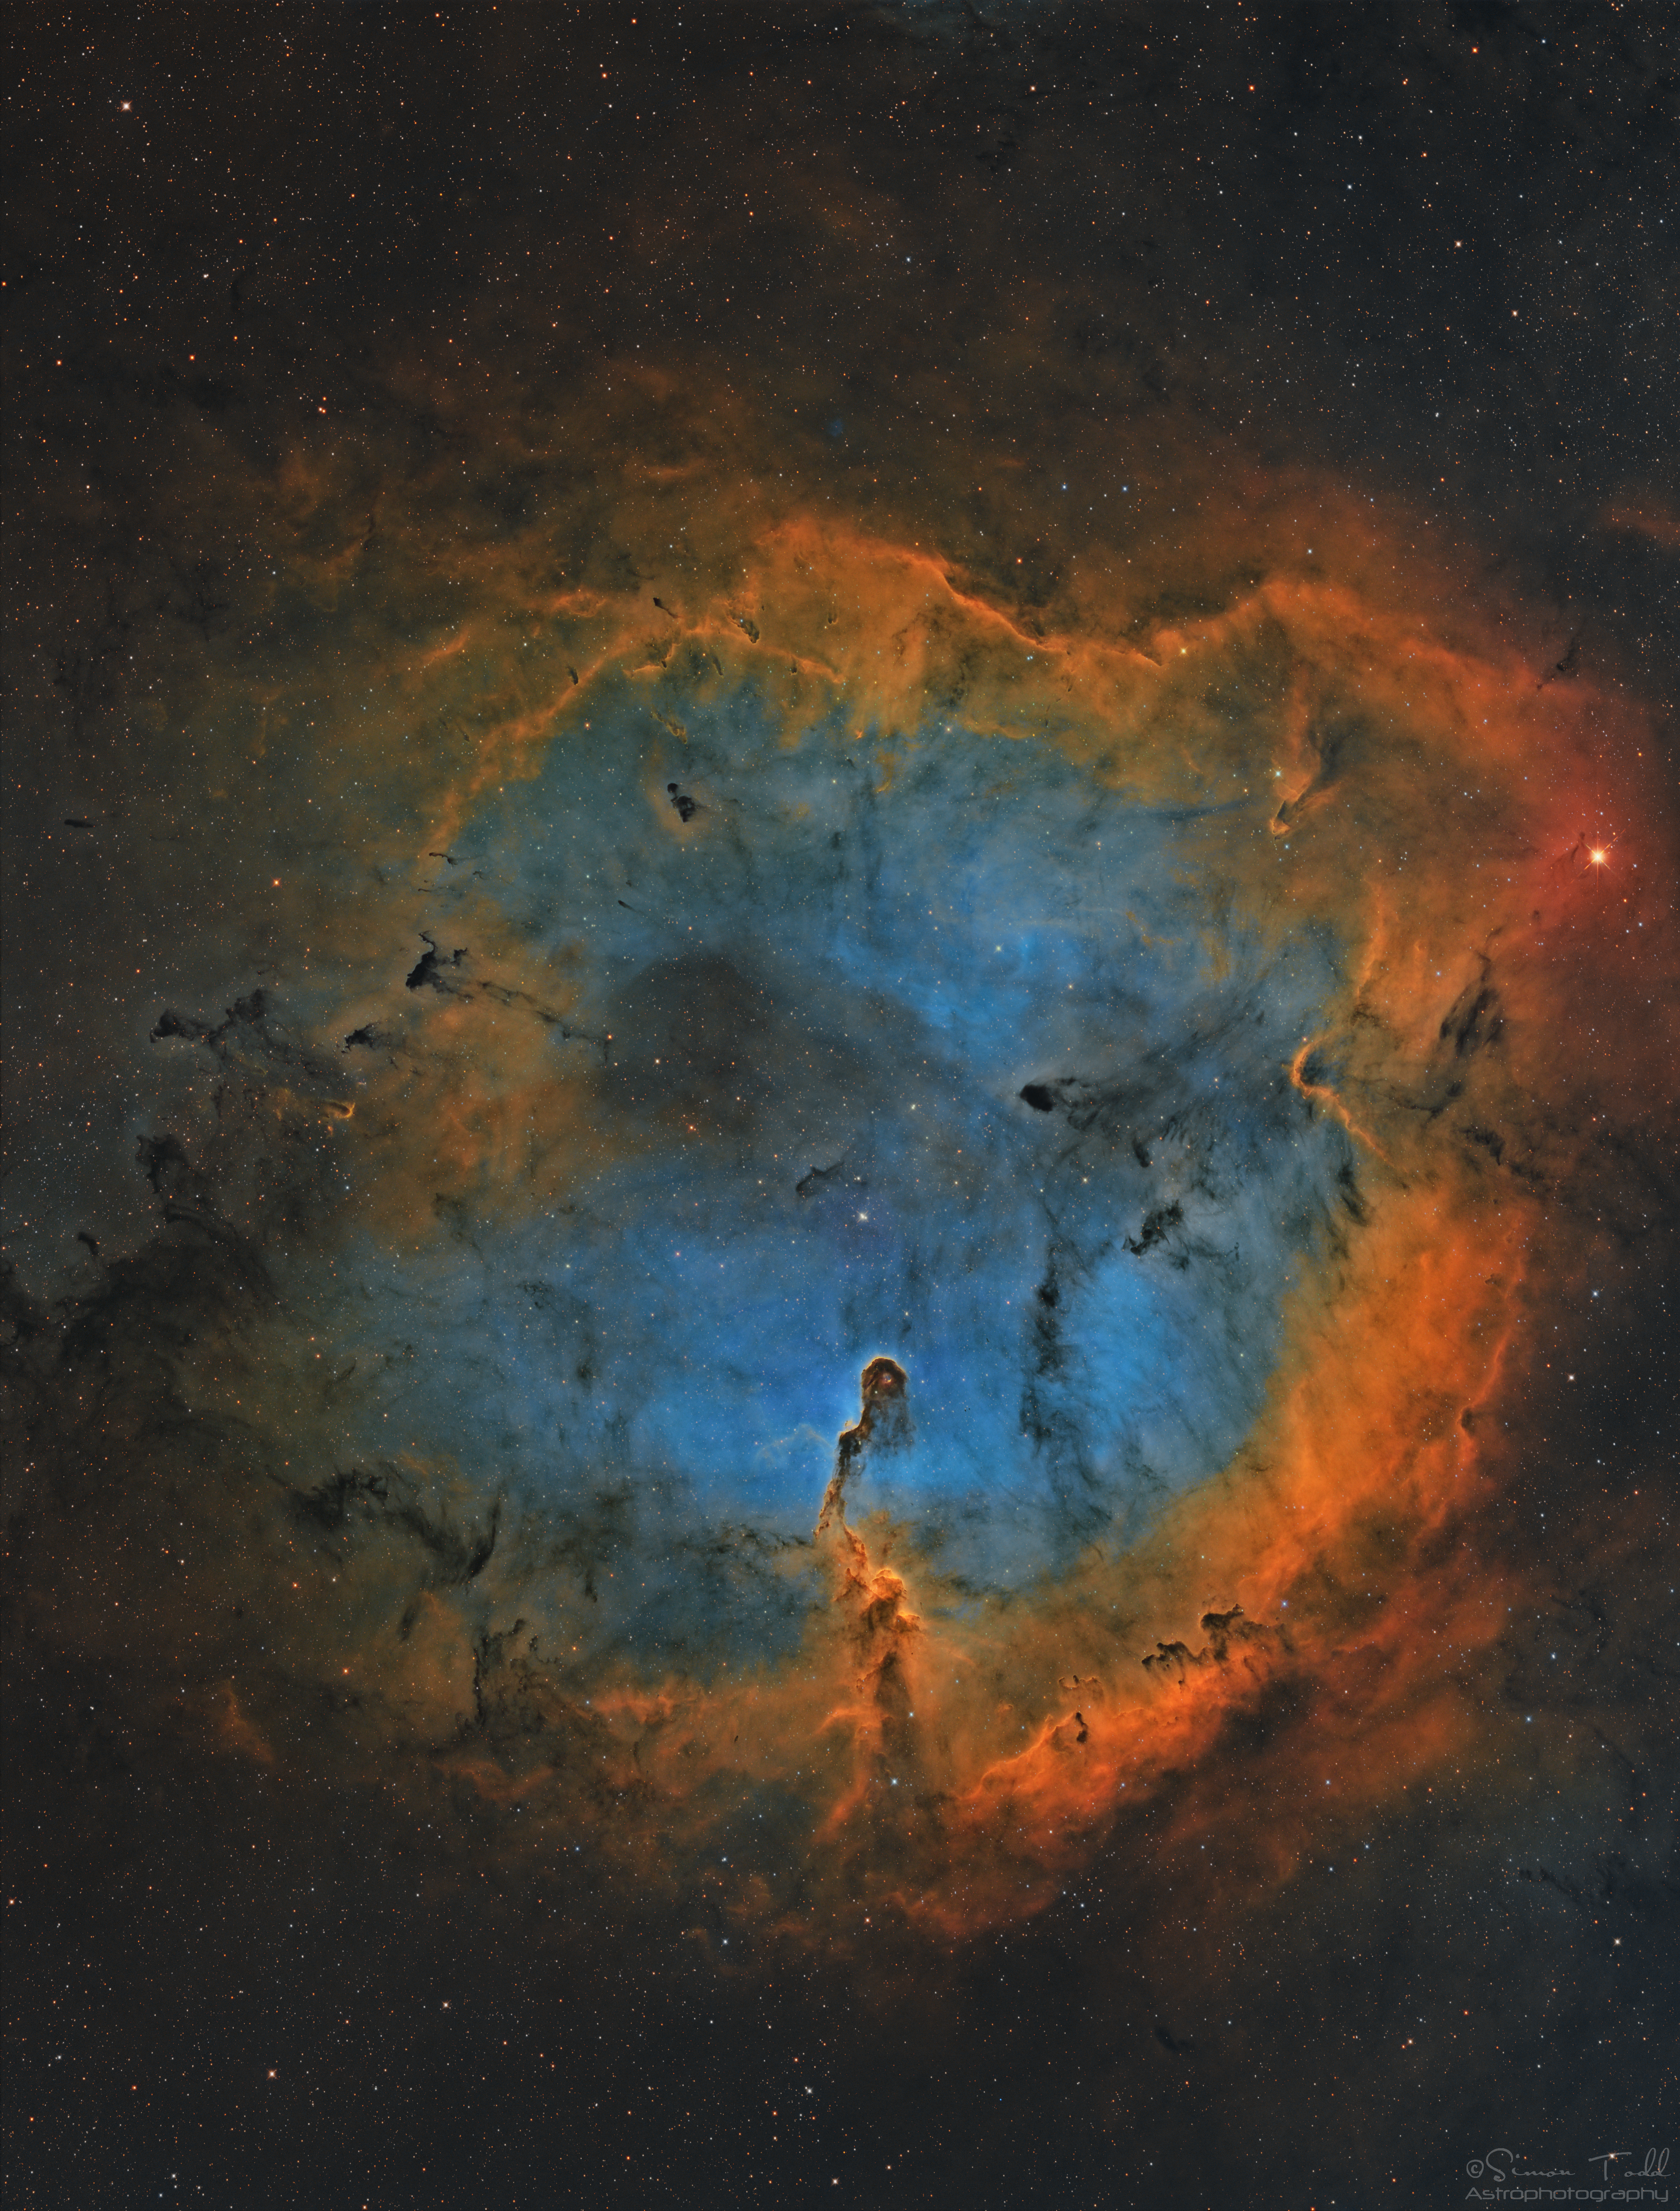
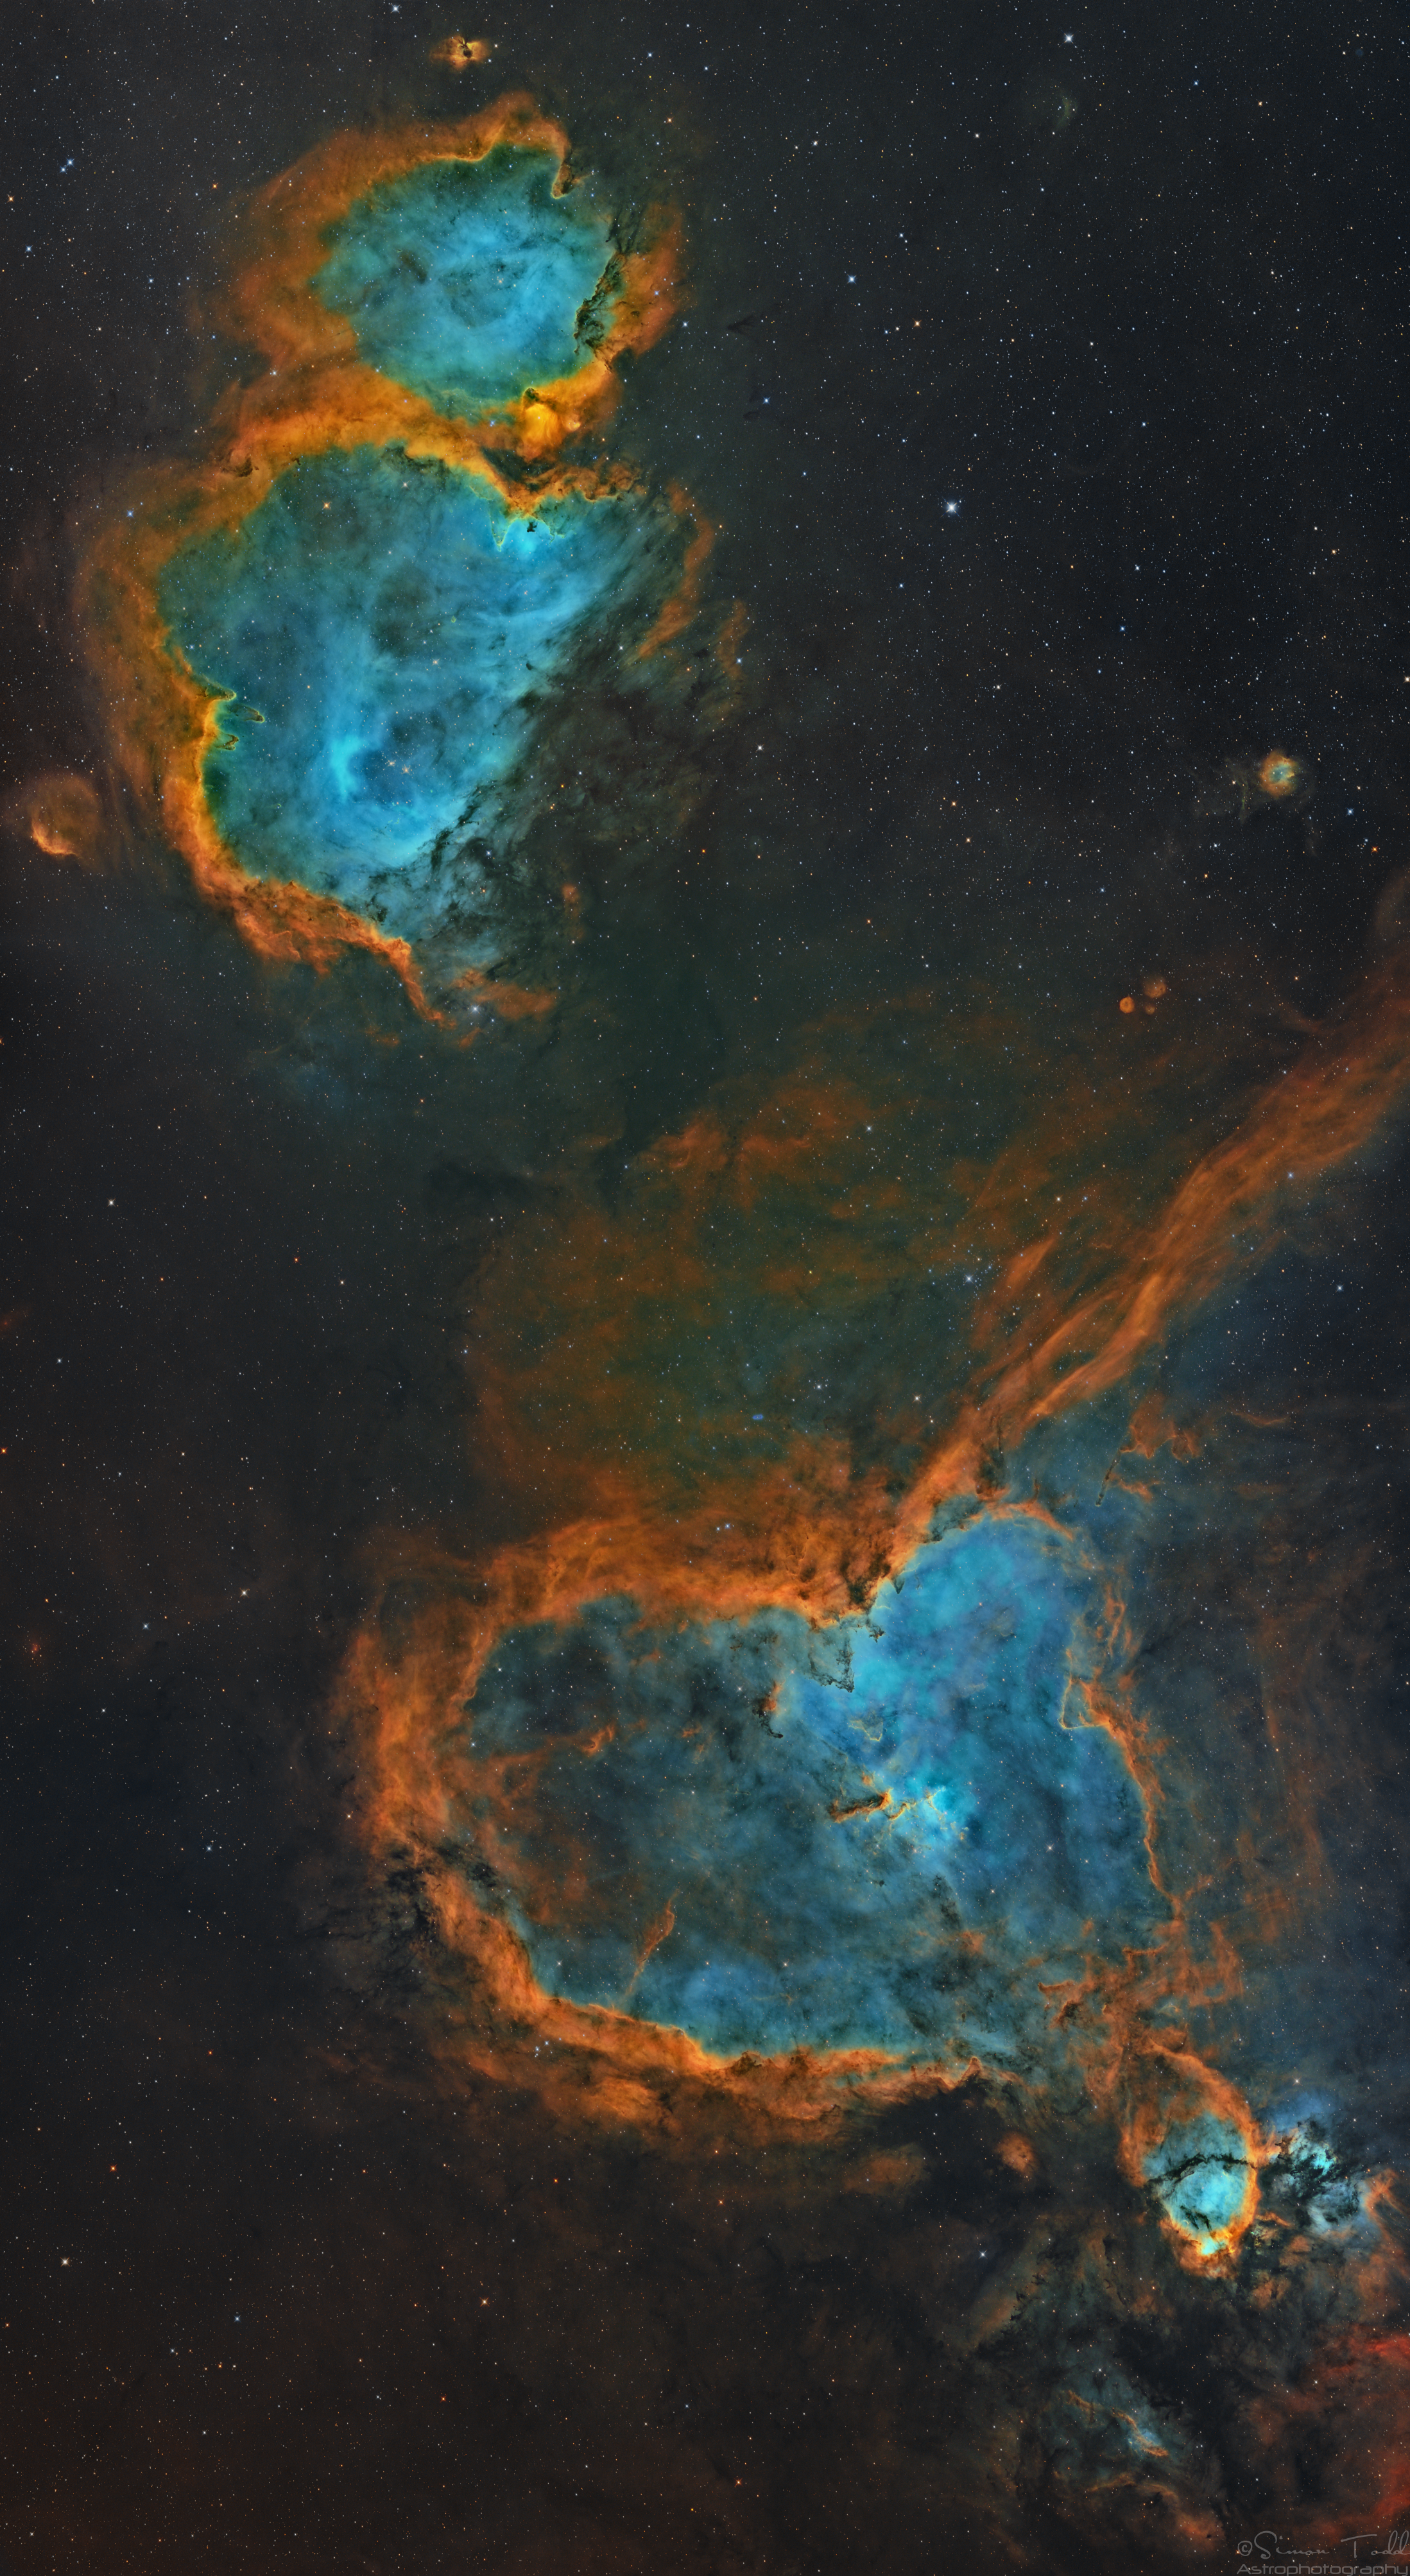
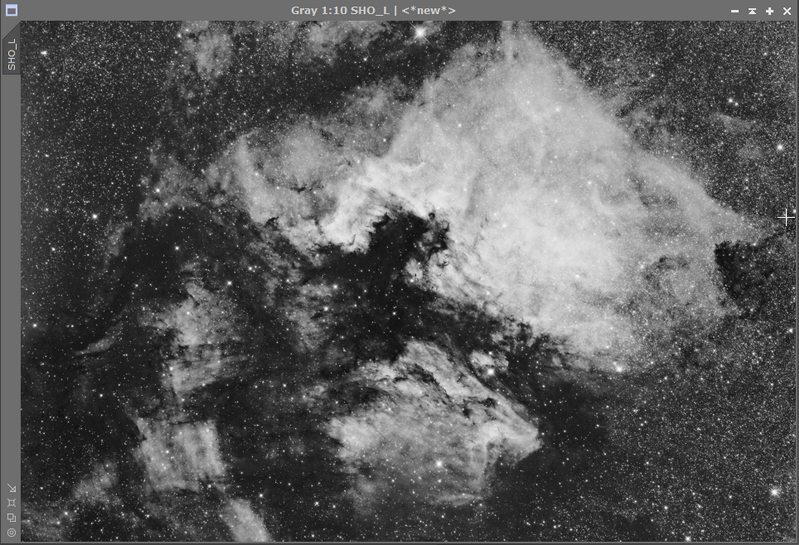
In the boundless theatre of the night sky, a spectacle of cosmic proportions gently unfolds. Here, through the unblinking eye of my camera, we witness the Heart and Soul Nebulae, celestial bodies of unimaginable scale and beauty. Captured in the vivid hues of the Hubble Palette, this image is the culmination of over 68 hours of patient vigil over the course of six months, a testament to the relentless march of time and space.
The Heart Nebula, known as IC 1805, and its companion, the Soul Nebula, IC 1848, are more than mere clusters of gas and dust. They are incubators of stars, cosmic nurseries where new celestial lives begin. Nestled within is the charmingly named Fish Head Nebula, a smaller star-forming region within this grand cosmic landscape.
Each pixel of this mosaic is a story, a tiny fragment of the universe’s narrative, captured through the artful blend of sulfur, hydrogen, and oxygen emissions. As we gaze upon this image, we are not merely observers but voyagers, embarking on an odyssey across the galaxy. It invites us to ponder our place in this magnificent universe, a reminder of both our insignificance and our profound connection to the cosmos.
In the grand scheme of things, this image is but a fleeting glimpse into the eternal dance of the cosmos. It is a humble offering to the beauty and complexity of the universe, a universe that continues to captivate and inspire us with its endless mysteries.
Catalog Names: IC 1805 (Heart Nebula) IC 1848 (Soul Nebula) Fish Head Nebula (Part of the Heart Nebula)
Acquisition Dates: 16 May 2023, 17 May 2023, 20 May 2023, 21 May 2023, 25 May 2023, 26 May 2023, 27 May 2023, 28 May 2023, 15 Jun 2023, 16 Jun 2023, 24 Jun 2023, 25 Jun 2023, 26 Jun 2023, 13 Jul 2023, 16 Jul 2023, 17 Jul 2023, 19 Jul 2023, 20 Jul 2023, 25 Jul 2023, 26 Jul 2023, 6 Aug 2023, 7 Aug 2023, 9 Aug 2023, 10 Aug 2023, 17 Aug 2023, 20 Aug 2023, 22 Aug 2023, 5 Sep 2023, 9 Sep 2023, 15 Sep 2023, 23 Sep 2023, 29 Sep 2023, 8 Oct 2023, 9 Oct 2023, 14 Oct 2023, 15 Oct 2023, 6 Nov 2023, 7 Nov 2023, 10 Nov 2023, 11 Nov 2023, 14 Nov 2023, 15 Nov 2023, 19 Nov 2023, 20 Nov 2023, 22 Nov 2023, 24 Nov 2023, 25 Nov 2023
Many people like myself have transitioned from a MONO camera to a One Shot Colour (OSC) for whatever reason, for me it was all about not being able to get the required amount of time due to weather conditions here in the UK. When I first considered moving to an OSC camera, it dawned on me that I would not be able to produce the vibrant Hubble Palette images that I could produce by imaging with specific filters on my MONO camera, specifically Hydrogen Alpha (Ha), Oxygen 3 (OIII) and Sulphur Dioxide 2 (SII) which would then be mapped to the appropriate colour channels when creating the final image stack.
Now along came Dual and Tri band narrowband filters for OSC cameras which peaked my attention, the Dual Band filters allow Ha and OIII data to pass, the Tri Band filters allow Ha, Hb (Hydrogen Beta) and OIII to pass but at a high Nm value. I reached out to my friends at Optolong who had two filters, the L-eNhance and the L-eXtreme, the L-eNhance is a Tri Band filter, but after speaking with Optolong it would not work well for me at F2.8, so I went with the L-eXtreme Dual Band filter which has both the Ha and OIII at 7nm.
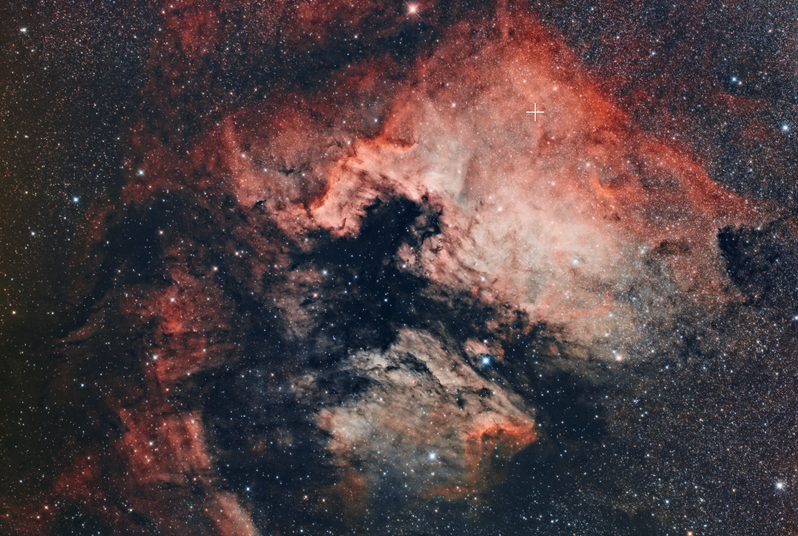
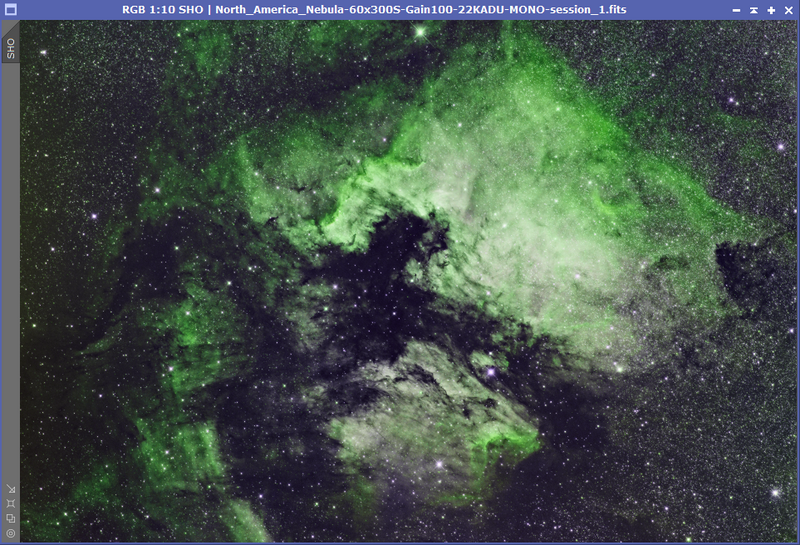
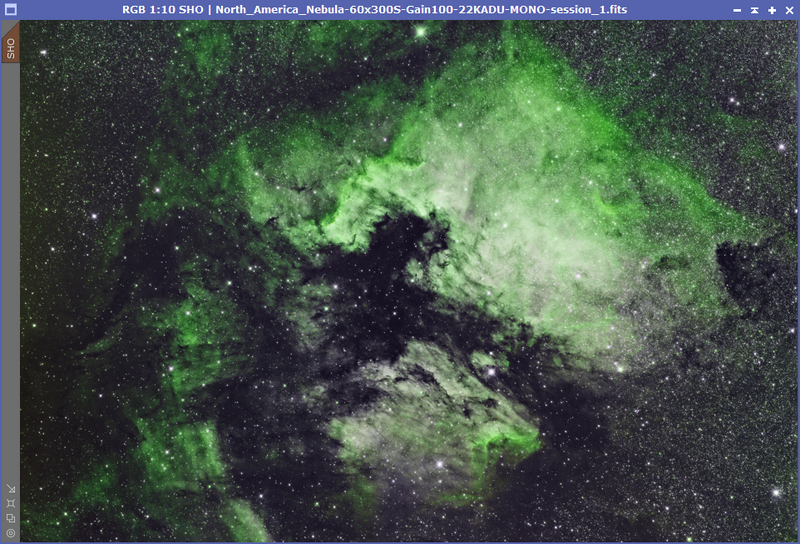
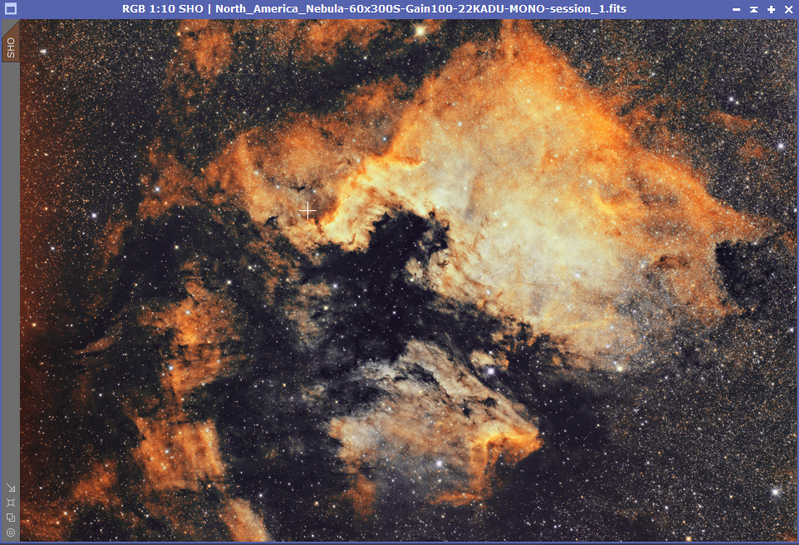
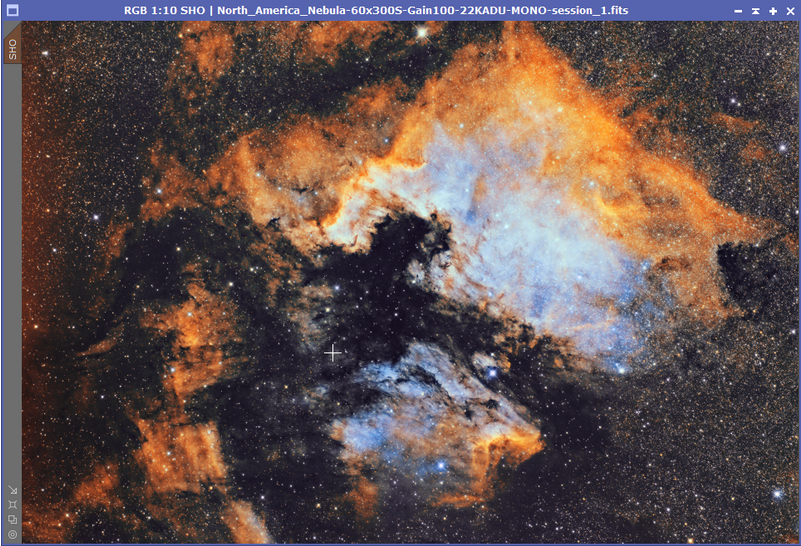
After receinving my ASI6200MC Pro, I decided to start acquiring data on a 1/2 to 2/3 moonlit nights on the North America Nebula, and so far when writing this post I had acquired a total of 60 frames of 300 seconds each at a gain value of 100, I processed the image my normal way in PixInsight and below is the result of the image:
North America Nebula, 60x300S at Gain100, Darks, Flats and BIAS frames applied with the ASI6200MC Pro using the Optolong L-eXtreme Dual Band 2″ Filter
I thought that my data looks good enough to work with and experiment with trying to build an SHO (Hubble Palette) image with, and I have spoken with Shawn Nielsen on this exact subject a few times so he gave me some hints and tips especially with the blending of the channels. So off I went to try and produce an SHO image.
Before we start, there are some requirements:
This tutorial uses PixInsight, I am not sure how you would acomplish this with Photoshop since I have not used PhotoShop for Astro Image Processing for a number of years
Data captured with a One Shot Color (OSC) camera using a Dual or Tri Band Narrowband filter
Image is non-linear…so fully processed
Step 1 – Split the Channels
In order to re-assign the channels, you have to split the normal image into Red, Green and Blue channels, I found this to work better on a fully processed “Non-Linear” image as above, once this was done, I renamed the images in PixInsight to “Ha” – Red Channel, “OIII” – Blue Channel and “SII” – Green Channel, this makes it easier for Pixelmath in PixInsight to work with the image names. Once this was done, I used PixelMath to create a new image stack with the channels assigned, and this is how PixelMath was configured
Red Channel = SII Green Channel = 0.8*Ha + 0.2*OIII Blue Channel = OIII
Once applied this produced the following image stack (do not close the Ha, OIII or SII images, you will need these later on):
SHO Combined image from PixelMath
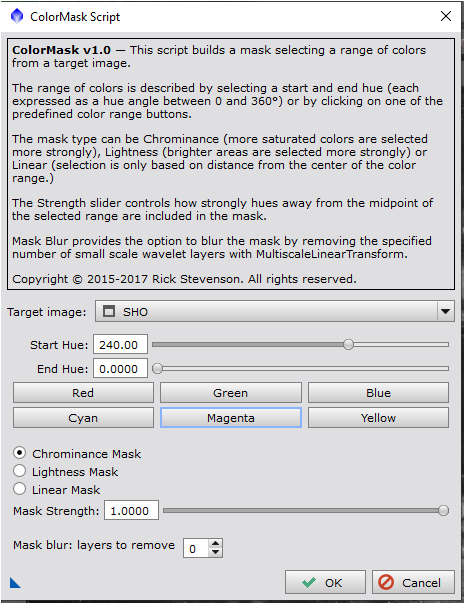
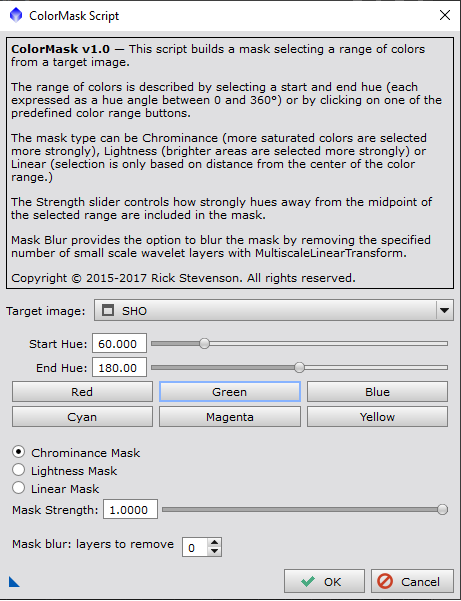
Step 2 – Reduce Magenta saturation
As you can see from the above image, some of the brighter stars have a magenta hue around them, so to reduce this, I use the ColorMask plugin in PixInsight (You will need to download this), and selected Magenta
ColorMask tool with Magenta selected
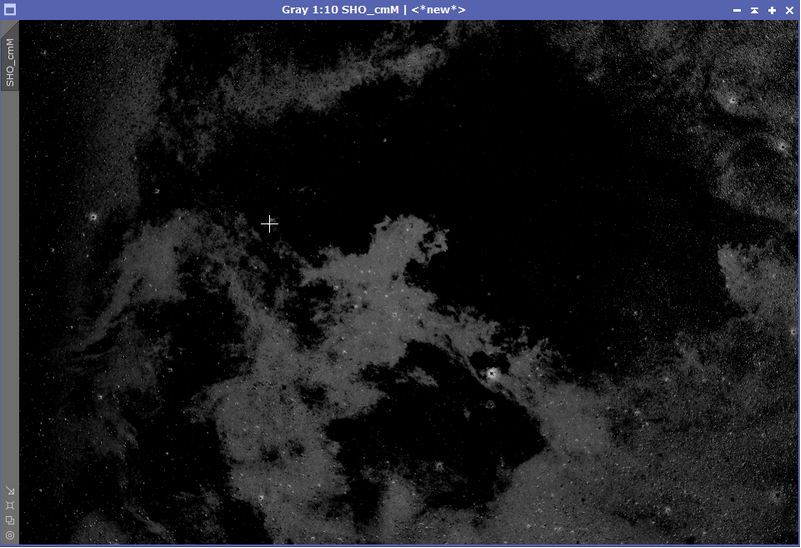
When you click on OK, it will create the Magenta Mask which would look something like this:
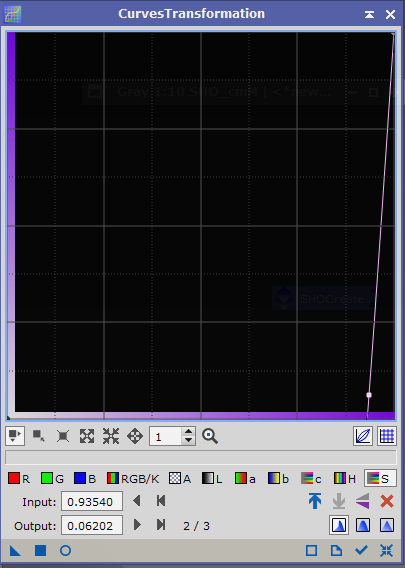
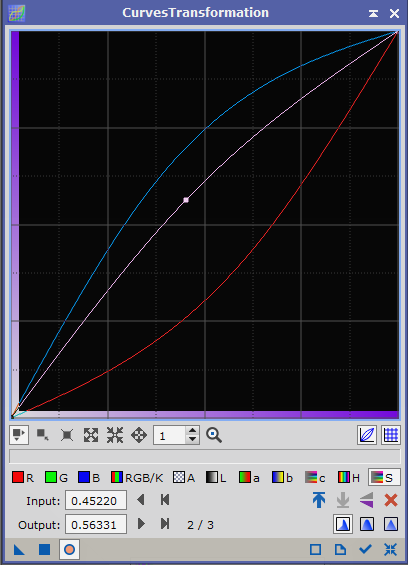
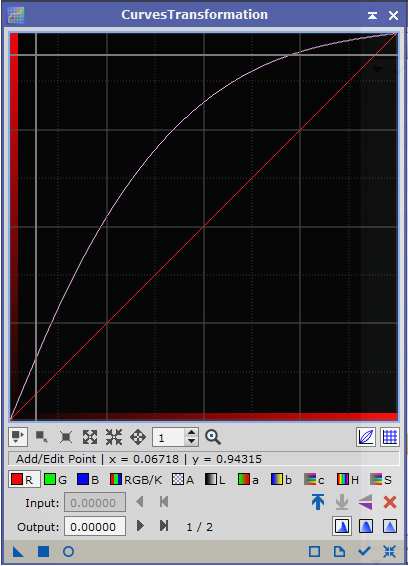
Once the mask has been applied to the image, I then use Curves Transformation to reduce the saturation which will reduce the Magenta in the image
The result in reducing the magenta can be seen in this image, you will notice there is now no longer a hue around the brighter stars
Result after Magenta Saturation reduced using Magenta ColorMask and Curves Transformation
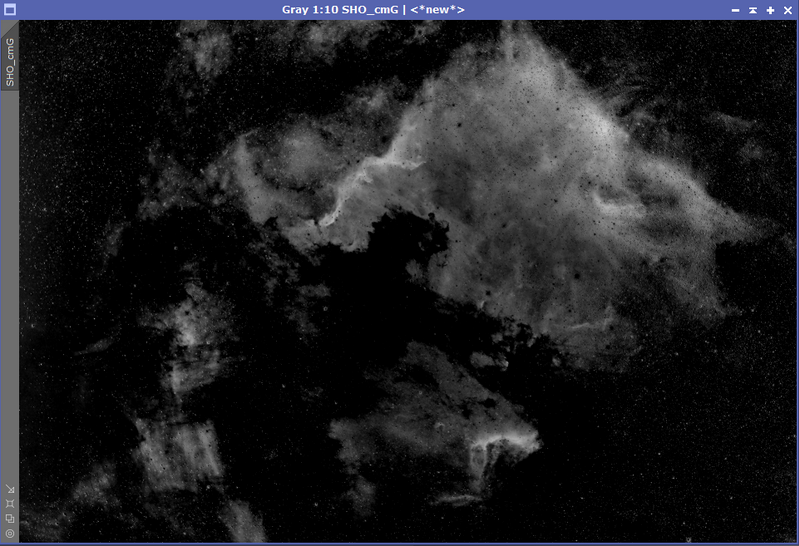
Step 4 – ColorMask – Green
Again using the Color Mask tool, I want to select the green channel, as we will want to manipulate most of the green here to red, so again ColorMask:
This then produced a mask that looks like the following:
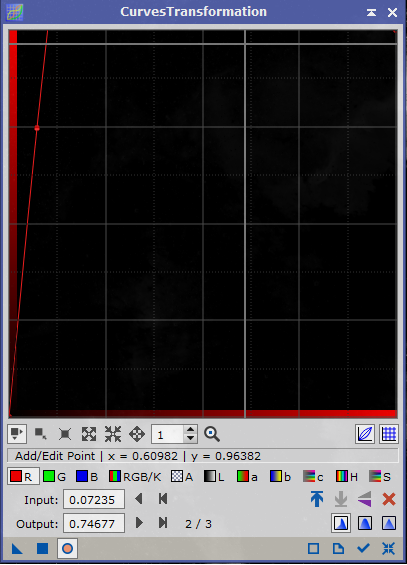
Step 5 – Manipulate the Green Data
Once the Green Mask has been applied to the image, since most of the data in the image is green, we are looking to manipulate that data to turn it golden yellow, so for this we use the Curves Transformation again
The above Curves transformation was applied to the image three times whilst the the green mask was still im place, and this resulted in the following image changes:
Resulting image after green data manipulated in the red channel using Curves Transformation
So as you can see we are starting to see the vibrant colours associated with Hubble Palette images
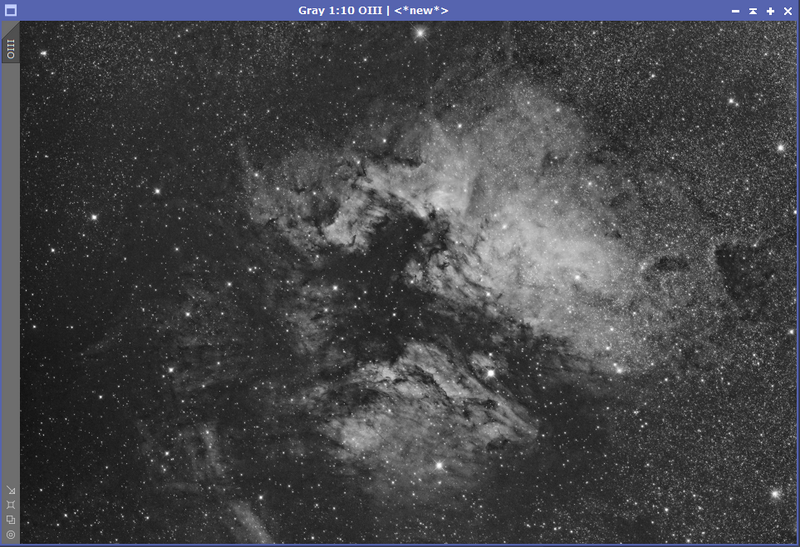
Step 6 – Create a Starless version of the OIII Data
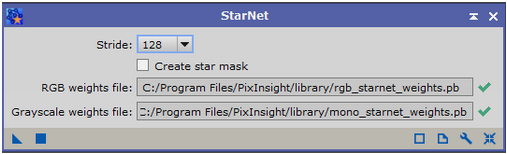
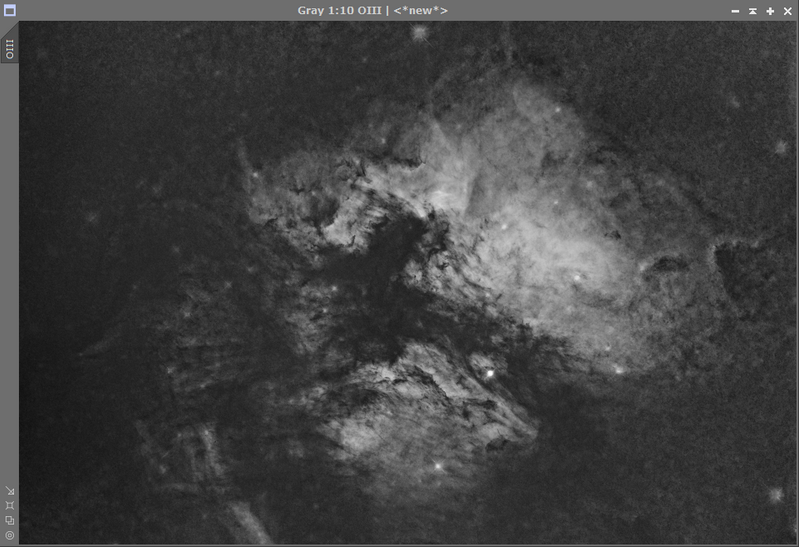
Now remember I said not to close out the separated channel images, this is because we are going to want ot bring out the blue in the image without affecting the stars, so for this we will turn the OIII image into a starless version by using the StarNet tool in PixInsight
Here’s the OIII Image before we apply StarNet star removal:
Default settings used in the StarNet process
This resulted in the following OIII image with no stars:
Step 7 – Range Selection on OIII Data
Because we do not want to affect the whole image, we will use the range selection tool on the starless OIII image to select areas we wish to manipulate, now we have to be careful that the changes we make are not too “Sharp” that they cause blotchy areas, so within the range selection tool, not only do we change the upper limit to suit the range we want to create the mask for, but we also need to change the fuzziness and smoothness settings to make it more blended, these are the setings I used:
Which resulted in the following range mask
Step 8 – Bring out the Blue with Curves Transformation
We apply the Range Mask to the SHO Image so that we can bring out the Blue in the section of the nebula where the OIII resides, with the range mask applied we will use the Curves Transformation Process again as follows:
Curves transformation process to increase blue, reduce red and increase saturation of image with rangemask applied
The result of which is:
Result after first curves transformation with RangeMask applied
As you can see we have started to bring out the blue data, but we are not quite there yet, with the range mask still applied, we will go again with the curves transformation only this time, just reducing the red element:
The result of the 2nd curves transformation with the Range Mask is as follows:
Resulting image after 2nd pass with Curves Transformation to remove the red elemtn in the range mask
Step 9 – Apply Saturation against a luminance mask
On the above image, we extract out the luminance and apply as a mask to the image, and we then use the Curves Transformation for the final time to boost the saturation to the luminance
Luminance Mask to be applied to image
Curves Transformation with Luminance Mask applied
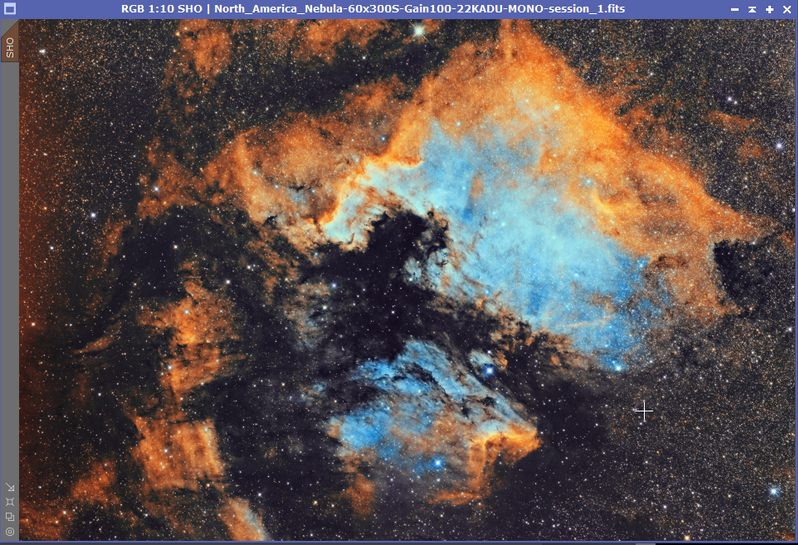
Final Image
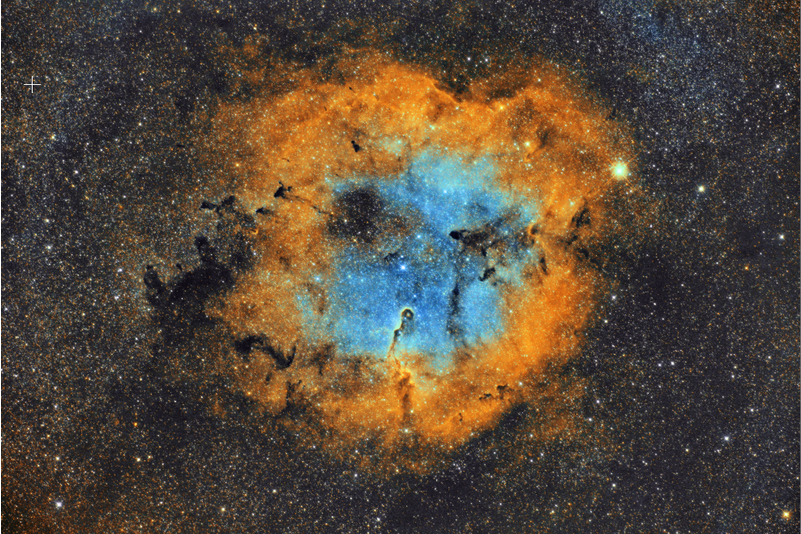
I repeated the same process on my Elephant’s Trunk Nebula that I acquired the data when testing out the ASI2400MC Pro and this was the resulting image:
I hope this tutorial helps in producing your SHO images from your OSC Narrowband images, I know many of my followers have been waiting for me to write this up, so enjoy and share.
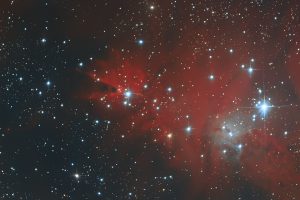
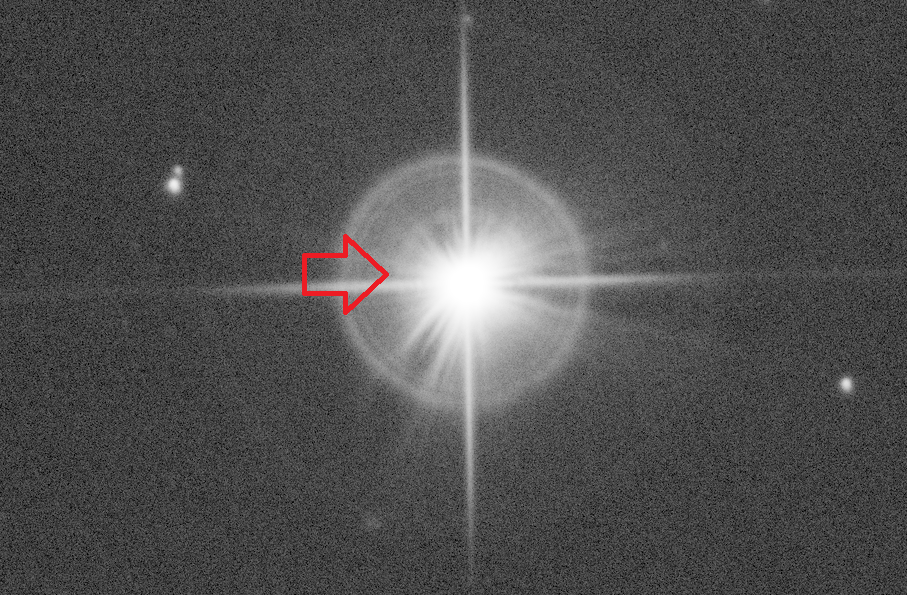
When I moved to the Sky-Watcher Quattro telescope I noticed some bizzare halo’s around bright stars in my images, this was evident in both my Atik 383L+ CCD Camera as well as my QHY183M ColdMOS Camera when using the Quattro 8-CF at F4, if you browse my galleries you will see what I mean, and it was more noticable in my Narrowband images. Below is one of my recent images where you can see the halo around Magnitude 3.9 star 15 Mon in the Christmas Tree Cluster / NGC2264.
I contacted Baader back in February 2019 since all of my filters were Baader, and I noticed that the Halo was present in all of my filters but significantly less in Red, but more prevalent in Narrowband filters, so the logical cause would be the filters. Baader immediately dismissed this to be the fault of their filters and suggested that my Coma Corrector be the root cause.
Not convinced that the Coma Corrector was causing the issue, I did some research online and came across a brilliant page on the Astronomik website where they claim to have resolved the majority of the Halo issue, and after reading the following line from the page I was convinced the filters were my issue:
In recent years very fast optical systems have become popular for imaging. The energy in a filter induced halo grows exponentially as the f-ratio decreases. Additional to this, the smaller the FWHM band pass of the filter, the stronger the halo.
The above line described my issue perfectly so I mentioned this to Baader who again dismissed the possibility of it being their filters and again put the blame firmly to my optical train. Again not happy, I contacted Astronomik and Eric emailed me back very promptly and offered to send me out one of their 6nm Ha filters to test. A few days ago the filter arrived and I was able to perform some testing against the Baader filter also for comparison on the same star.
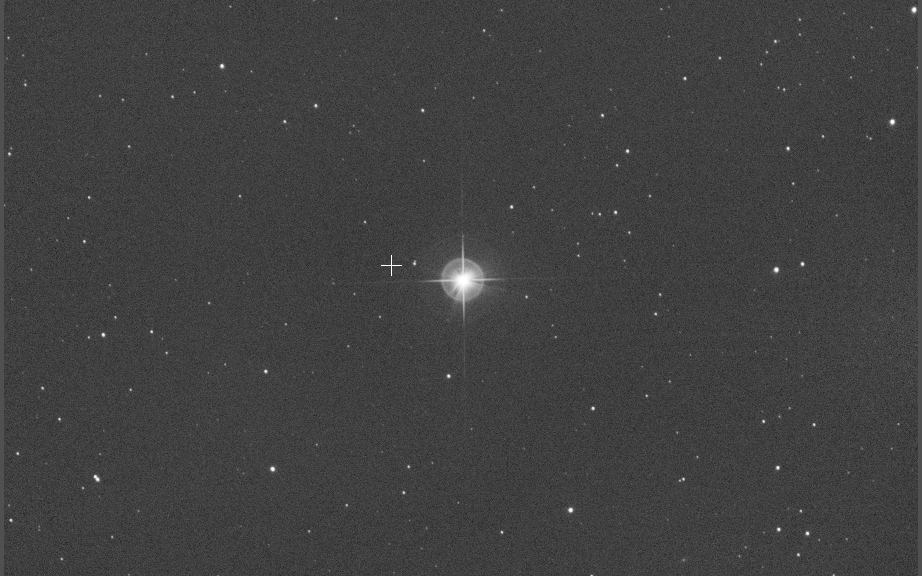
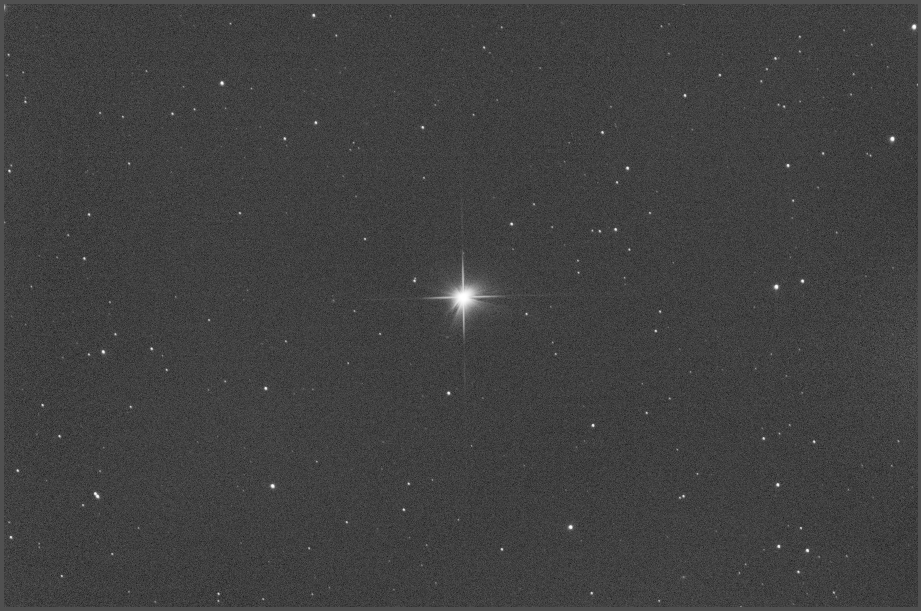
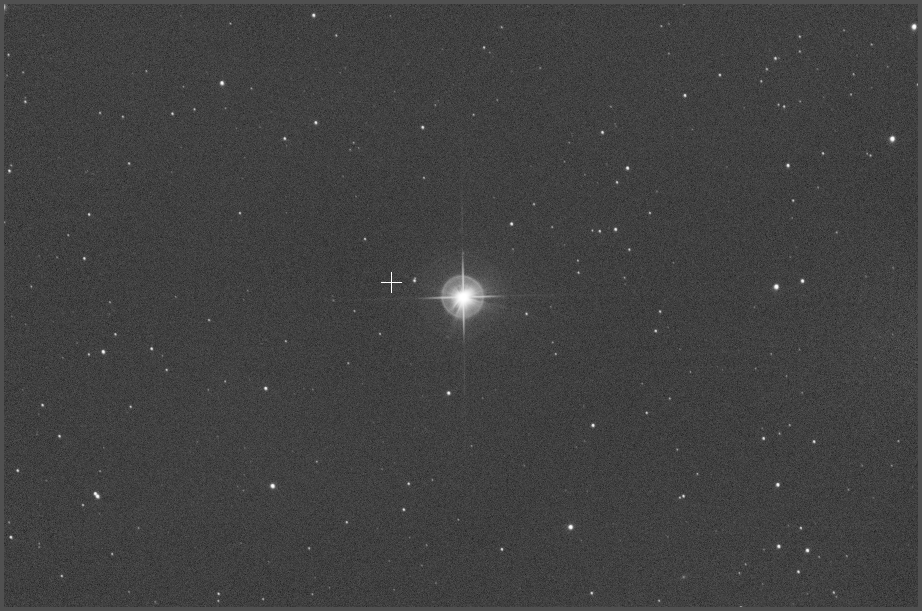
Since the star in my image above was of magnitude 3.9, I wanted to find something similar, so I found star Alhaud VI and proceeded to obtain 15x300S Exposures for each filter, and here are the results:
Astronomik 6nm HA filter, 15x300S with Darks and Flats appliedBaader 7nm Ha filter, 15x300S with Darks and Flats applied
So as you can see the Baader filter shows a high amount of Halo around the bright star and the Astronomik filter does not, now if this was something to do with the rest of the optical train there would be evidence in the Astronomik filter also.
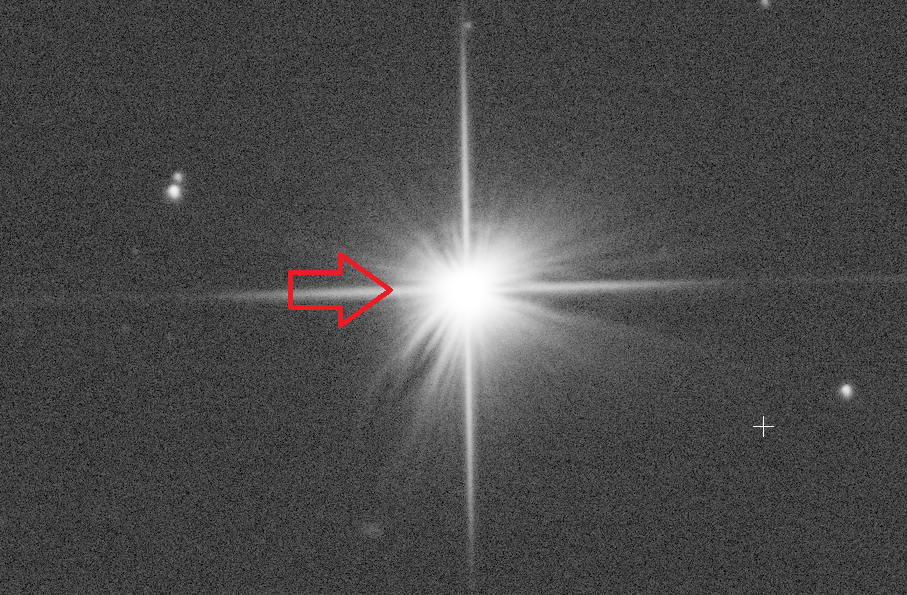
Now I agree there will be some reflection in the optical train, all that glass in the coma corrector, the glass on the camera etc, so I thought I would have a look at both images in a bit more detail, zoomed in on the stars there is what appears to be a slight halo in the same place on both images:
Astronomik 6nm Ha FilterBaader 7nm Ha Filter
So both filters show the Inner Halo which in my opinion would not be visible in an image, but again clearly the Baader filter has some reflection issues happening as you can clearly see two additional Halos. The interesting thing about all three Halos is that the central one visible in both filters has no relationship to the distances between the other two in the Baader, however the two outer Halos on the baader are the same distance apart as the middle halo is from the star, so clearly this is some sort of reflection.
Conclusion: Astronomik have done a fantastic job at eliminating Halo artifacts around bright stars, clearly the Baader filters are causing major Halo artifacts because if this was the optical train then it would be evident in the Astronimik filters also, I suspect that the Baader filters are not optimised for faster focal ratio imaging systems. I have provided this information to Baader and await a response from them.
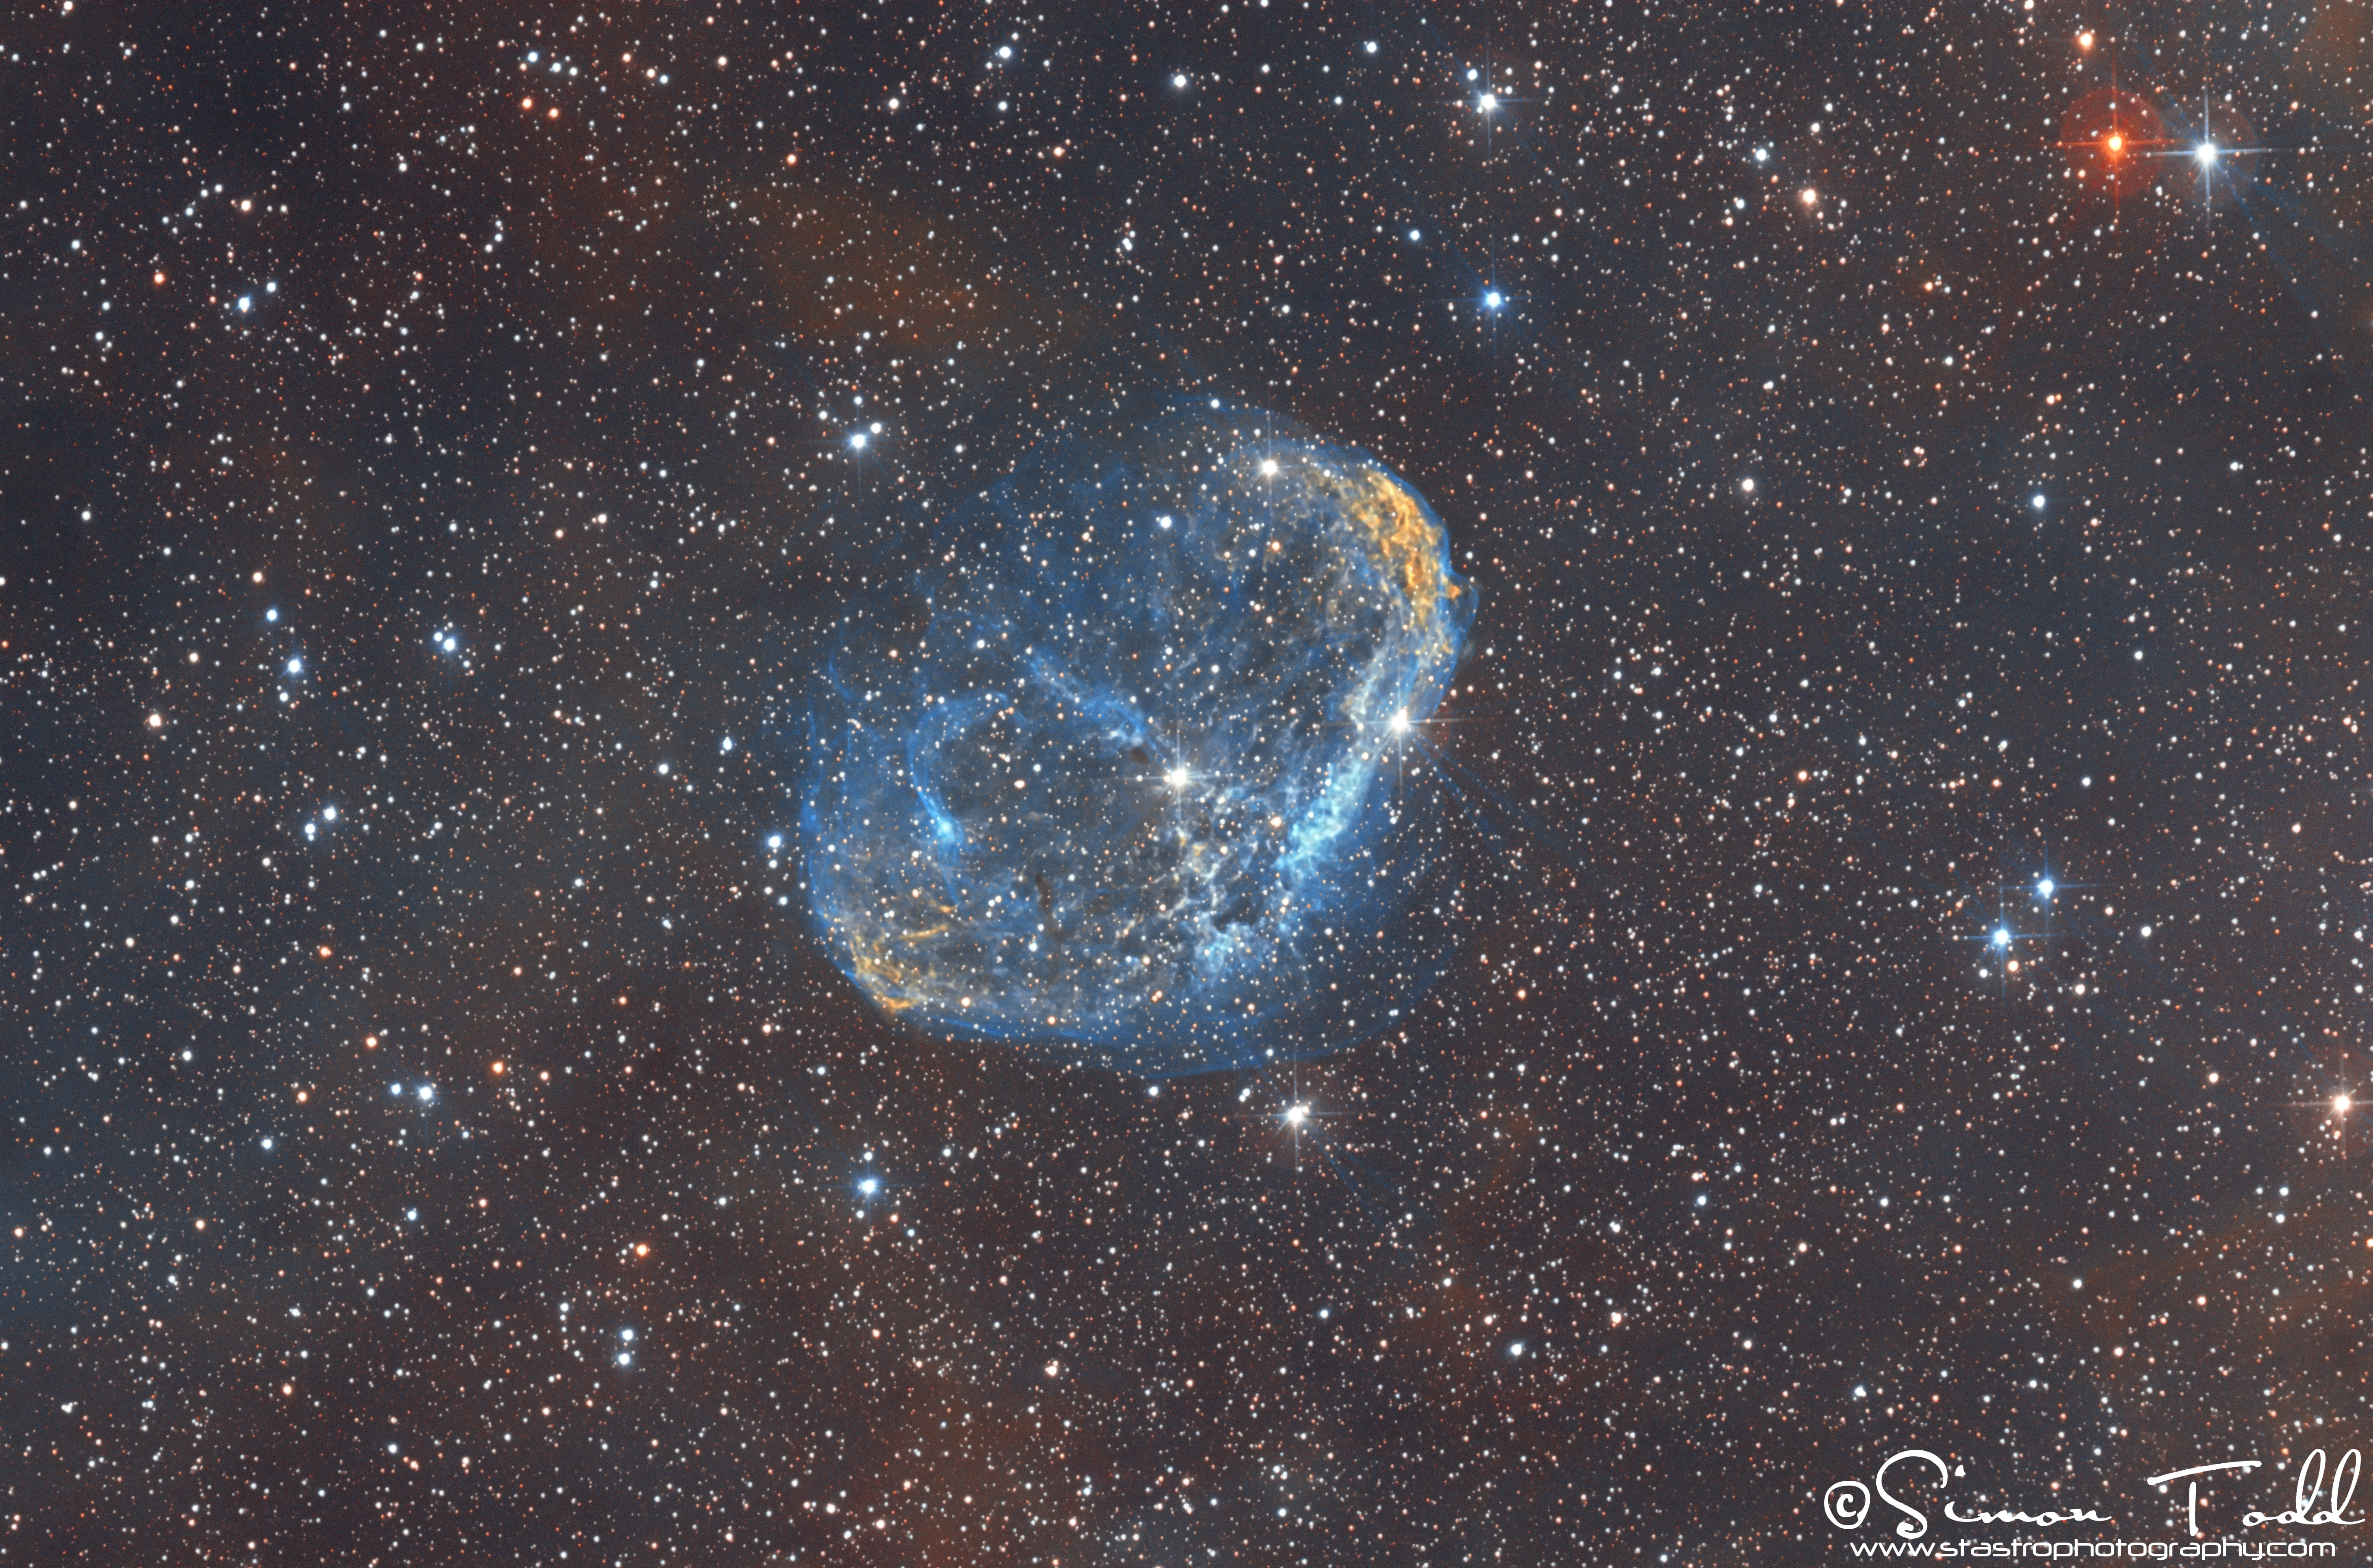
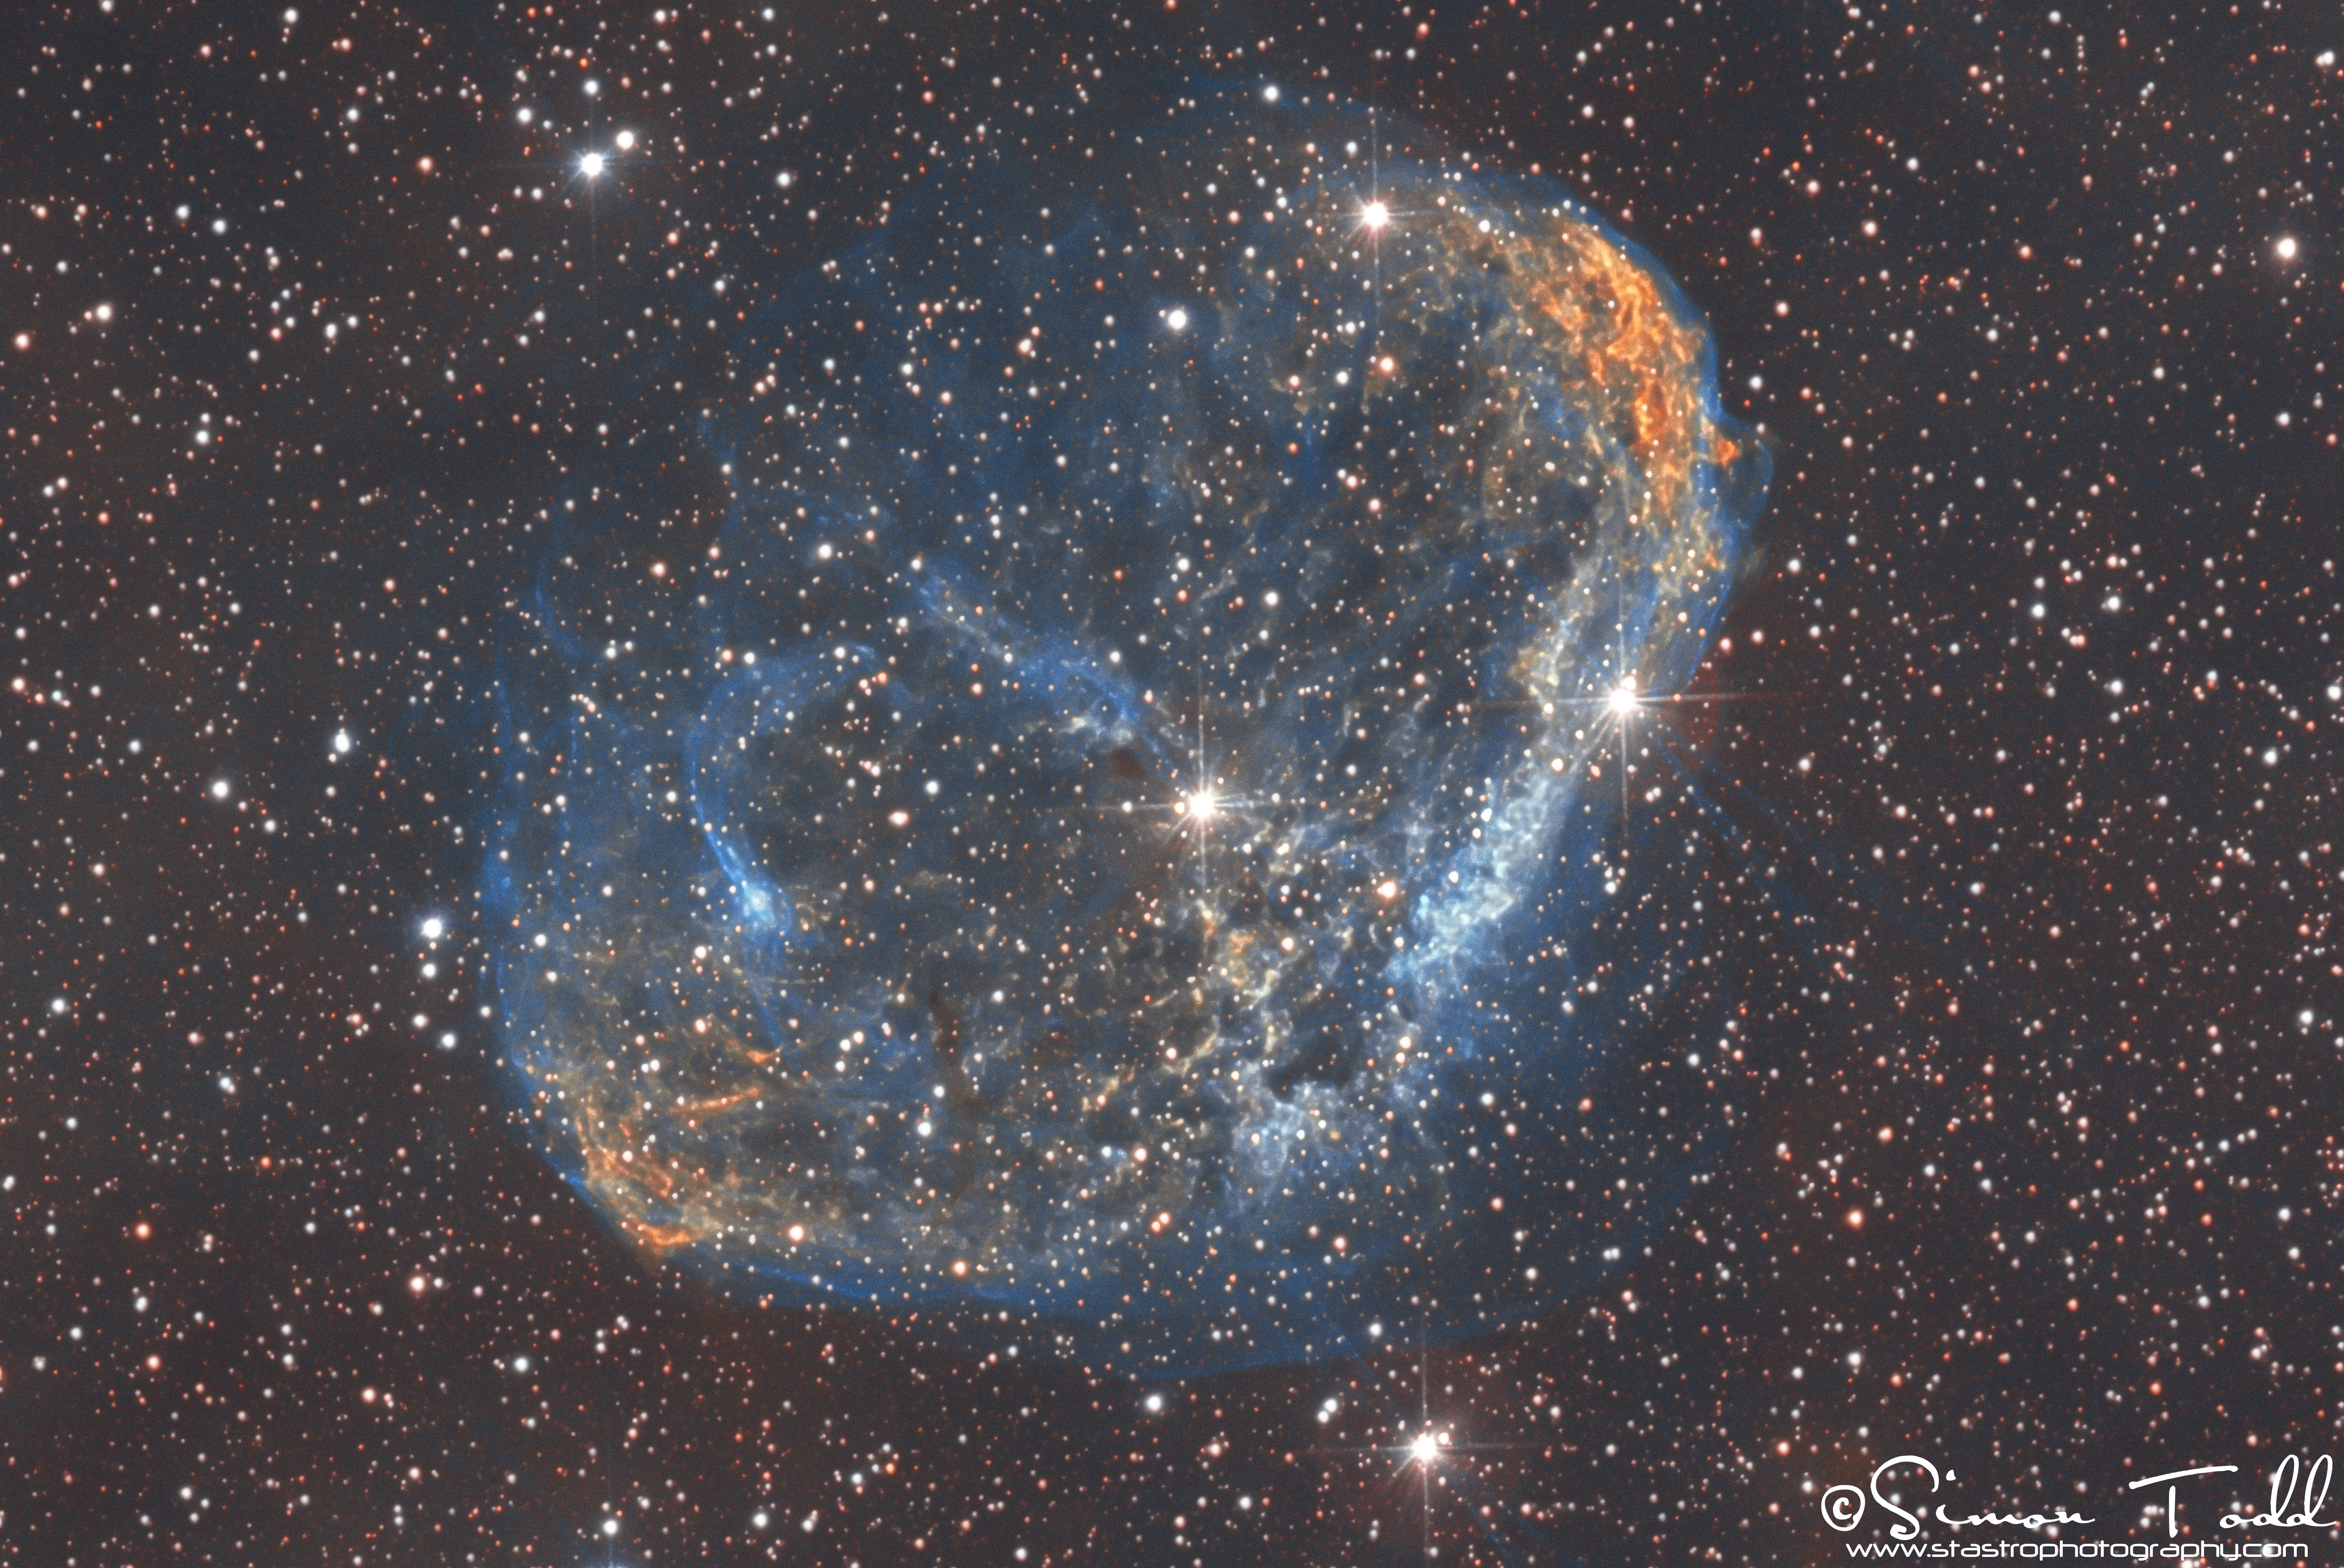
This object is a little tricker for me since I only have a 3-3.5 hour window per evening due to trees and the house blocking my view, this is also the first image that I used the drizzle function within PixInsight to be able to provide a detailed up close version of the image, I was very happy to have captured the brown “Globules” within the nebula to
Crescent Nebula in SHO NarrowbandSame object but with a 2x drizzle function in PixInsight applied
Image Details: Red Channel – SII Data – 89x300S Green Channel – Ha Data – 64x300S Blue Channel – OIII Data – 109x300S
101 Darks, Flats and BIAS Frames used
Equipment Used:- Imaging Camera: QHY183M Mono ColdMOS Camera at -20C Imaging Scope: Skywatcher Quattro 8″ F4 Newtonian Guide Scope: Skywatcher Finder Scope Guide Camera: QHY5L-II Mount: Skywatcher EQ8 Pro GEM Mount Focuser: PrimaluceLabs ROBO Focuser Filterwheel: StarlightXpress 7x36mm EFW Filters: Baader 7nm Ha, SII and OIII Acquision Software: Main Sequence Software Sequence Generator Pro Processing Software: Pixinsight 1.8.5
After much waiting, I finally have the RGB Data to go with the luminance layer, a new learning curve was the HDR Compose process in PixInsight, I used this to include the 300S Exposures I had previously that were burning out the core.
Equipment Used:
Imaging Camera: Qhyccd 183M Back Illuminated ColdMOS Camera at -20C
Imaging Scope: Sky-Watcher 8″ Quattro F4
Mount: Sky-Watcher EQ8 Pro
Guide Camera: Qhyccd QHY5L-II
Guide Scope: Sky-Watcher 90×50 Finder
Filter Wheel: Starlight Xpress Ltd 7x36mm EFW
Filters: Baader Planetarium LRGB + 7nm Ha
Image Acquisition: Main Sequence Software SGPro
Image Processing: PixInsight
Image Details:
101x150S in LRGB, Total 16.83 Hours
25x300S in LRGB, Total 8.33 Hours
25x600S in Ha, Total 4.16 Hours
Total exposure time: 29.32 Hours
BIAS, Darks and Flats subtracted
Target: M81 and M82 in Ursa Major
Acquisition Dates: Feb. 11, 2018, Feb. 12, 2018, Feb. 16, 2018, Feb. 23, 2018, Feb. 24, 2018, March 13, 2018, March 14, 2018, March 15, 2018, March 16, 2018, March 19, 2018, March 20, 2018
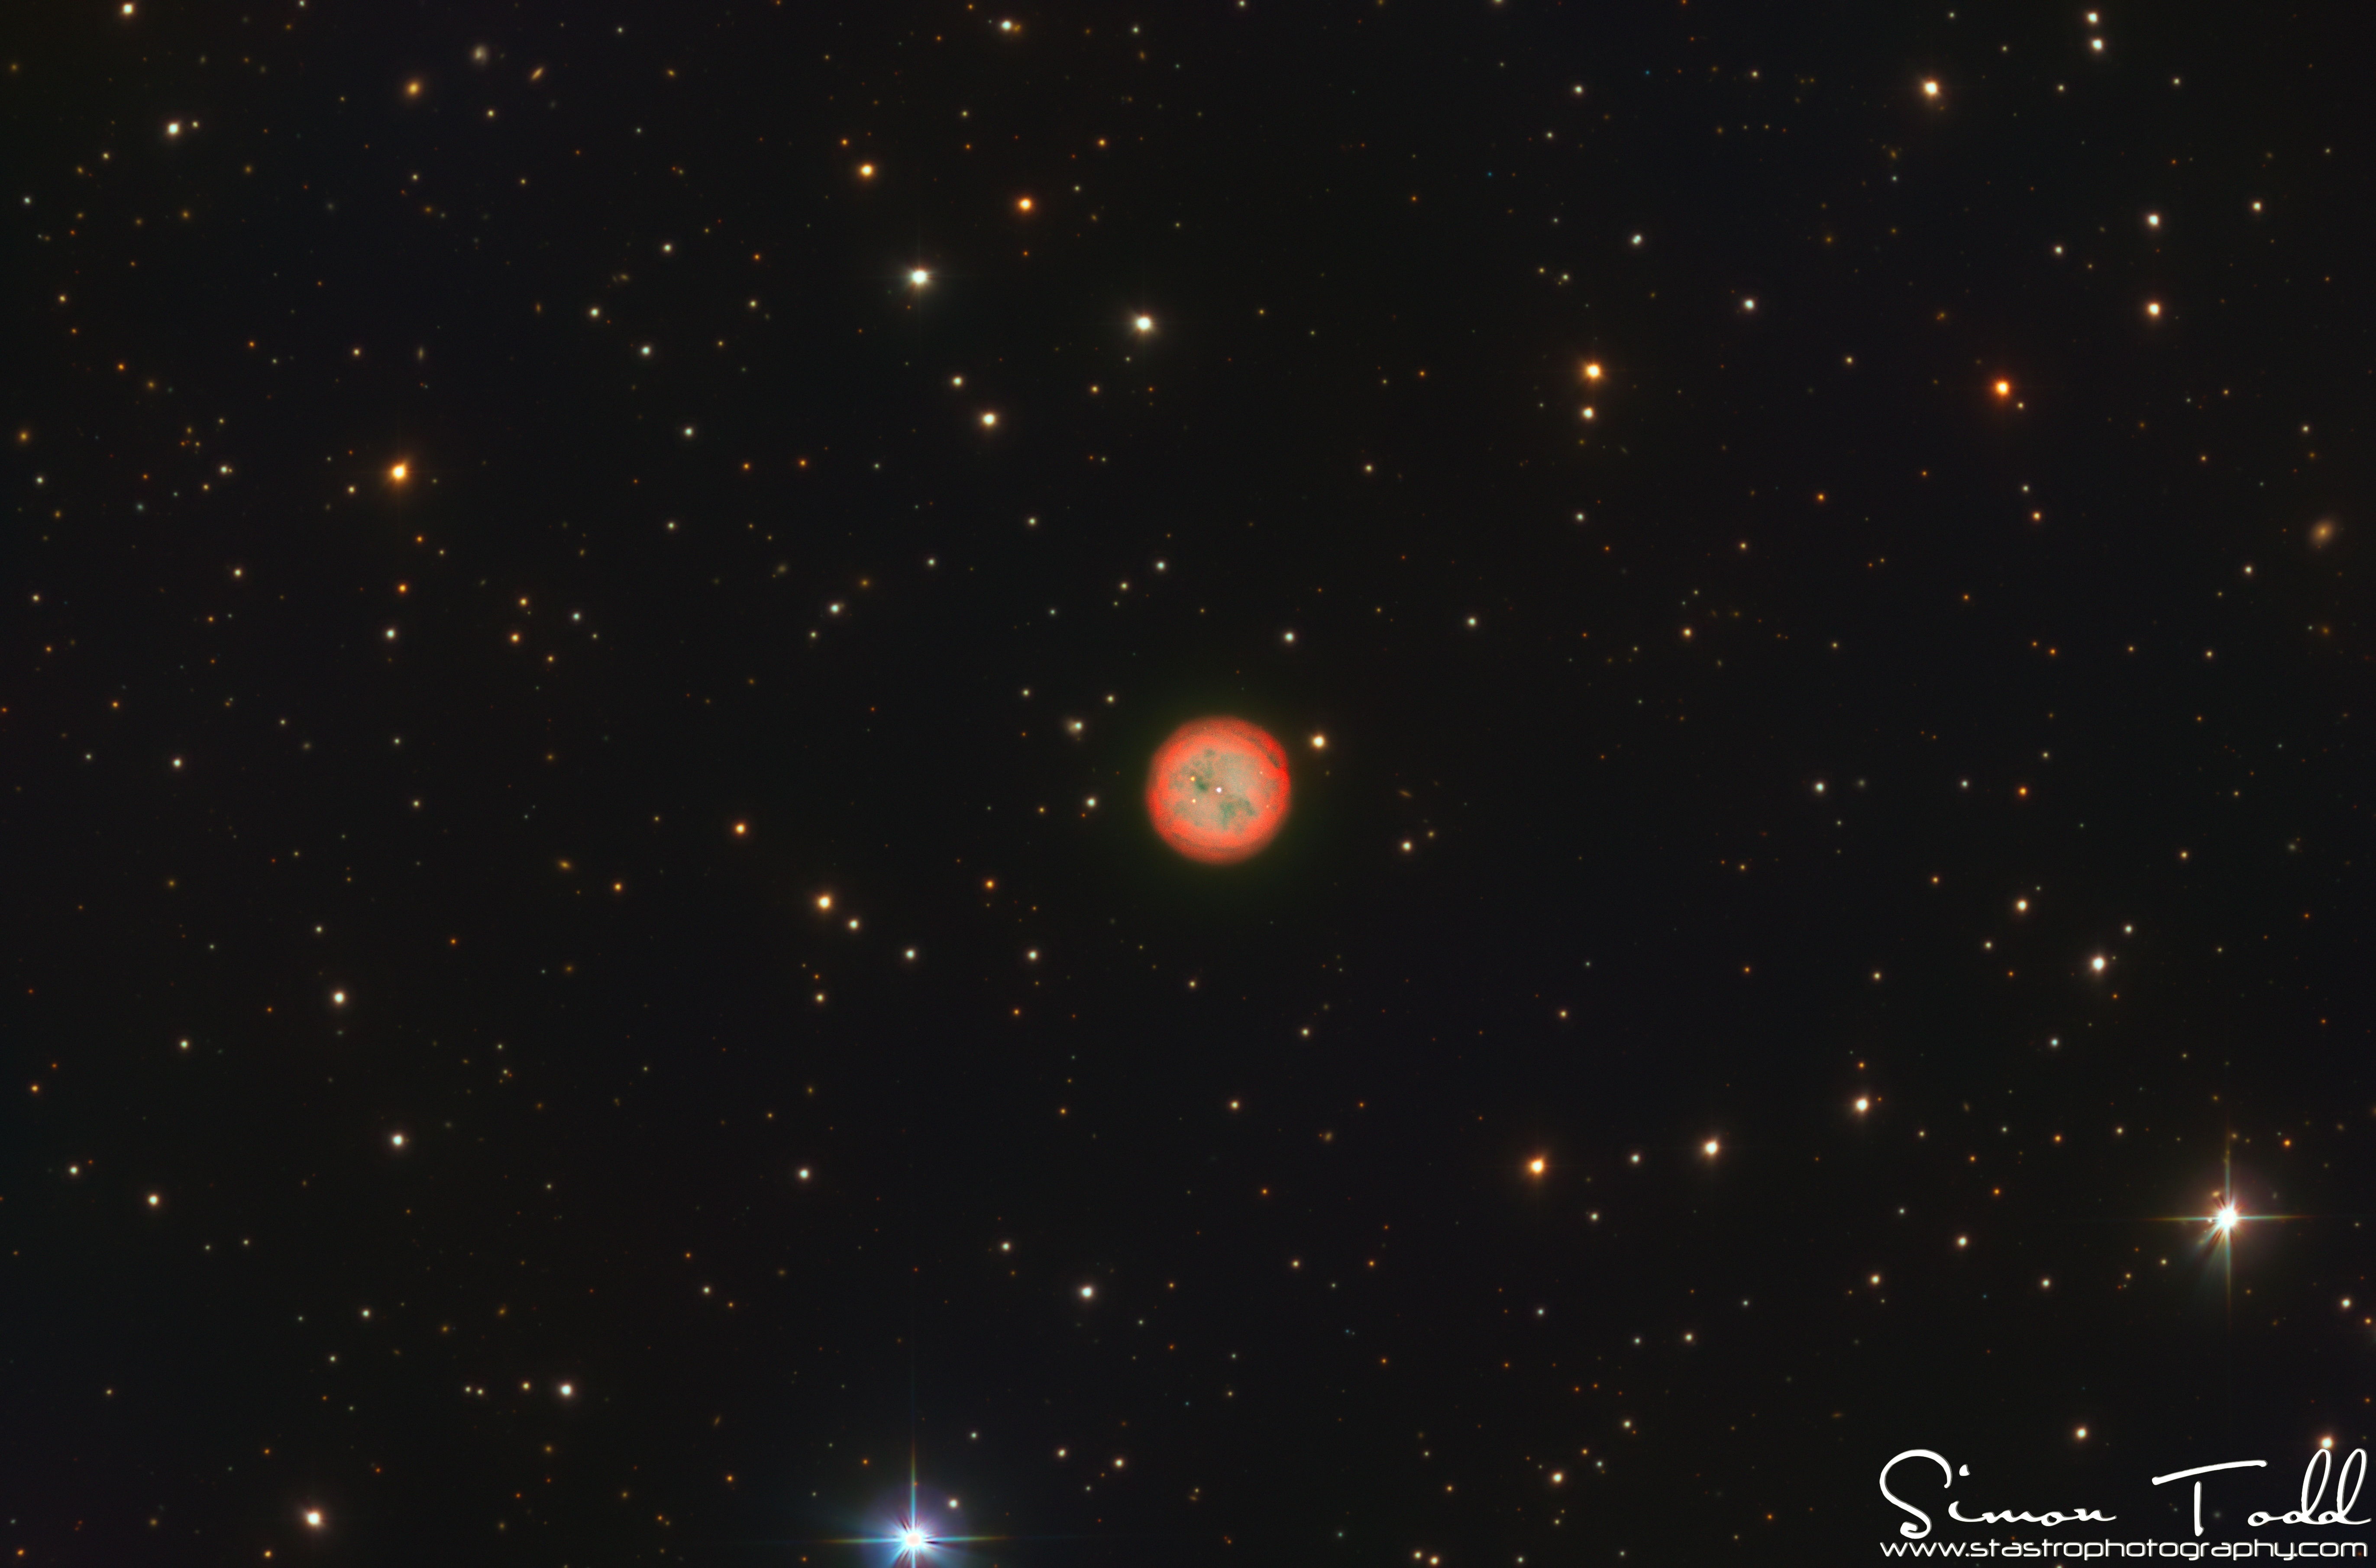
I have imaged this before in the same frame as the Surfboard Galaxy, however the 0.62 Arcseconds Per Pixel the Qhyccd 183M gives me on my Sky-Watcher Quattro 8″ F4 gives me a much higher resolution image, so here it is, the Owl Nebula in the constellation of Ursa Major at a distance of 2030 Light years from Earth
Gear:
Imaging Scope: Sky-Watcher Quattro 8″ F4 Imaging Newtonian
Imaging Camera: Qhyccd 183M 20mpx ColdMOS Camera at -20C and DSO Gain
Mount: Sky-Watcher EQ8 Pro
Guide Camera: Qhyccd QHY5L-II Mono
Guide Scope: Sky-Watcher 50×90 Finder Scope
Filter Wheel: Starlight Xpress Ltd 7x36mm EFW
Filters: Baader Planetarium 36mm RGB
Coma Corrector: Sky-Watcher Aplanatic Coma Corrector
Image Acquisition: Main Sequence Software SGPro
Image Processing: PixInsight
PixInsight Image processing workflow:
1. Calibrated against darks and Bias Subtracted Flats
2. Star Alignment for all RGB and Ha Frames
3. Least noise frame from each colour chosen as Normalization Frame and Dynamic Background Extraction Performed
4. Normalization of all frames
5. Stacking of frames and generation of drizle data (for larger quality image in future)
6. Performed LinearFit using Red stacked image as reference for RGB Frames
7. Performed DynamicCrop on all channels and Ha
8. Performed MultiMedianTransformation to reduce background noise
9. Performed SCNR to remove excessive green in image
10. Stretched the image using HistogramTransformation
11. Performed an Unsharp Mask on RGB and HA Data
12. Performed an ATWT on the Background
11. Merged the Ha Data using the HaRVB-AIP Script in PixInsight
12. Performed a CurvesTransformation to bring out the star colour
As promised, now that I have done some imaging with my new QHYCCD 183M Mono ColdMOS Back Illuminated camera here’s the second part of my review on the camera.
Pixel size:- The pixel size on the 183M is 2.4um which I absolutely love, on my Sky-Watcher 8 Inch Quattro F4 the camera gives me a field of view of 0.62 Arcseconds/Pixel, which is a fantastic resolution, I remember when I had my Atik 383L+ and my Astro-Tech AT8RC F8, that offered me a resolution of around 0.63 Arcseconds/Pixel, so I am now imaging at almost the same field of view but at F4 and at 20mpx, but let’s just put that into comparison on the same scope, the first image below is IC434 taken with the Atik 383L+ on the Quattro, and the second image below is taken with the QHY183M on the same telescope, you can see what impact it has on the field of view:
FOV on Atik 383L+ with 8″ Quattro F4
FOV on QHY183M with 8″ Quattro F4
As you can see from the above two images the difference in the field of view due to the chip size.
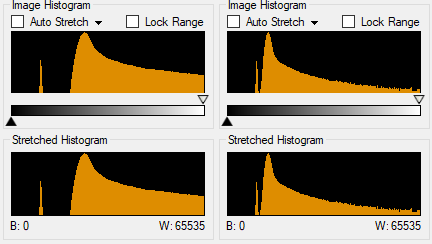
Camera Sensitivity:- Since moving to the QHY183M I have had to make changes to how I image, having owned the Atik 383L+ for a good few years, I got used to imaging with it, so when I moved to the QHY183M I suddenly noticed that this camera was quite a bit more sensitive, the first image above consists of 300 second frames for the LRGB whereas the second image consists of just 150 second frames, yes 150 second frames!!!
When I first started imaging M81/M82 with the QHY183M, I immediately started with 300 Second frames, I ended up with the same amount of 300 second frames that I had with the Atik 383L+ but I just could not process it, after further analysis I noticed then that the lights were severely clipped, to put this into perspective, below is the Sequence Generator Pro Histogram for both the 300 second exposure (left) and the 150 second exposure (right)
As you can see the histogram on the left for the 300 second exposure is severly clipped on the right side of the histogram indicating that the exposure was too long, the histogram on the right for the 150 second exposure is a lot better, there is still some slight clipping happening but this was a luminance frame, this clearly indicates that the 183M is much more sensitive than my previous CCD imager.
The following two images were produced with the 183M, firstly IC434 consists of 19×300 Second Exposures in RGB and the Second Image of The Owl Nebula consists of 27×300 second exposures in RGB + 25x600S in Ha
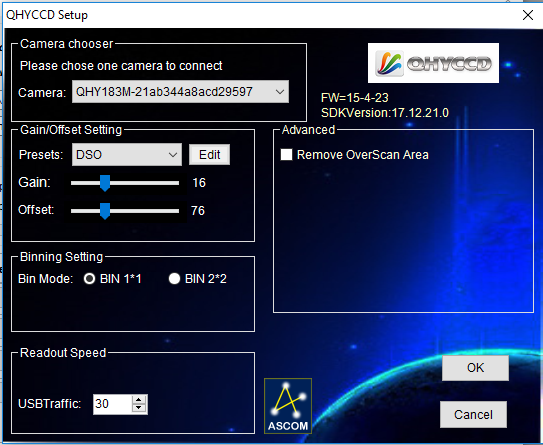
Software Integration:- As you probably know already, I use Sequence Generator Pro for my image acquisition and the integration with the camera has been pretty seemless, the ASCOM platform driver works pretty well, and I have the camera set to the default gain and offset setting that QHY have provided which is 16 of Gain and 76 for offset:
UV/IR Sensitivity:- I have read online that the 183M is a little bit sensitive to UV/IR Light, so I asked the guys at QHYCCD about this abd they informed be that the window on the senor is straight clear glass, so it also lets in UV/IR Light, which for me is not an issue as all of my Baader filters are UV/IR Blocked anyway, but it is something to consider if I ever change filters.
Conclusion The camera has performed way beyond my expectations, had to change some of my approaches to image acquisition but that was to be expected, I am extremely happy with the camera and look forward to getting more data to compliment the Luminance for M81/M82 in the not so distant future.
If you are considering the QHY183M as an imaging camera, and would like to discuss, then feel free to reach out to me.
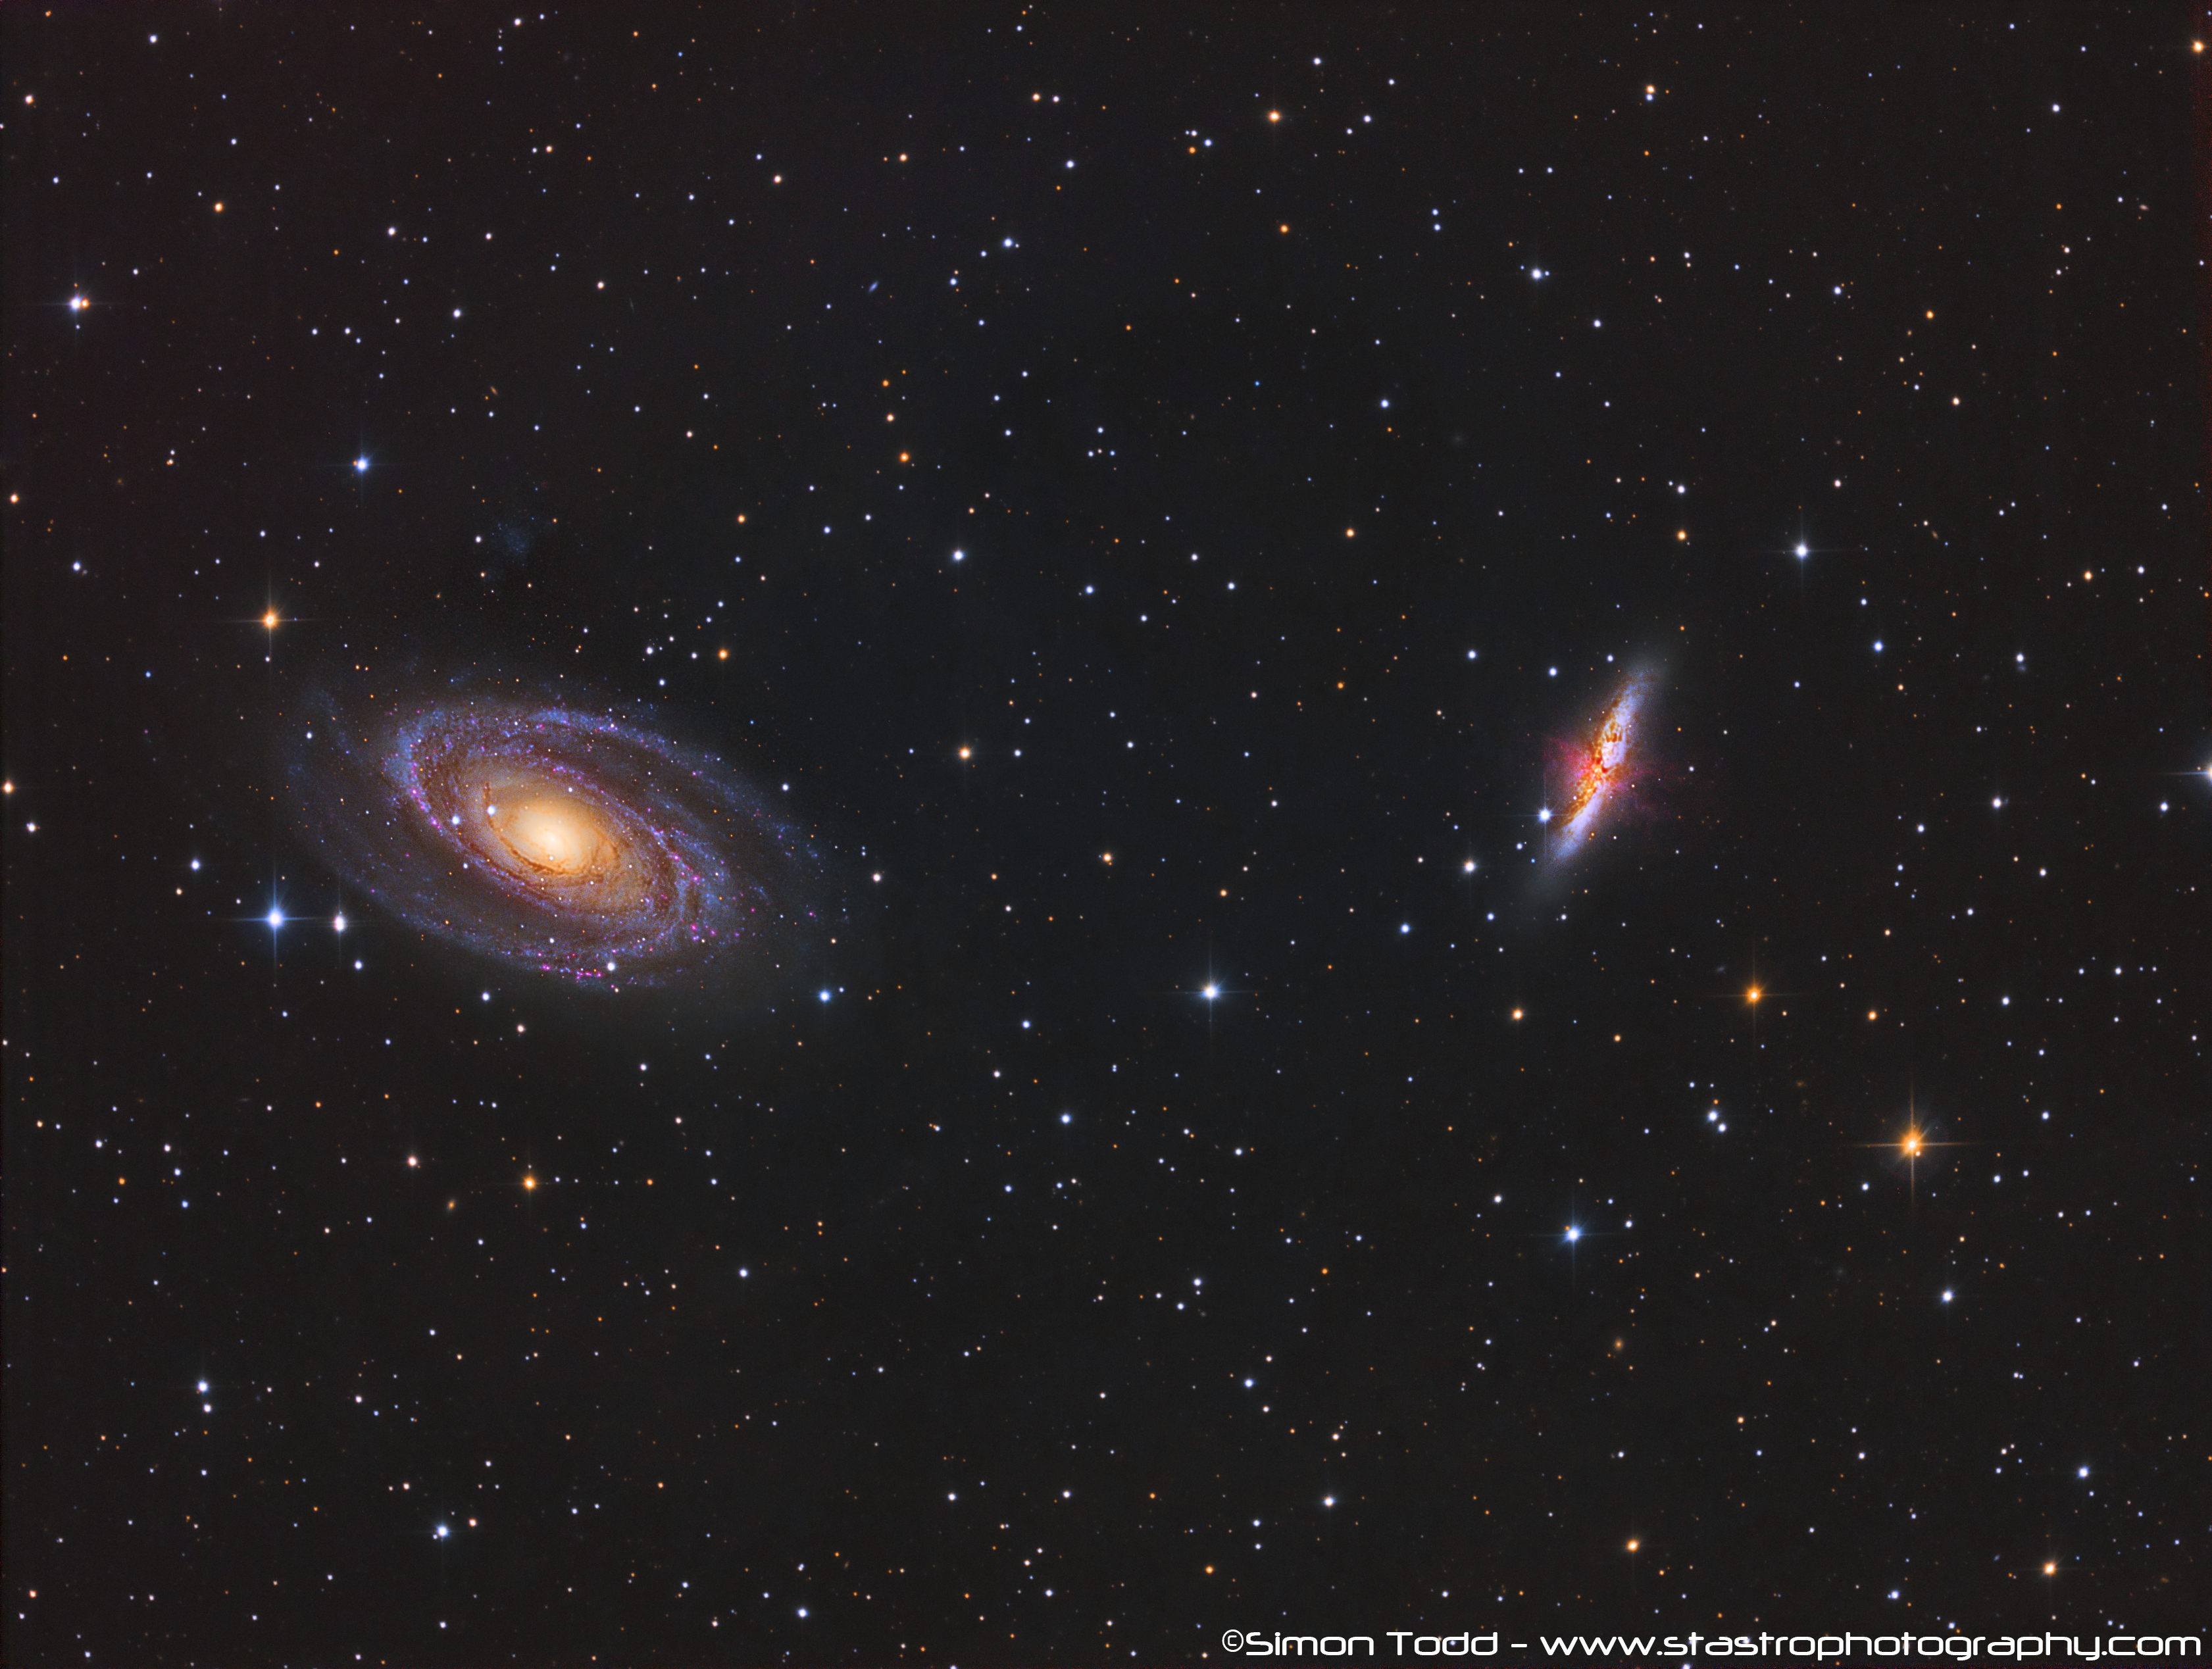
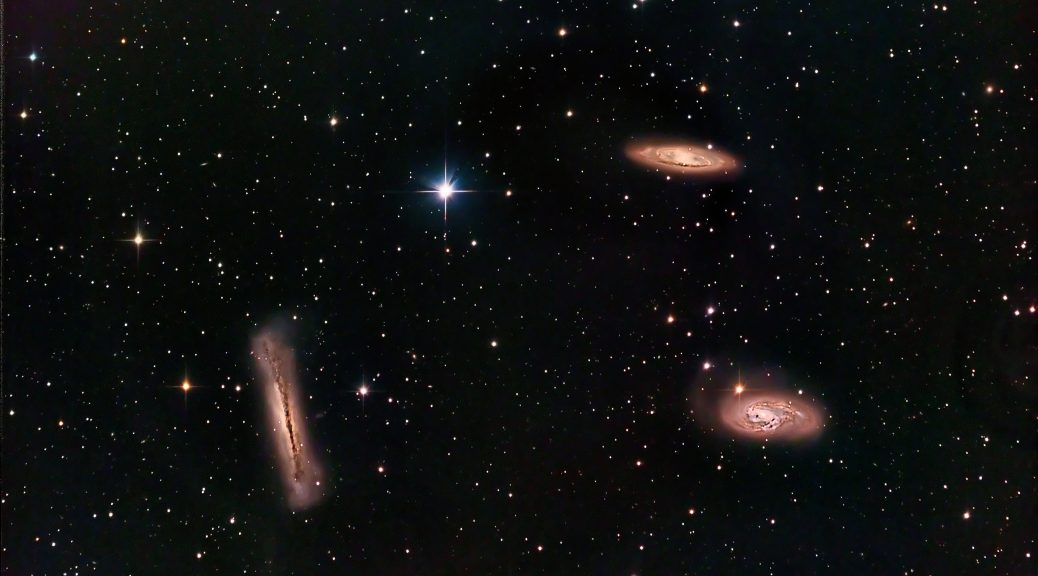
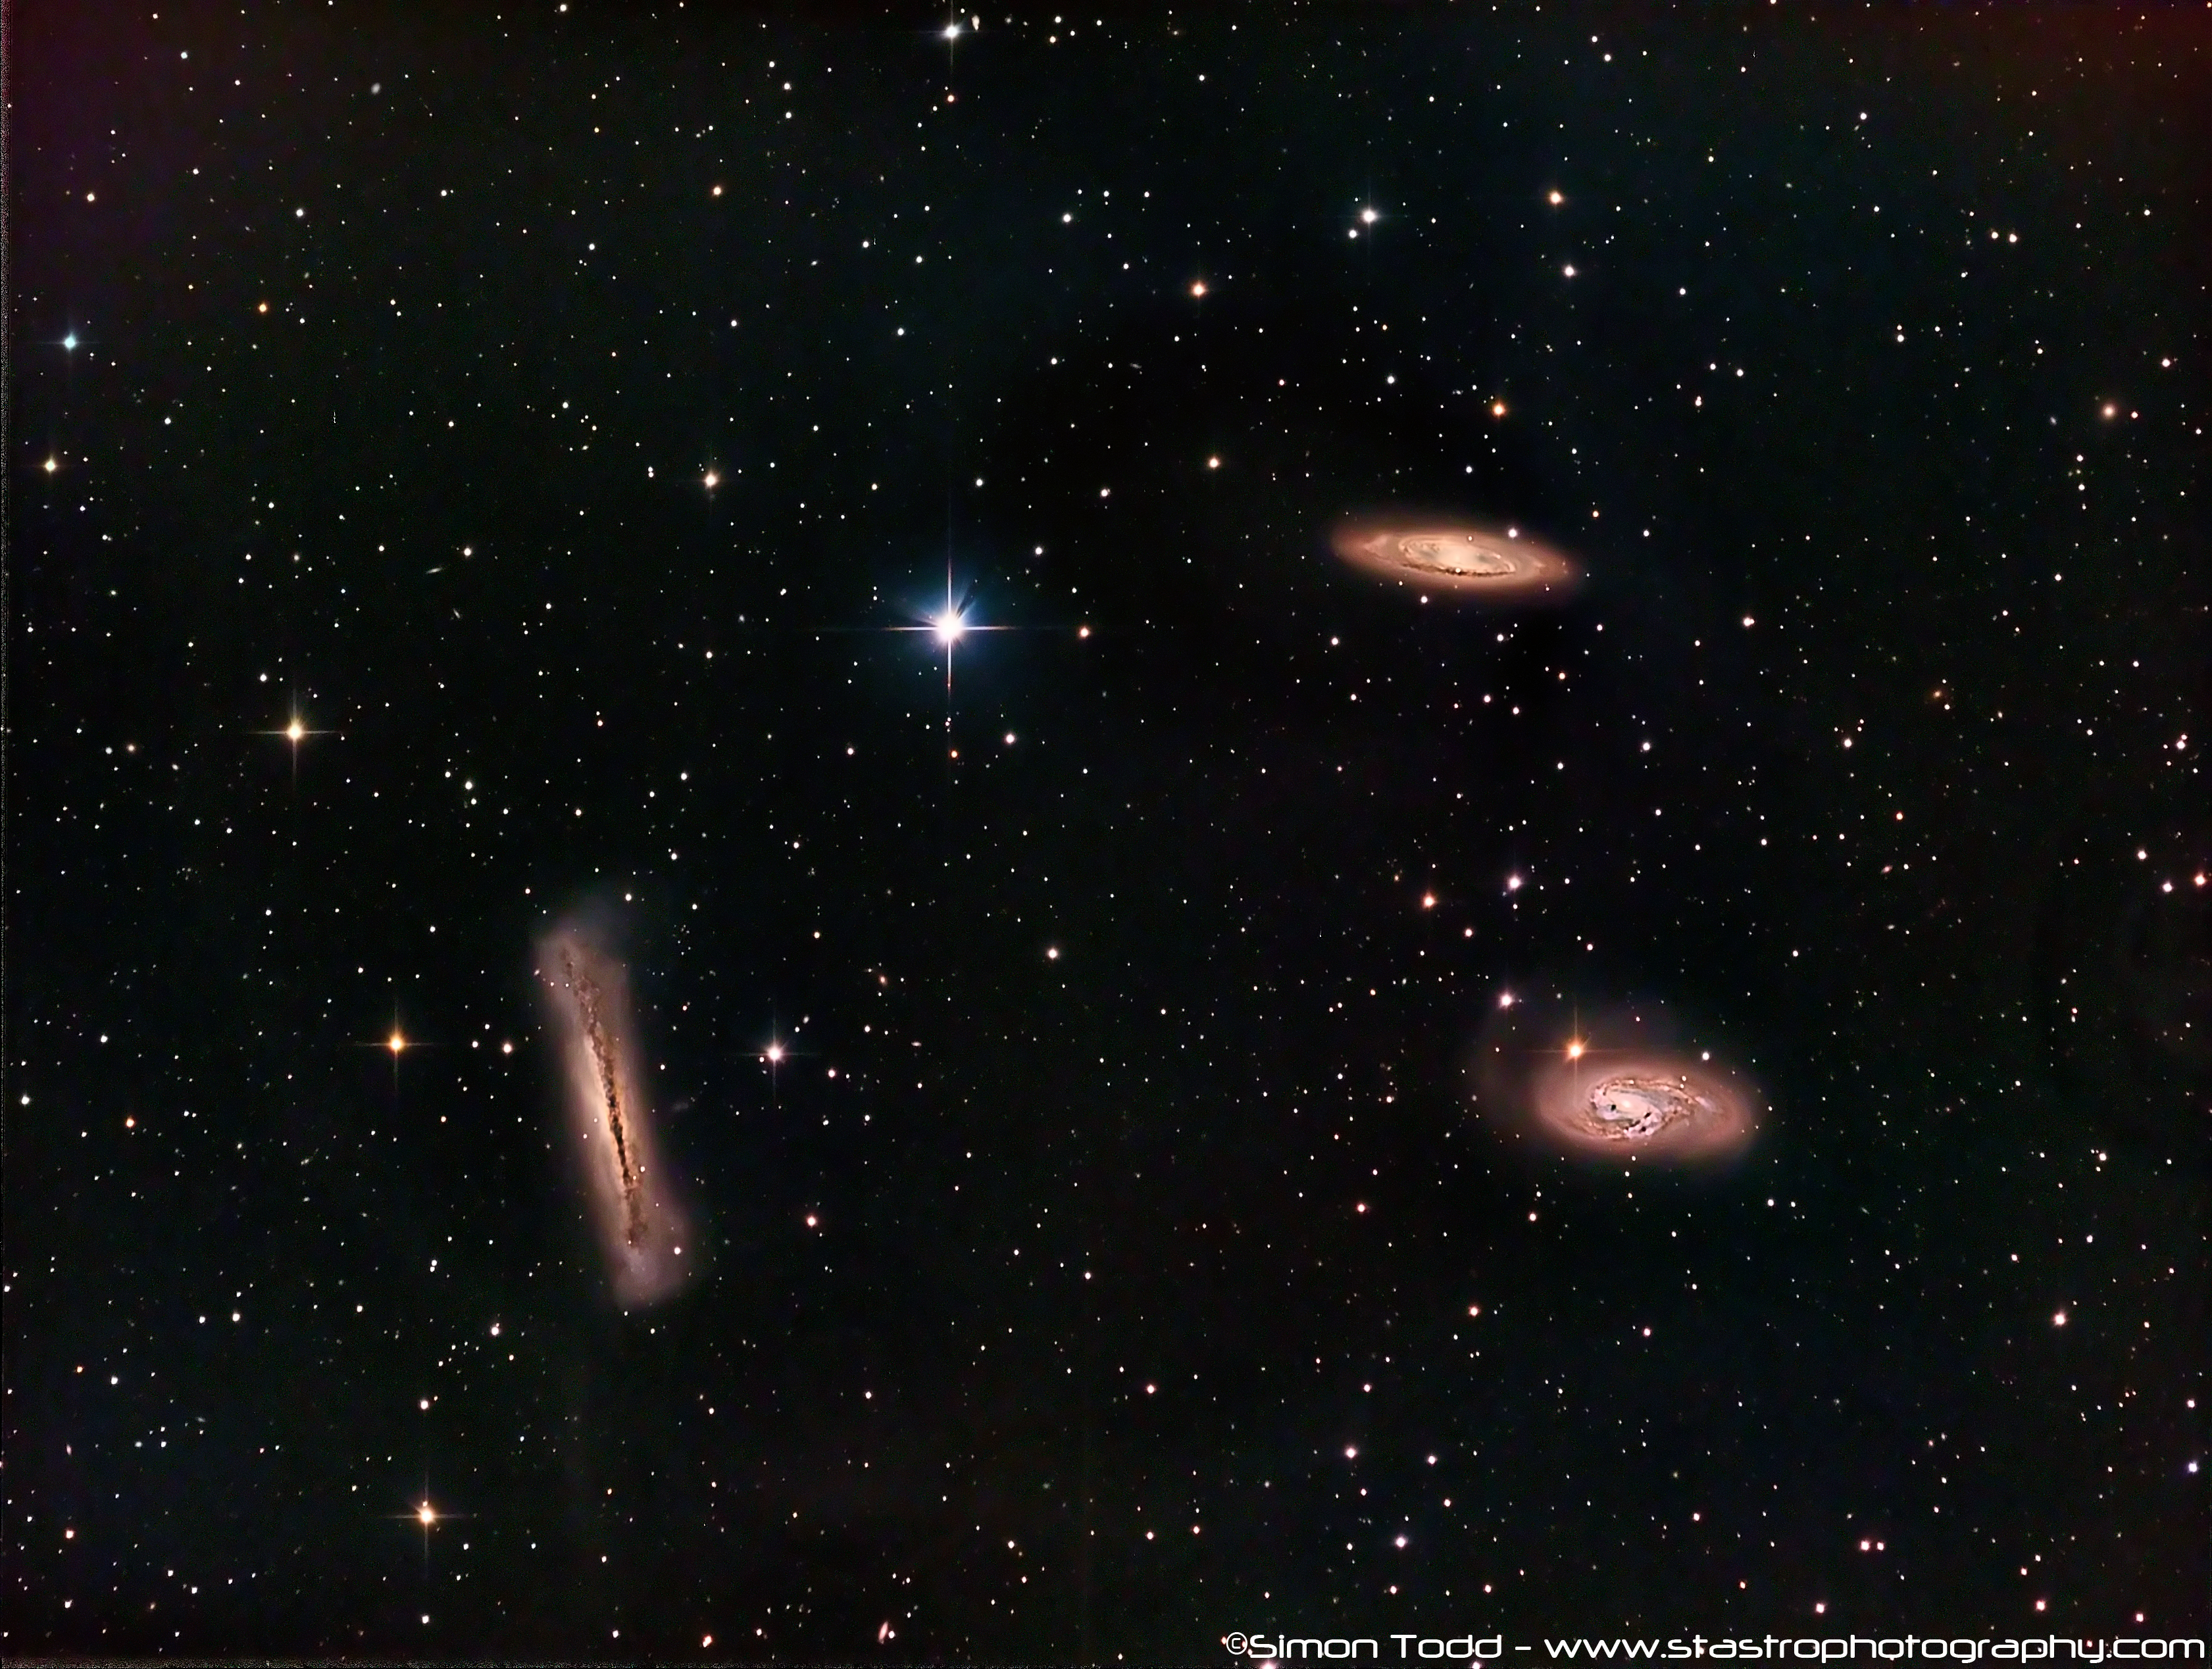
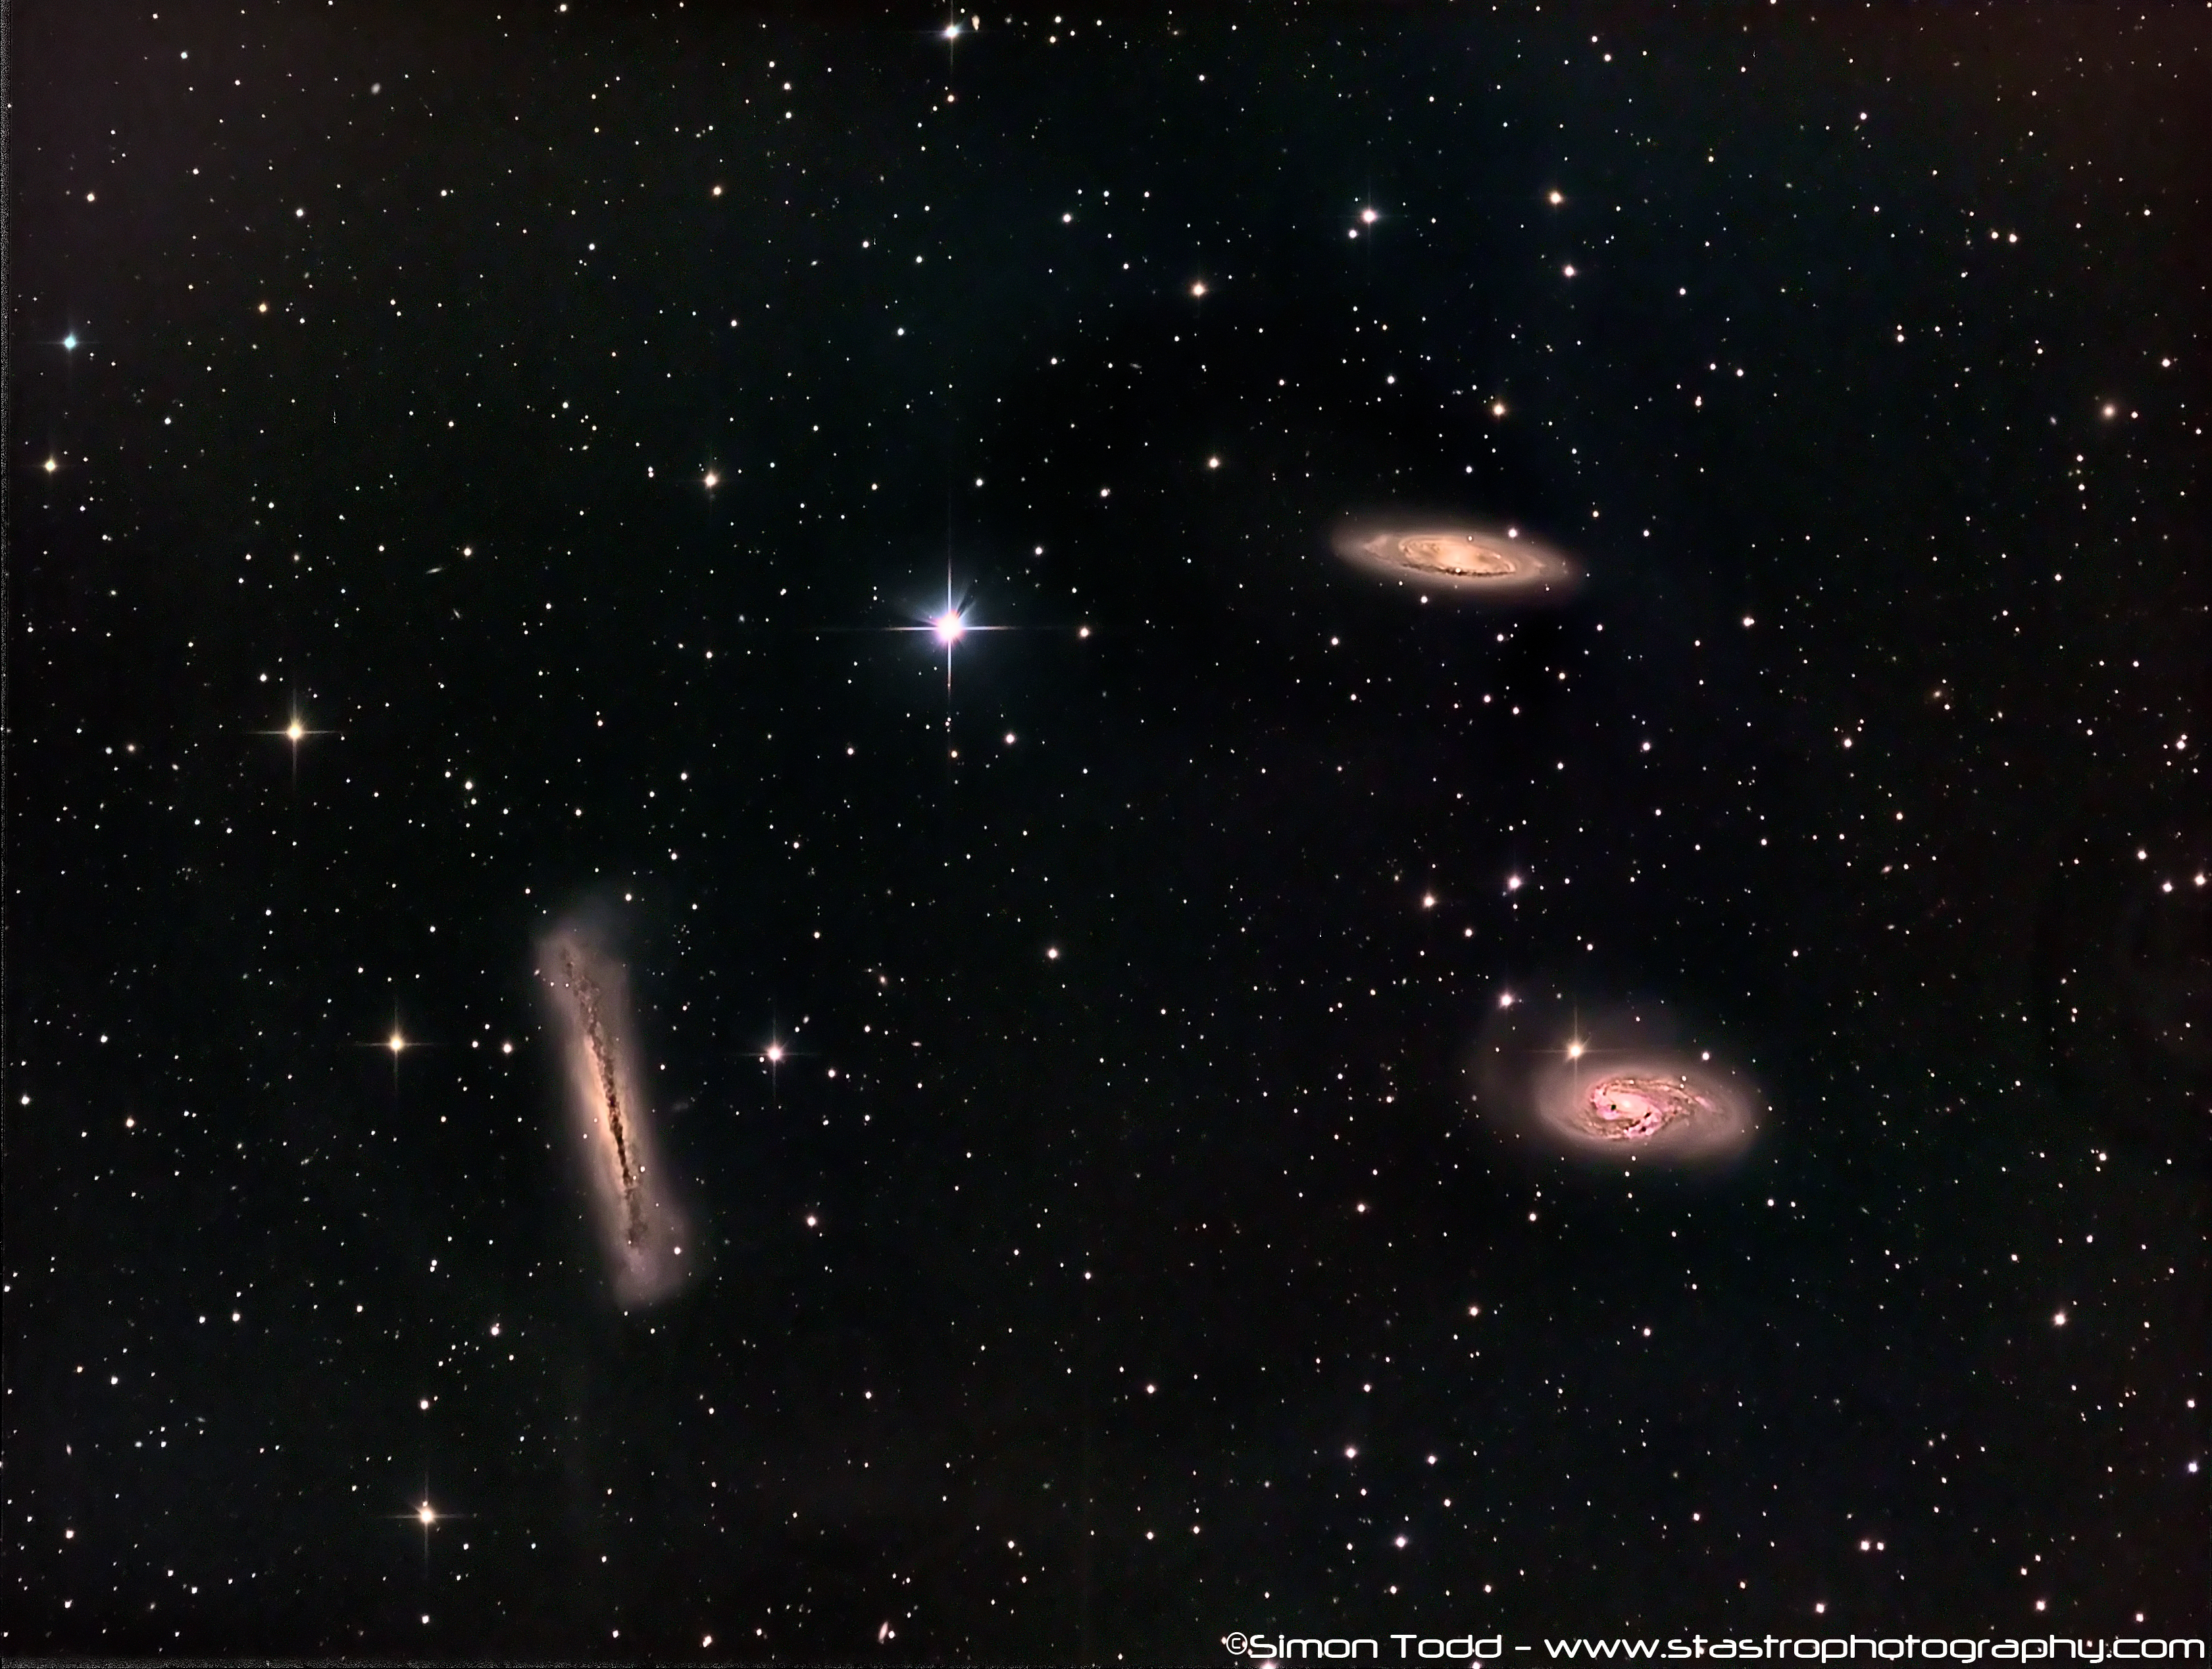
The Leo Triplet consists of three galaxies at a distance of around 35 million light years, M65 (top right), M66 (bottom right) and NGC3628 (left). I have always aimed at imaging the triplet since I started imaging but never got around to it.
M65 (NGC 3623) and M66 (NGC 3627) are classed as intermiediate spiral galaxies and NGC3628 is also known as the Hamburger Galaxy or Sarah’s Galaxy and is classed as an Unbarred Spiral Galaxy.
The image consists of:-
29x300S of Luminance
14x300S Red, Green and Blue
15x600S of 7nm HA in the LRGB+HA Image
25 Darks and flats subtracted from all frames
Equipment Details:
Imaging Telescope: Sky-Watcher Quattro 8-CF F4 Imaging Newtonian
Imaging Camera: Atik Cameras 383L+ Mono CCD
Coma Corrector: Sky-Watcher Aplanatic Coma Corrector
Guide Camera: Qhyccd QHY5L-II
Guide Scoope: Celestron Telescopes C80ED Refractor
Mount: Sky-Watcher EQ8 Pro
Filter Wheel: Starlight Xpress Ltd 7x36mm USB EFW
Filters: Baader Planetarium LRGB + 7NM HA
Image Aquisition: Main Sequence Software SGPro
Image Pre-Processing and STacking: Maxim-DL
Post Processing: PixInsight
In my opinion, there’s only a subtle difference between the LRGB and LRGBHA images, personally I preffer the LRGB Version, the data was captured over multiple nights since the beginning of 2017 but in total gives 5.91 Hours on the LRGB Image and 8.41 Hours for the LRGB+HA Image