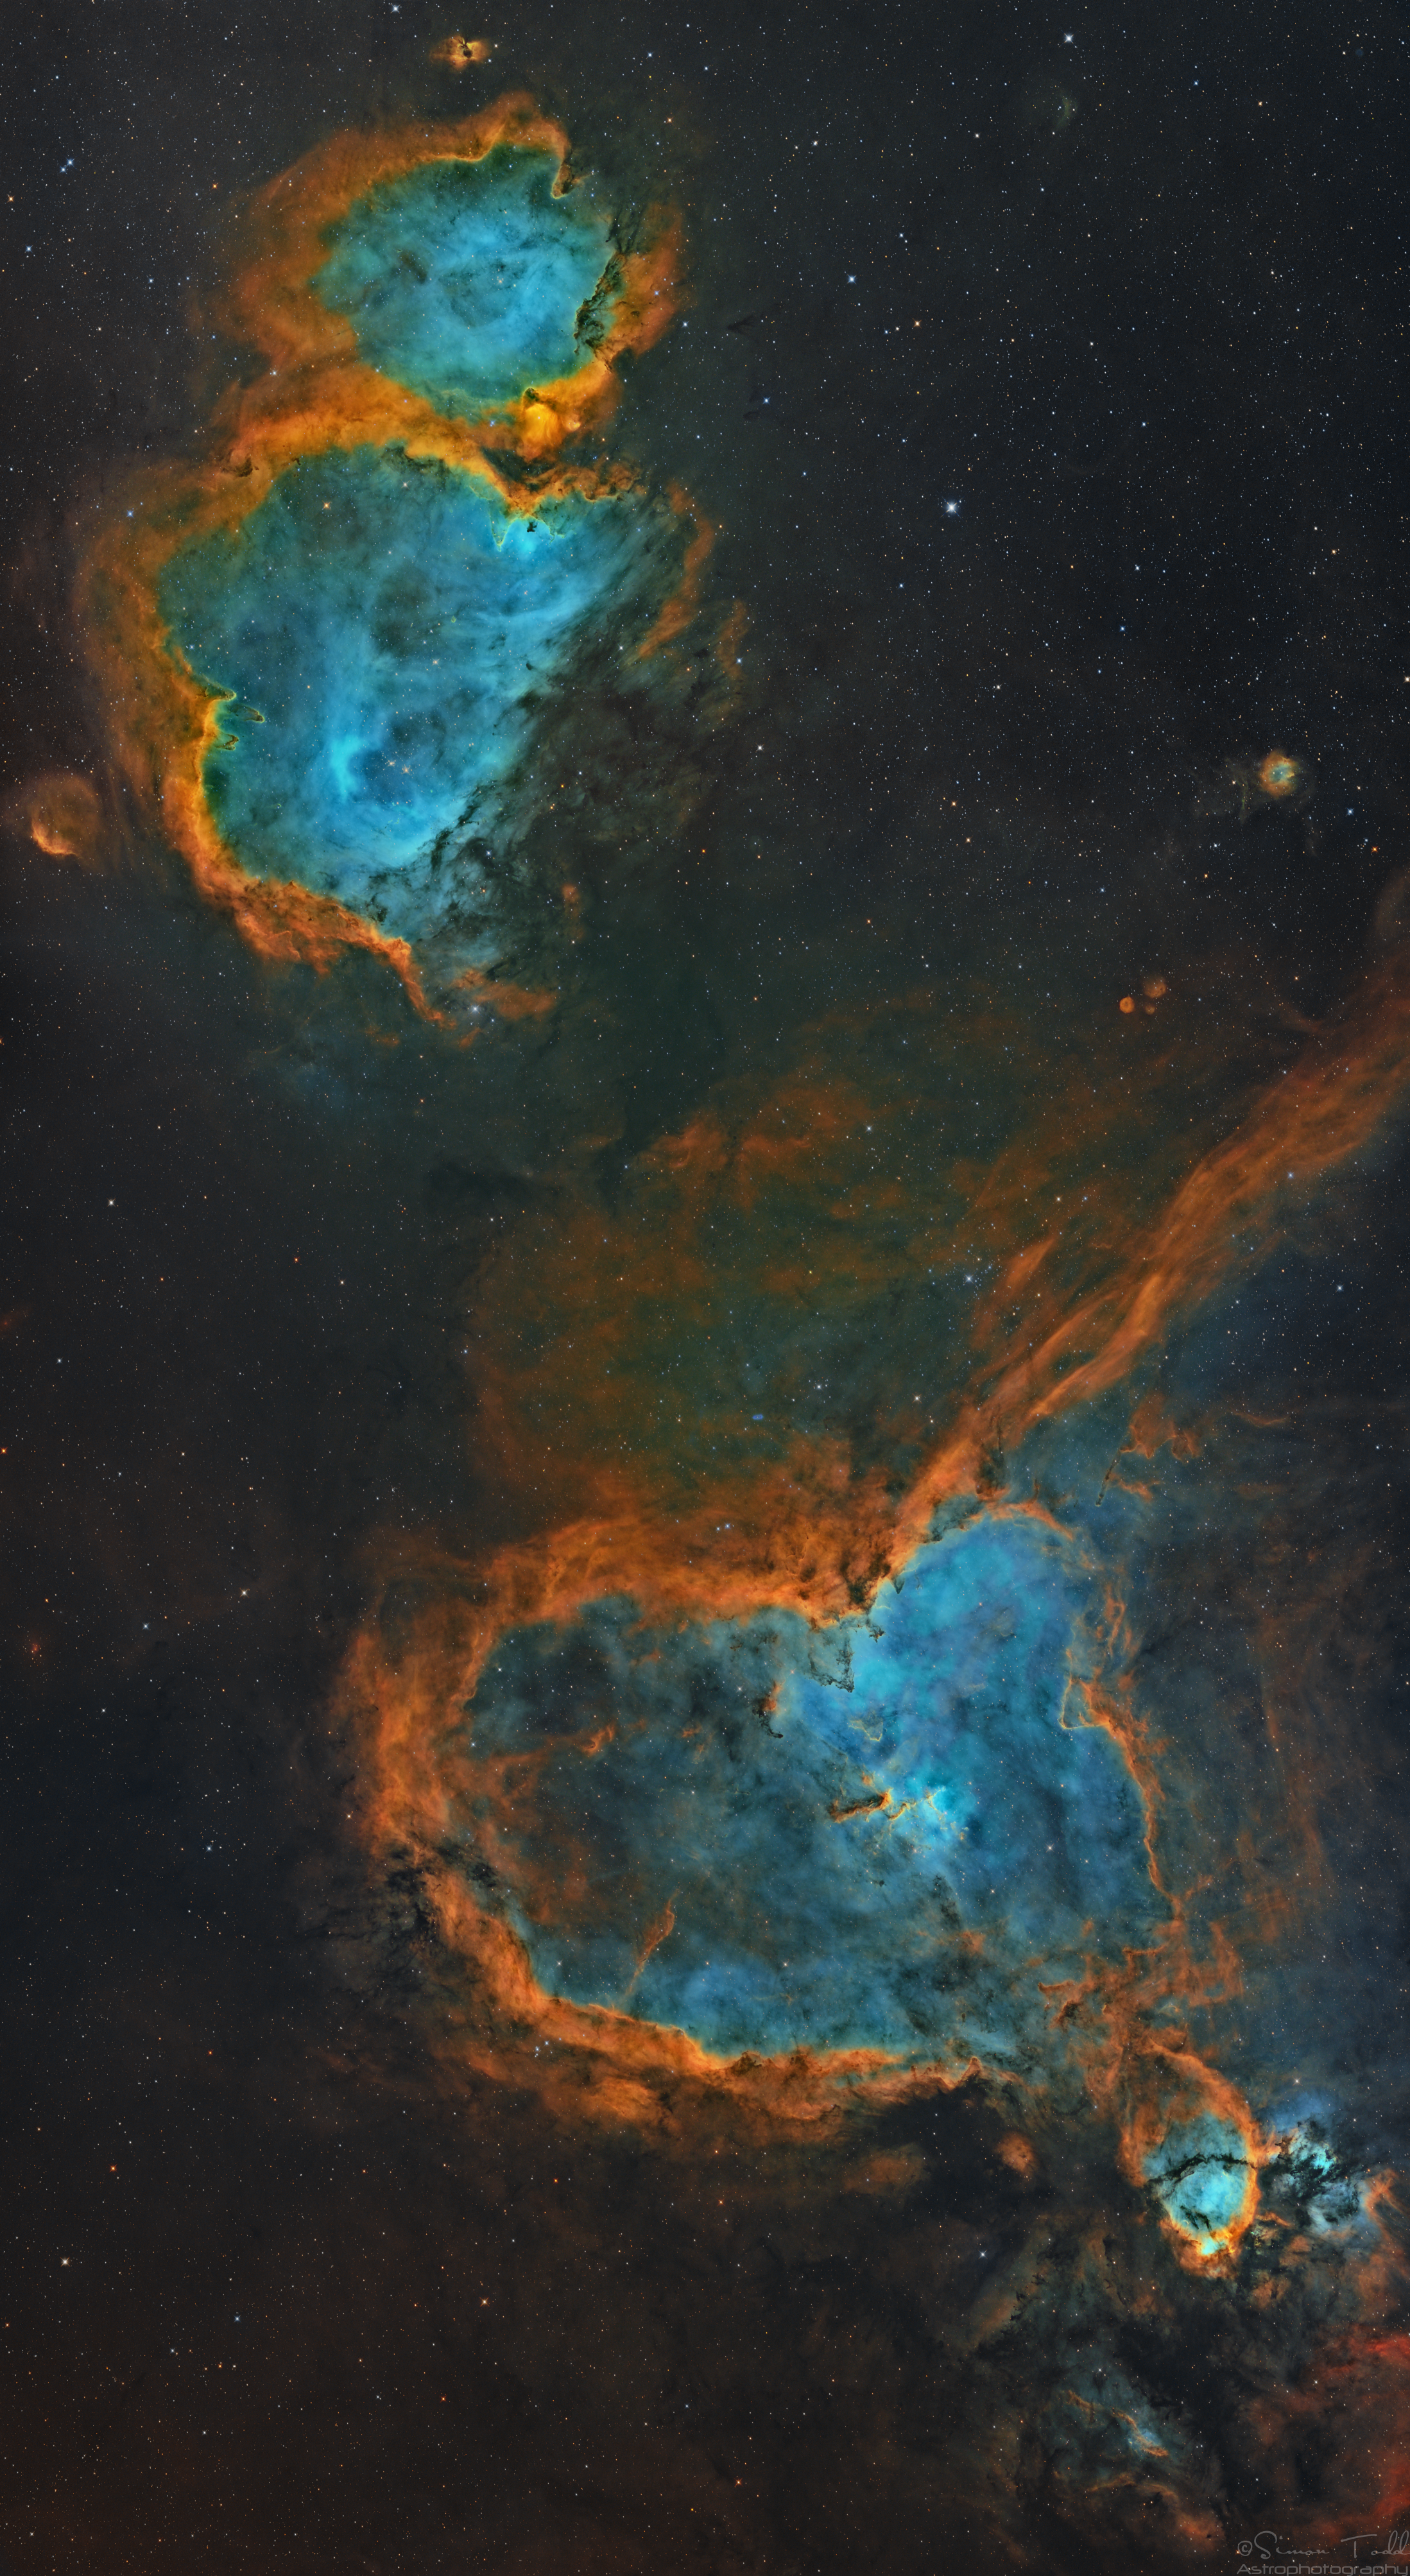
In the boundless theatre of the night sky, a spectacle of cosmic proportions gently unfolds. Here, through the unblinking eye of my camera, we witness the Heart and Soul Nebulae, celestial bodies of unimaginable scale and beauty. Captured in the vivid hues of the Hubble Palette, this image is the culmination of over 68 hours of patient vigil over the course of six months, a testament to the relentless march of time and space.
The Heart Nebula, known as IC 1805, and its companion, the Soul Nebula, IC 1848, are more than mere clusters of gas and dust. They are incubators of stars, cosmic nurseries where new celestial lives begin. Nestled within is the charmingly named Fish Head Nebula, a smaller star-forming region within this grand cosmic landscape.
Each pixel of this mosaic is a story, a tiny fragment of the universe’s narrative, captured through the artful blend of sulfur, hydrogen, and oxygen emissions. As we gaze upon this image, we are not merely observers but voyagers, embarking on an odyssey across the galaxy. It invites us to ponder our place in this magnificent universe, a reminder of both our insignificance and our profound connection to the cosmos.
In the grand scheme of things, this image is but a fleeting glimpse into the eternal dance of the cosmos. It is a humble offering to the beauty and complexity of the universe, a universe that continues to captivate and inspire us with its endless mysteries.
Catalog Names: IC 1805 (Heart Nebula) IC 1848 (Soul Nebula) Fish Head Nebula (Part of the Heart Nebula)
Acquisition Dates: 16 May 2023, 17 May 2023, 20 May 2023, 21 May 2023, 25 May 2023, 26 May 2023, 27 May 2023, 28 May 2023, 15 Jun 2023, 16 Jun 2023, 24 Jun 2023, 25 Jun 2023, 26 Jun 2023, 13 Jul 2023, 16 Jul 2023, 17 Jul 2023, 19 Jul 2023, 20 Jul 2023, 25 Jul 2023, 26 Jul 2023, 6 Aug 2023, 7 Aug 2023, 9 Aug 2023, 10 Aug 2023, 17 Aug 2023, 20 Aug 2023, 22 Aug 2023, 5 Sep 2023, 9 Sep 2023, 15 Sep 2023, 23 Sep 2023, 29 Sep 2023, 8 Oct 2023, 9 Oct 2023, 14 Oct 2023, 15 Oct 2023, 6 Nov 2023, 7 Nov 2023, 10 Nov 2023, 11 Nov 2023, 14 Nov 2023, 15 Nov 2023, 19 Nov 2023, 20 Nov 2023, 22 Nov 2023, 24 Nov 2023, 25 Nov 2023
I was lucky enough for 365Astronomy to offer me one of the ZWO ASI2400 full frame cameras to test and write a review, so obviously I jumped at the chance, and within a couple of days I was successfully imaging and acquiring data with it, so firstly what is the ASI2400?
The ASI2400MC Pro is a full frame 24mpx camera that utilises the Sony IMX410 back illuminated sensor, ZWO produced a similar camera before which was the ASI128MC Pro (24mpx) and they also have the ASI6200 (62mpx), so what are the differences between the cameras?
ASI2400MC
ASI128MC
ASI6200MC
Image Sensor
IMX410
IMX128
IMX455
Pixel Size
5.94
5.97
3.76
Full Well Capacity
100ke
76ke
51.4ke
Cooling Delta
-35C
-35C
-35C
Resolution
6072×4042
6032*4032
9576×6388
ADC
14-Bit
14-Bit
16-Bit
Read Noise
1.1e-6.4e
2.5e
1.2e-3.5e
DDR Buffer
256MB
256MB
256MB
QE
>80%
>53%
>80%
FPS (Video)
8
5
2
If we compare the ASI2400 and the ASI128 since they have similar pixel sizes and offer almost a matching resolution, but the ASI2400 clearly is a better camera, with a higher full well capacity, this means that it takes a lot more to saturate out the colours around bright stars for example, but also a big increase on the quantum efficiency going from 53% to >80%.
Now the first thing I noticed was that the ASI2400 was only slightly cheaper than the ASI6200, but the ASI6200 is offering a much higher resolution, so why would people not just go for the ASI6200? Well it comes down to pixel size, the ASI6200 has a pixel size of 3.76 so it would be better suited to a short focal length scope, if I attach the ASI6200 to my SharpStar 15028HNT which has a focal length of 420mm at F2.8, this will give me around 1.85 Arc-Seconds per Pixel which for UK skies is an ideal figure, the ASI2400 has a bit more flexibility with the focal length of telescopes because of the larger pixel size, so whilst the ASI6200 offers a higher resolution image sensor of 62mpx, the ASI2400 offers more flexibility of a higher focal length telescope.
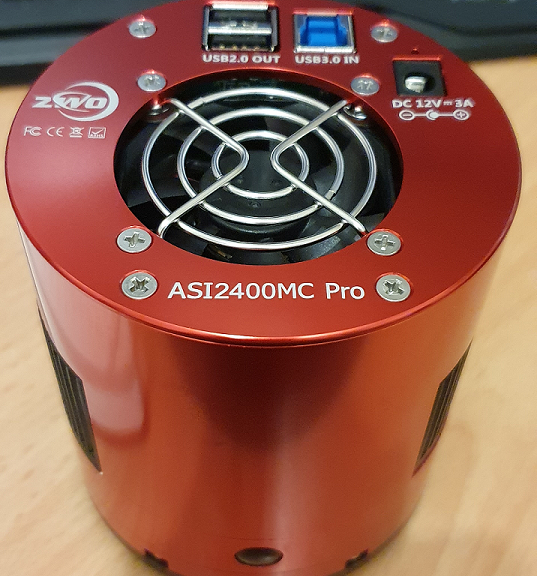
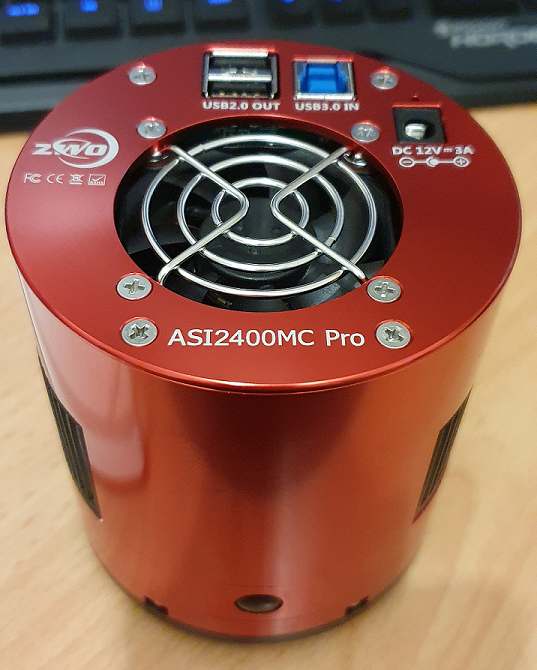
When I unboxed the ASI2400 I was very impressed with the quality, this was the first ZWO Camera I have ever actually seen in the flesh, the red finish matches my SharpStar 15028HNT, but one thing that I noticed straight away was the two additional USB Ports on the top of the camera which I sat and thought to myself that it would certainly help with tidying up my cables around the scope. In the box was a couple of adapters to obtain the very common 55mm back focus, two USB Cables, and a USB 3.0 cable, and the camera arrived in a very nice case too.
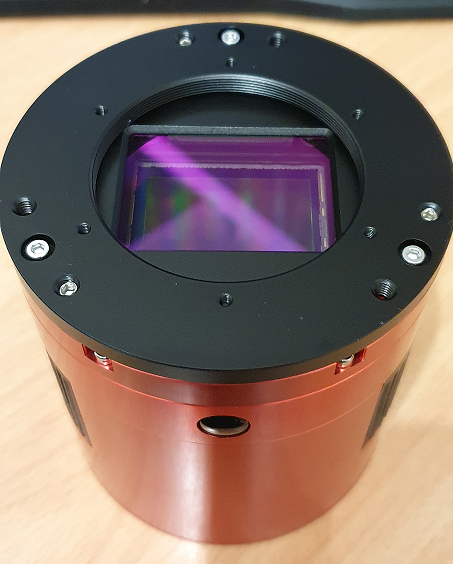
I removed the camera sensor cover and revealed the massive full frame sensor and compared it to the APS-C sized camera I have and was like wow, that’s a big sensor, here’s a picture of the sensor:
Size matters, the Full Frame sensor on the ASI2400MC Pro
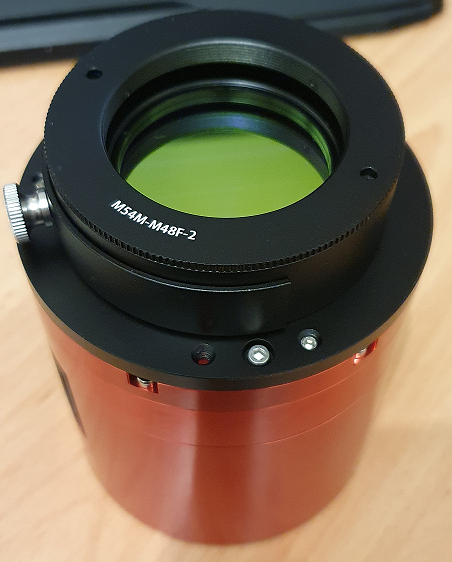
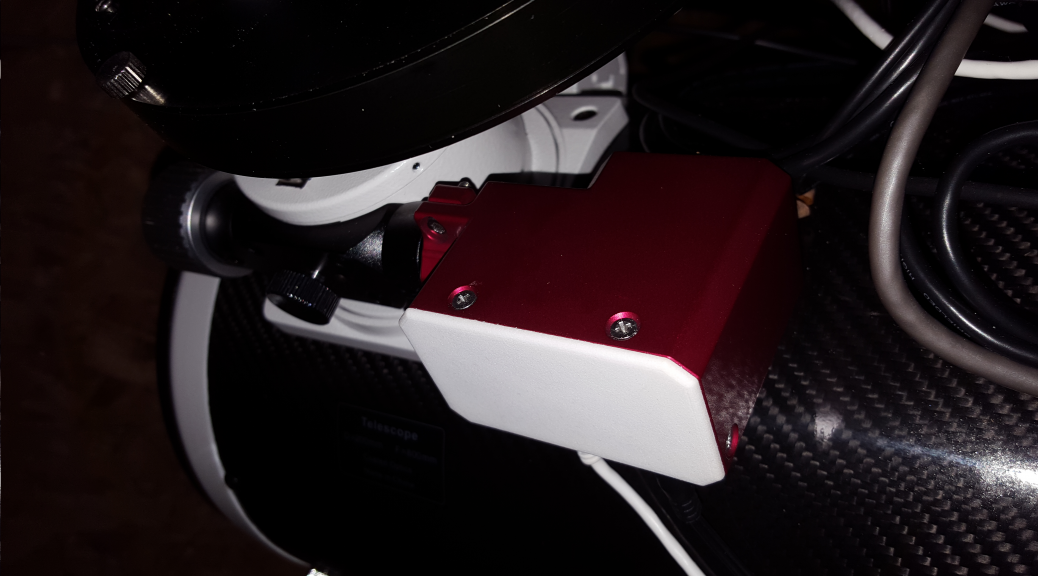
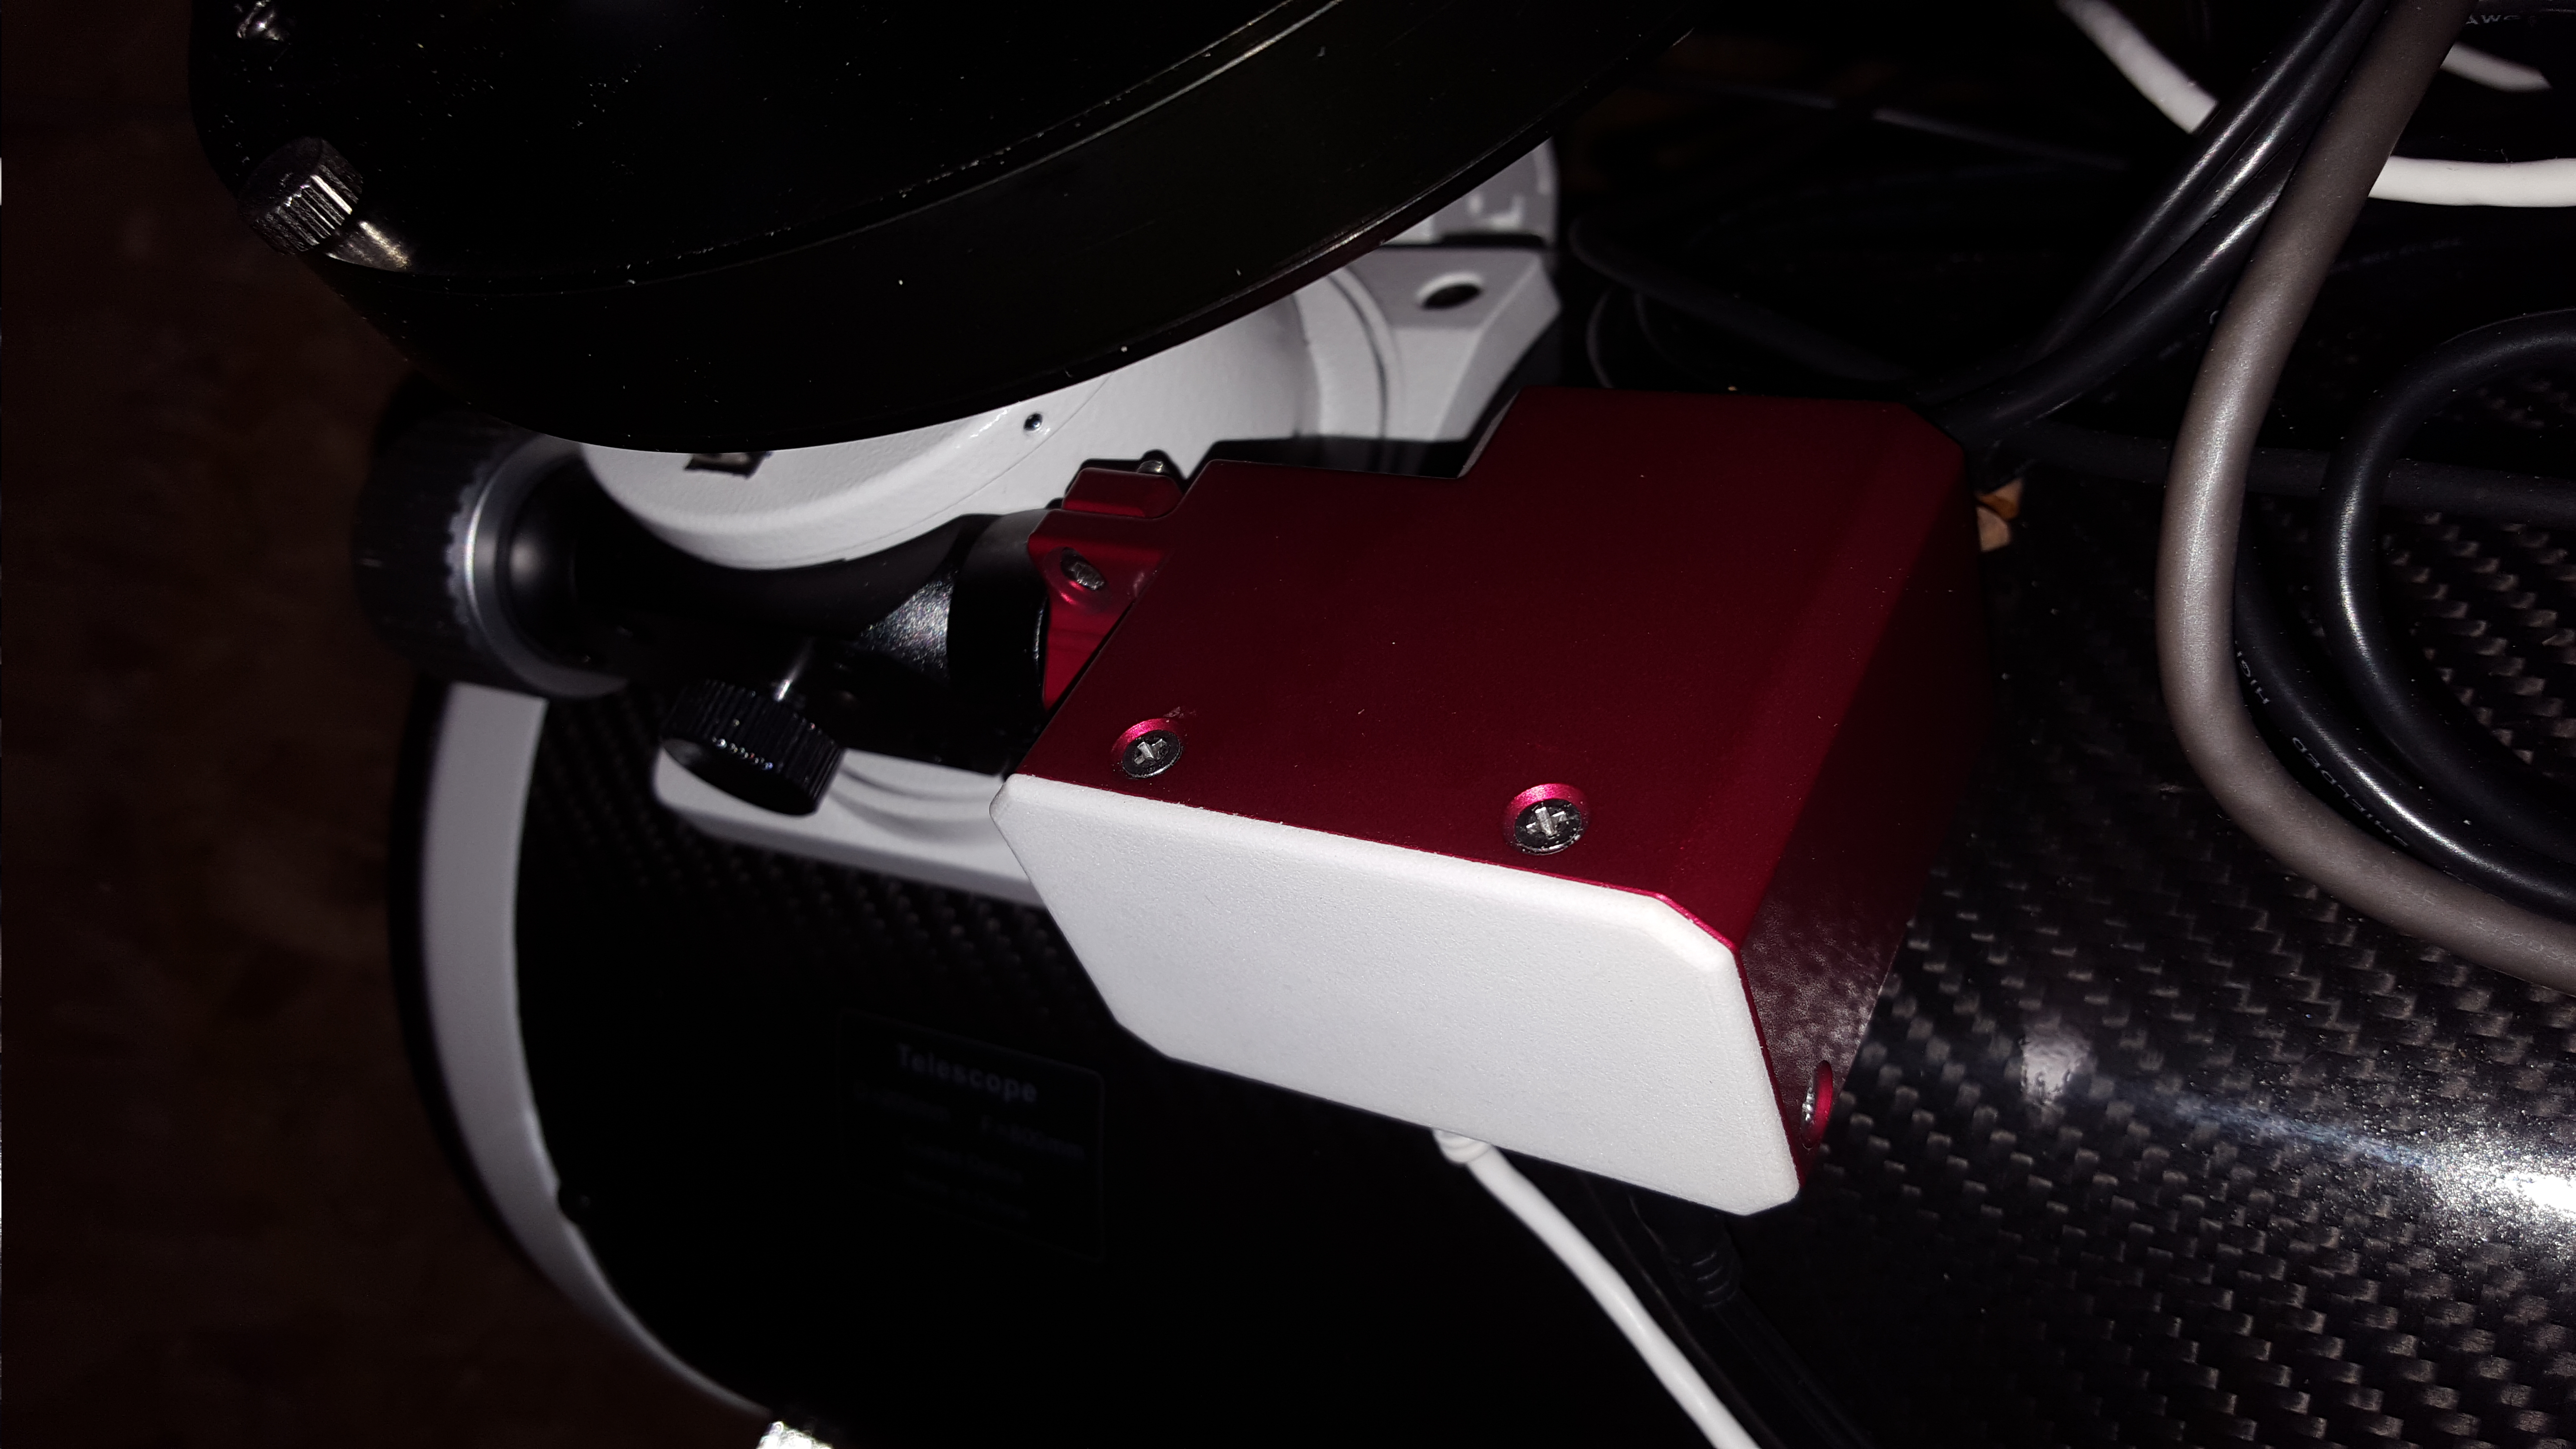
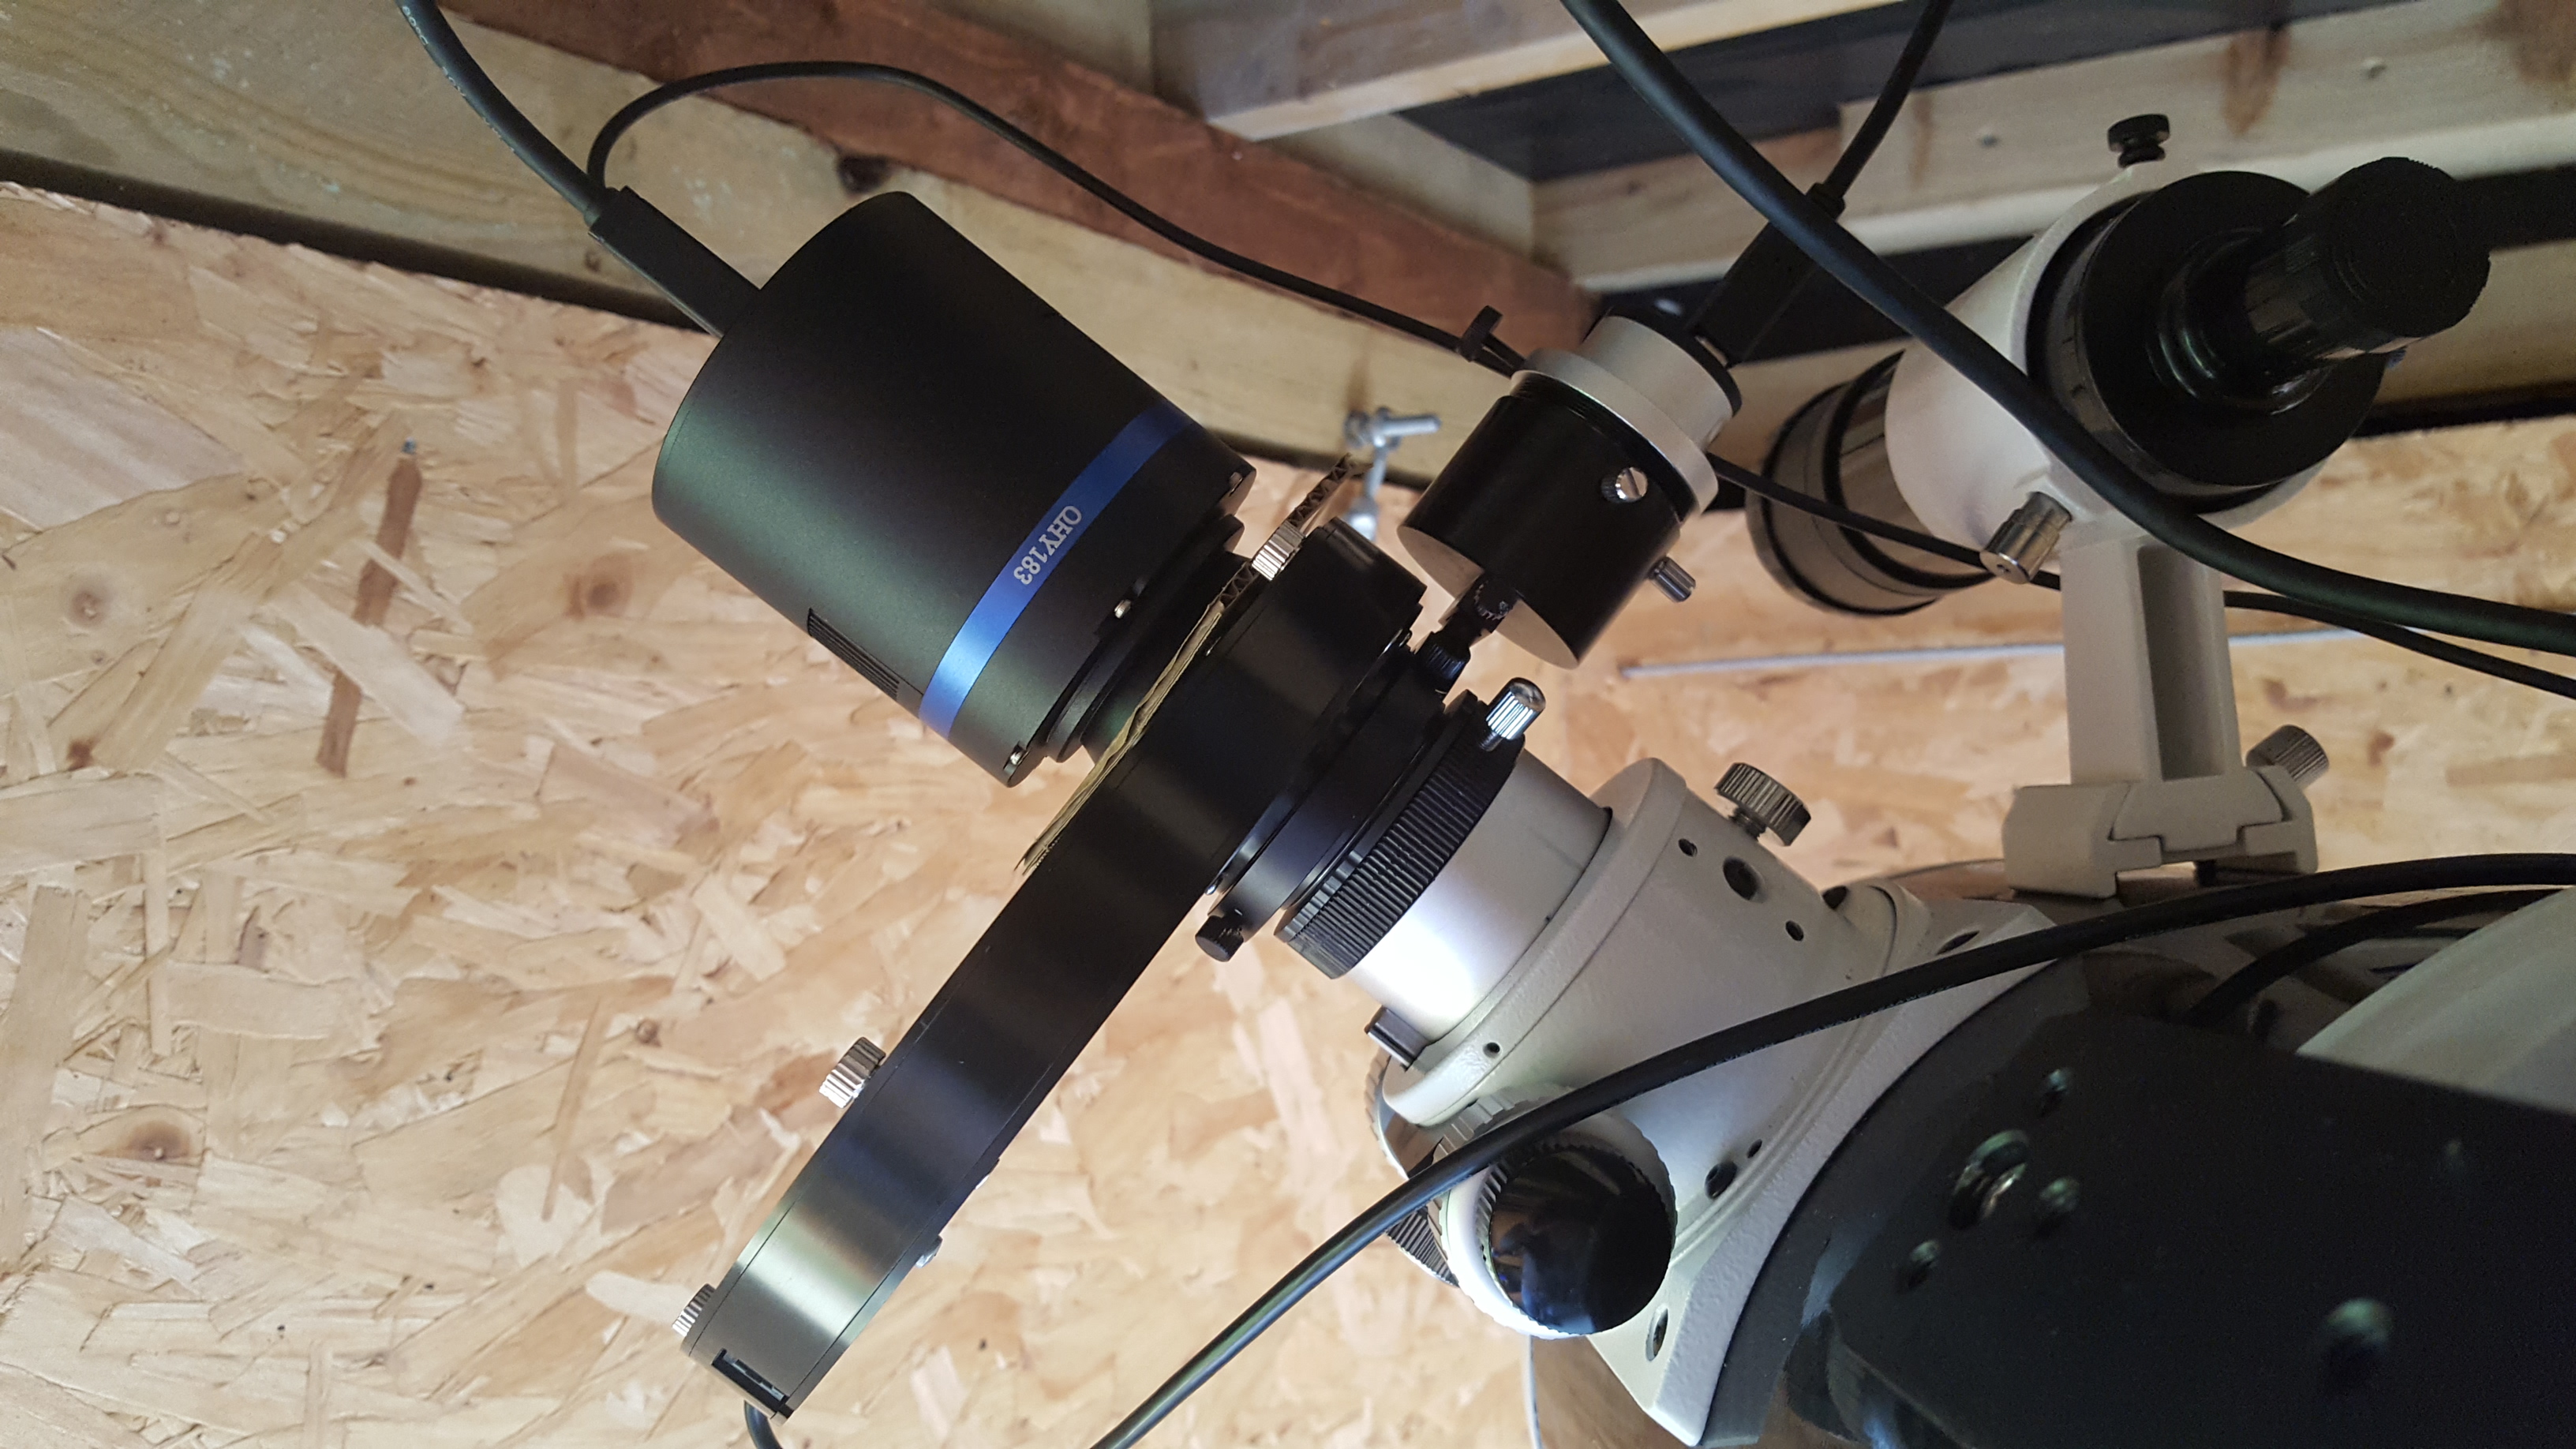
I noticed too that there was a special tilt plate on the camera which in my opinion is a critical point, my other camera has a tilt plate that is very cumbersome to use, so after a while of looking at the sensor, I decided to start adding my ZWO filter drawer and M48 extension tubes in order to get it connected to the mount, I am using the ZWO M54 2″ Filter drawer which has a 2mm M54 to M48 adapter too, threading the filter drawer on the camera was very smooth, but I would not expect anything less than that with ZWO kit connecting to ZWO kit, here’s a picture with the filter drawer and the Optolong L-Pro 2″ filter connected to the camera:
ZWO M54 Filter Drawer connected to the ASI2400MC Pro
Once connected to the telescope, I had to find out where the camera was facing when connected at the optimal distance of 55mm as all of my image train is threaded on, once identified which direction the top of the camera sensor was facing I could rotate the focuser and then re-check the collimation with the laser before putting the camera back on and connecting the cables.
Identifying which side of the camera the top of the sensor was is so easy on this camera, there’s what looks like a black plastic button on the side of the camera, it is obviously a cover of some sort, but this also indicates which side the top of sensior is located, something I wish all camera vendors would do.
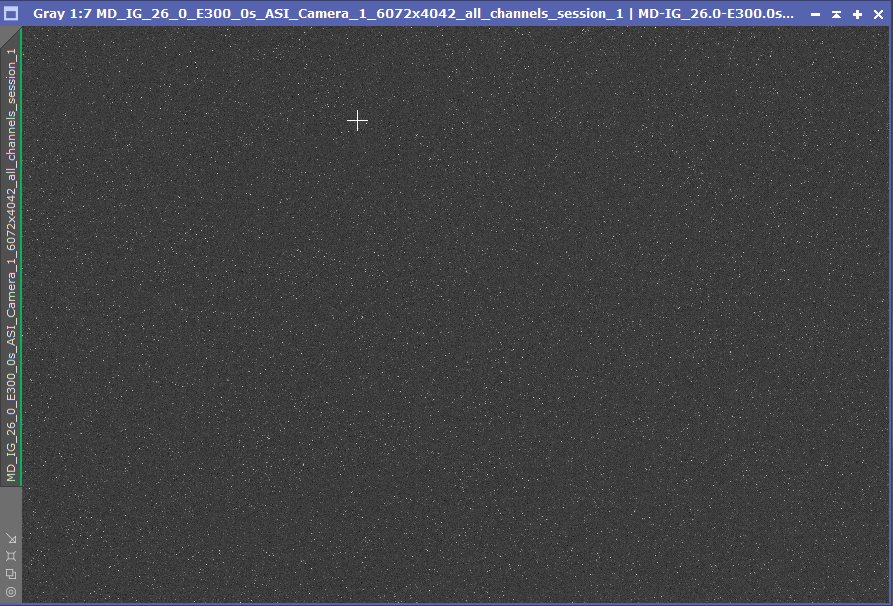
One of the first things I do when testing out a new camera is dark frames, all vendors claim they have zero amp glow, so this is always my first test, and the ASI2400 didn’t let me down, indeed there was zero amp glow and I tested with various exposure times and gain settings, here’s a 300S exposure with Gain 26 which has had a Screen Transfer Function auto stretch applied:
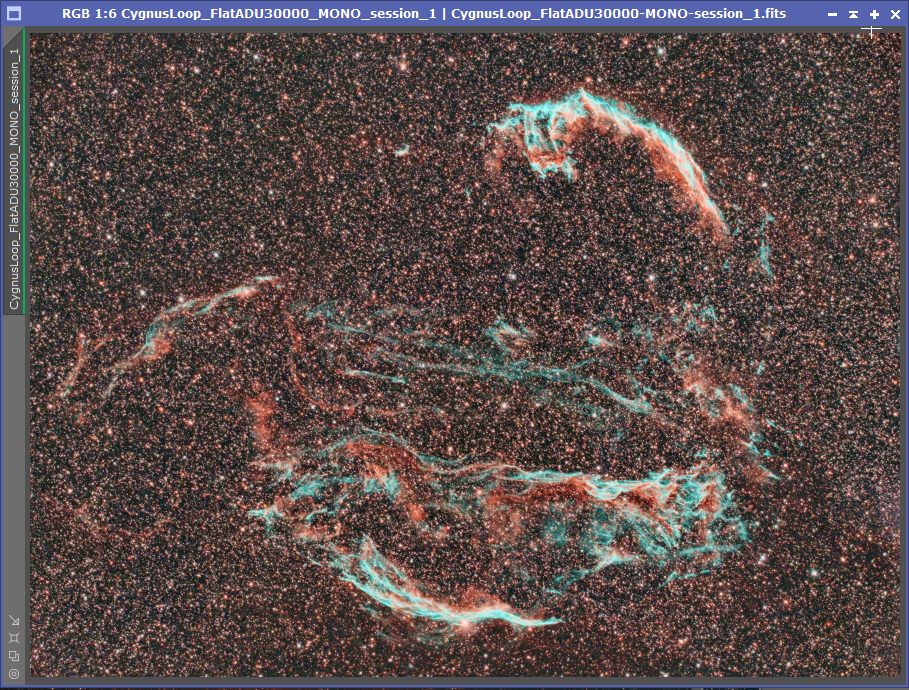
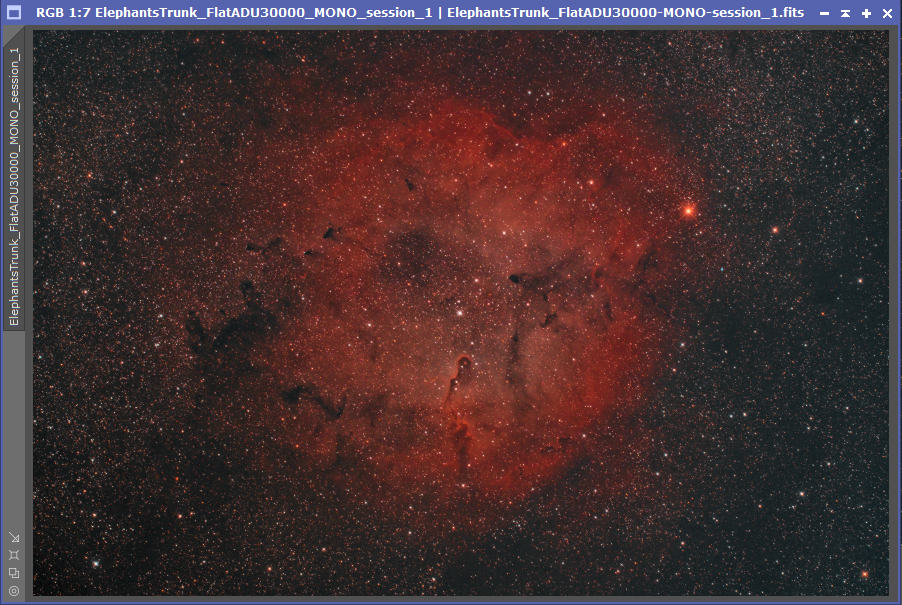
After connecting it all up to the telescope, and acquiring some darks, flats, and BIAS frames, and the skies were clear, it was time to put the camera under a proper test, I had set a couple of targets up, the Cygnus Loop and the Elephant’s Trunk Nebula using the Optolong L-eXtreme Narrowband filter and here are the results:
Cygnus Loop – Eastern Veil, Western Veil and Pickerings Triangle – 29x300S at Gain 26, ASI2400MC Pro on the Sharpstar15028HNT using the Optolong L-eXtreme Dual Band FilterElephant’s Trunk Nebula – 19x300S at Gain 26, ASI 2400MC Pro on the SharpStar 15028HNT using the Optolong L-eXtreme Dual Band Filter
So you can see the camera performed really well, stars are almost perfect in the corners (a little fine tuning required on spacing), I am hoping to get a few more clear nights over the next few days to build on the above images and really show off the performance of the ASI2400, and I can’t wait to test it out on the Iris Nebula.
Conclusion: The ASI2400 is in my opinion an awesome piece of kit, that massive full frame sensor has the adaptability for longer focal length telescopes due to the larger pixel size, the advantage of the USB Hub built into the camera, the adjustable tilt plate on the front of the camera is the most advantageous aspect, would have saved me so much time trying to rectify tilt instead using copper shims, but also the smaller things that are equally as important like having something to identify which way round the sensor is rather than trying to figure it out with images in my opinion is what sets this apart from other similar cameras from other vendors.
If you are looking for a full frame camera and have a short focal length telescope, the ASI2400 or the ASI6200 full frame cameras will do just the job,but any longer focal length scopes, then the ASI2400 is the right choice.
Additional image taken since writing this post:
M31 – Andromeda Galaxy – 51x90S frames at Gain 0 using the Optolong L-Pro Filter, darks and flats applied
Getting the best FWHM in your images is something that I have struggled with when imaging a whole night. As the temperature fluctuates, so does the FWHM in your images, this was a problem I had with my images at the beginning of the season. I looked around and the only focuser I could find was not a stepper motor focuser, so it didn’t offer predictable results. Since I am using the stock focuser for my Sky-Watcher Quattro 8-CF (and it’s a solid focuser at that), I did not really want to change focuser mid-season, so I did some research and landed upon the PrimaluceLabs Sesto Senso ROBO Focuser.
Now my expectations here were pretty low since I tried an electronic focuser and tried to use some sort of Auto Focus routine without any length of success, but when the Sesto Senso arrived I was excited as I looked at it and thought to myself that this would do the job.
Out of the box the Sesto Senso is very solid, good quality feel to it, and came with a bunch of different adapters for different focusers, one specifically for my Sky-Watcher Focuser too. I read the installation instructions a couple of times and set to work on upgrading my scope.
Installation Installation was fairly easy and straight forward, I removed the slow focusing knob off the focuser and attached the adapter for the Sky-Watcher that came with the Sesto Senso, so within 30 minutes it was successfully fitted. And I can still manually focus with the fast focusing knob on the other side of the focuser:
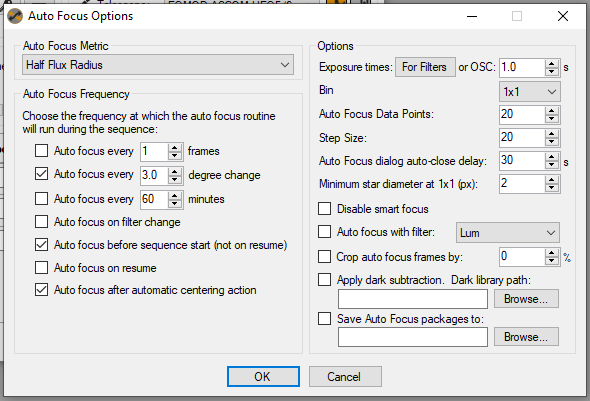
After all the physical installation was done, I then needed to install the software on the observatory PC, since I image using Sequence Generator Pro, I proceeded to install Sesto Software and the ASCOM driver so that SGPro could talk to the focuser, again this was relatively simple to do. Once this was completed it was important to load up the Sesto software and perform a calibration so that the Sesto Senso knows where the most innner and outer focus positions are.
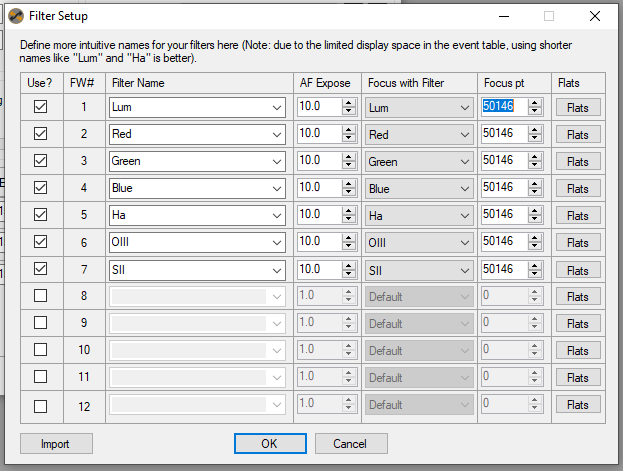
Setting the Focus Control module in SGPro was a breeze, for this I used a Focusing Mask to get a rough focus and set that point for all of my filters, now the following setting are what works for me really well, but basically:
I use 20 data points to achieve focus.
Step size between focus points is 20
Focus frame is 10 seconds for all filters, this is to get a better normalised focus frame, I was finding 5 seconds was too short and gave un-predictable results.
I set it to re-focus after a temperature change of 3.0 Degrees C since the last focus.
I re-focus on any centering action which is useful if you use a mirrored telescope like me.
Sequence Generate Pro Auto Focus settingsYou can see here that my start off point is 50146, so it will go 10 points either direction of this point at 20 steps per point
I have now been using the Sesto Senso for a few months now and it has not failed me, I maintain a good FWHM value throughout the night and it an awesome piece of kit, well done Primaluce Labs. Is there anything that I would change about it?
Only one thing…….It requires separate power, which in all honesty I can understand why but if I could run the power through USB that would be a bonus.
One problem I have with the Auto Focus routine in SGPro is that in the image sequence, since my filters for LRGB are all parfocal, but my Narrowband filters are not, I only wish to focus on a filter change if it’s going from LRGB to Narrowband to LRGB or Narrowband to Narrowband, unfortunately SGPro doesn’t have that intelligence in the sequence, I am trying to persuade Jared to have that in there to make life that bit more simple.
Anyway I hope this review inspires you to consider this awesome piece of kit, it’s certainly helped me!
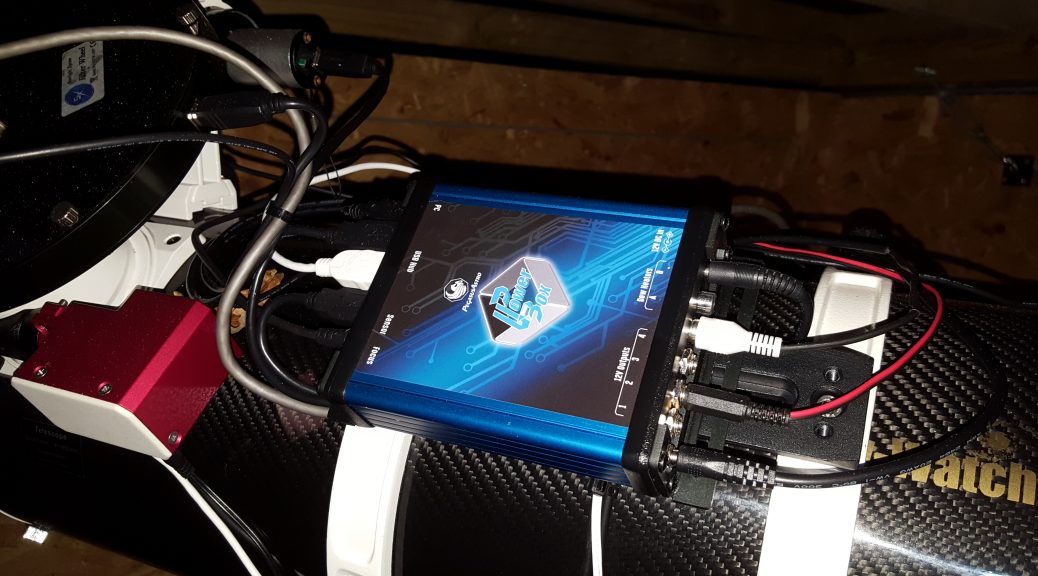
I spent a lot of time looking at PowerBoxes/USB Controllers, the late Per Frejvall had developed a very nice Remote USB Hub but of course with the passing of Per, these are no longer available. I looked at two hubs, the HitechAstro Mount Hub Pro abnd the one I settled for was the Pegasus Astro Ultimate PowerBox.
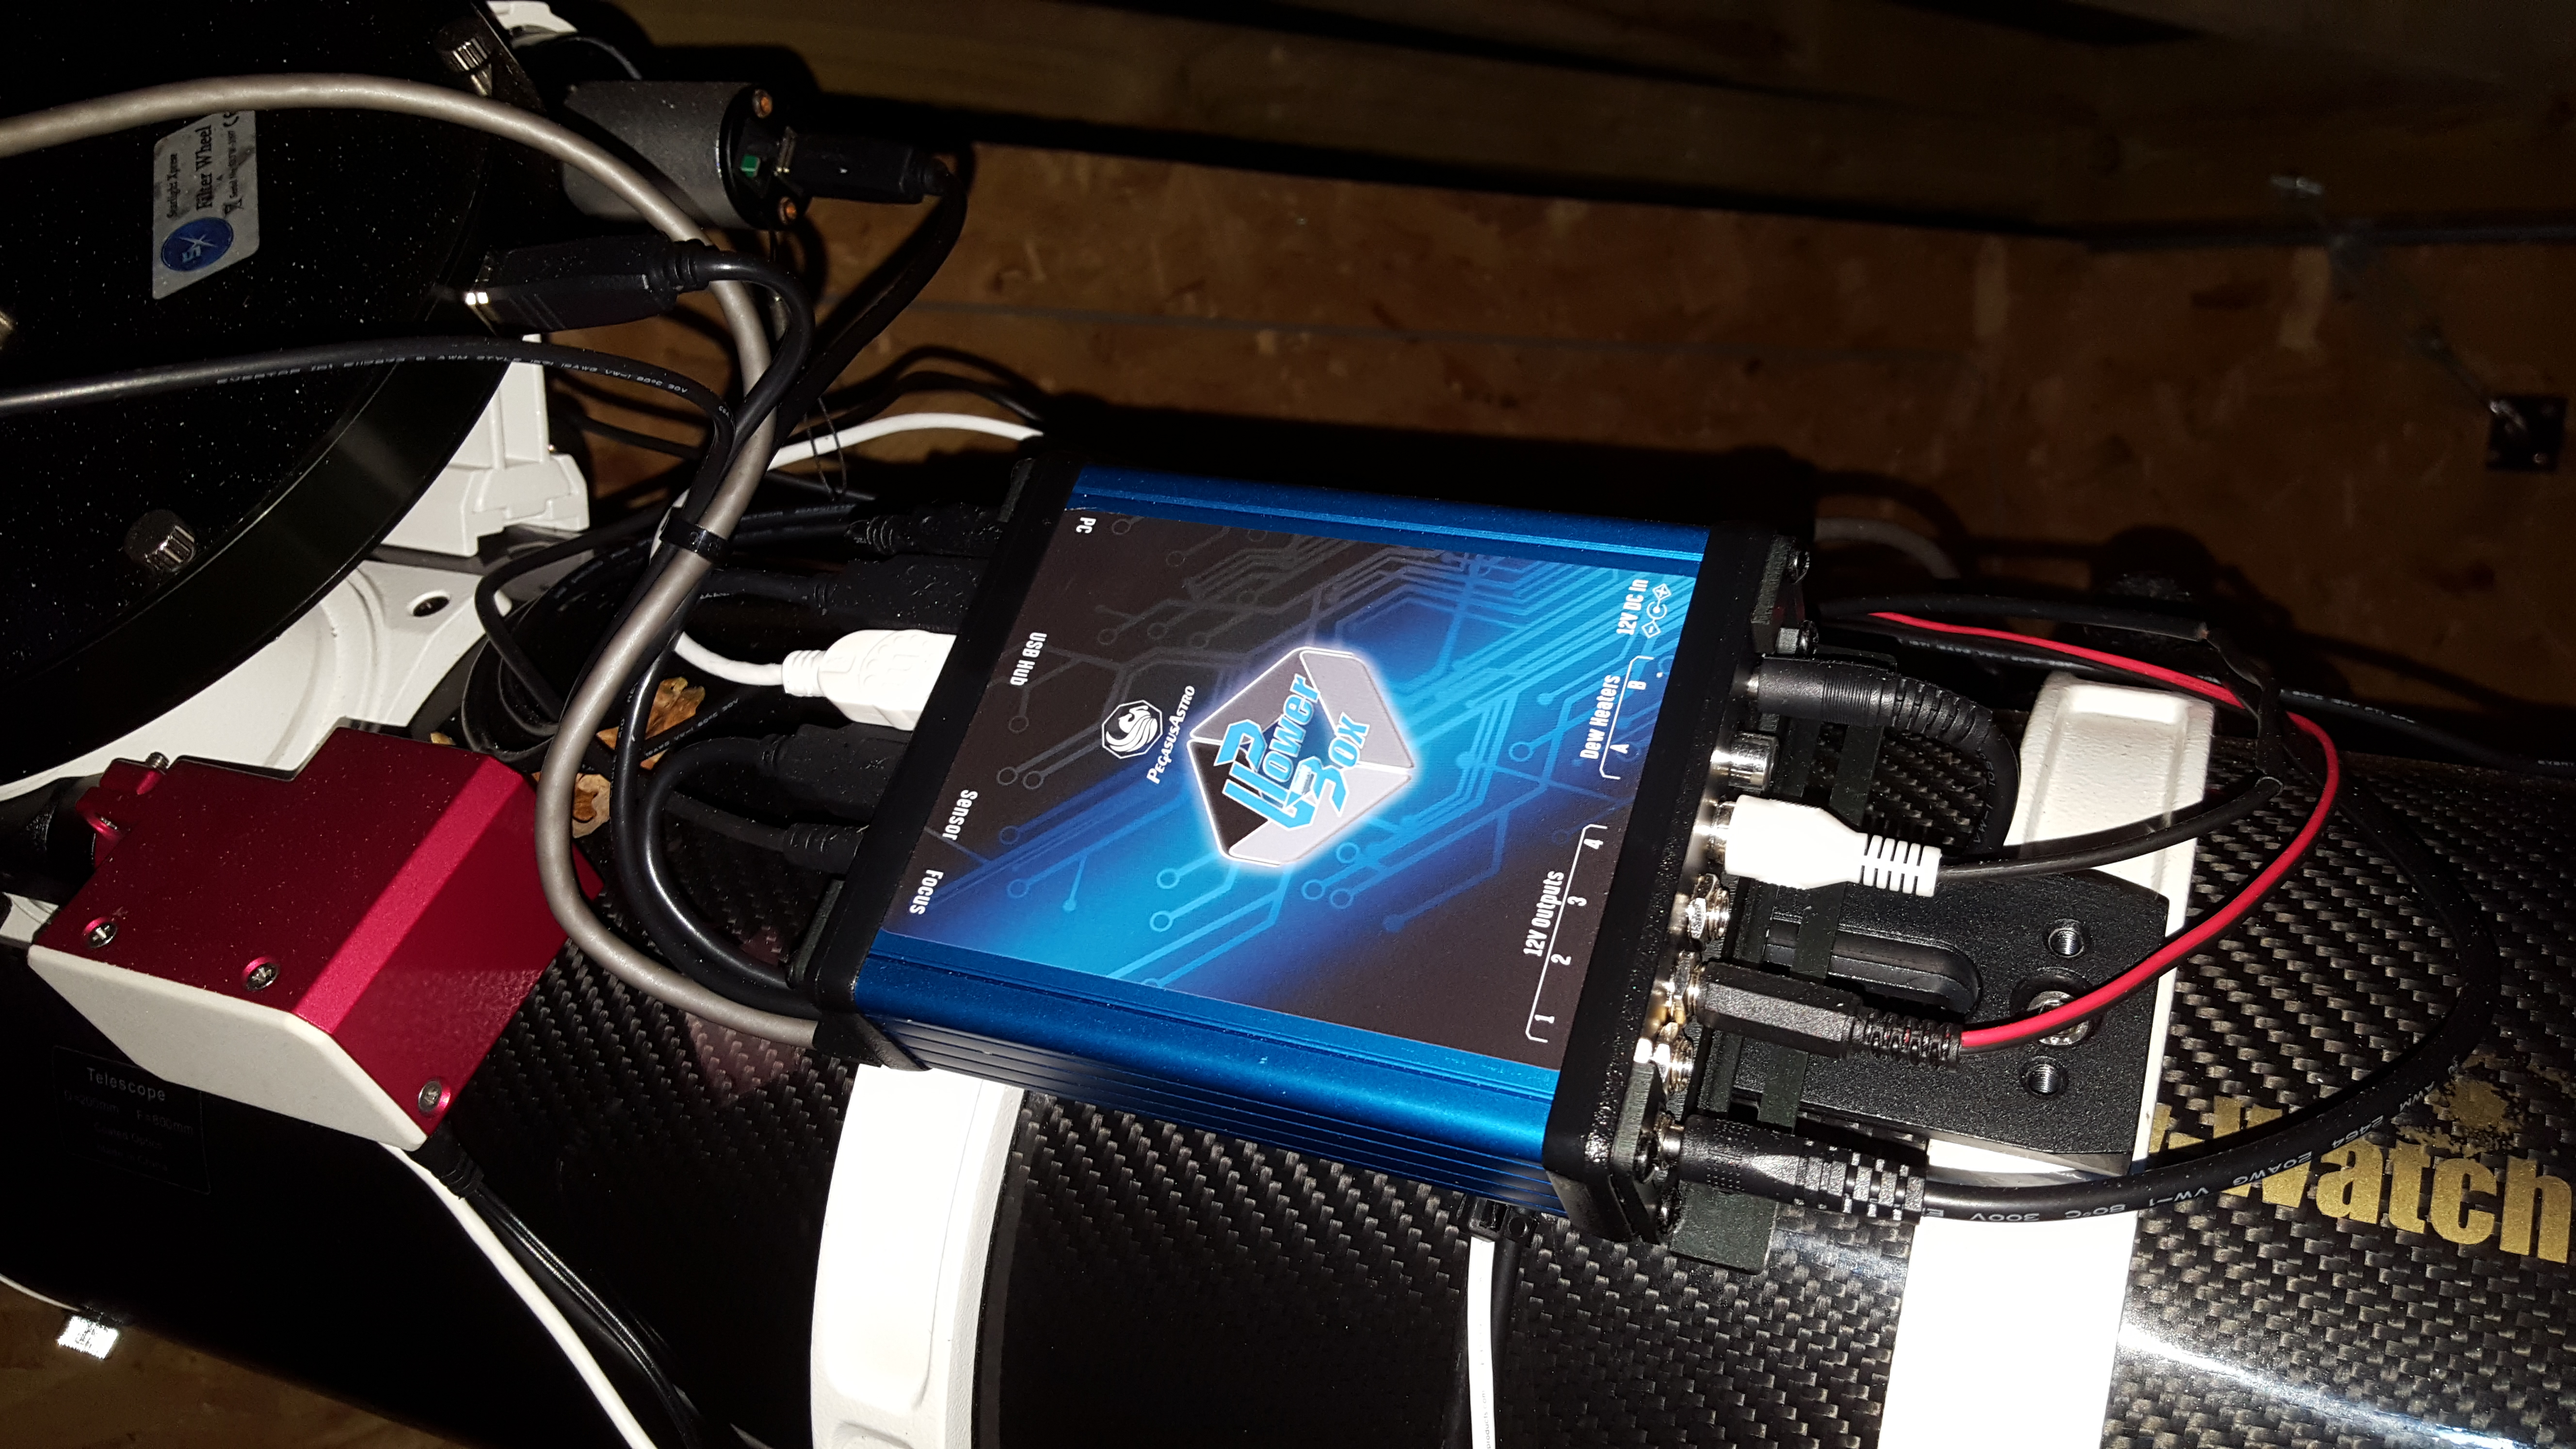
Unboxing the PowerBox I was pleased with the build quality, they even ship mounting brackets for you to be able to mount it onto your setup, here’s an image of mine mounted on top of my Sky-Watcher Quattro:
Pegasus Astro Ultimate PowerBox on Imaging Setup
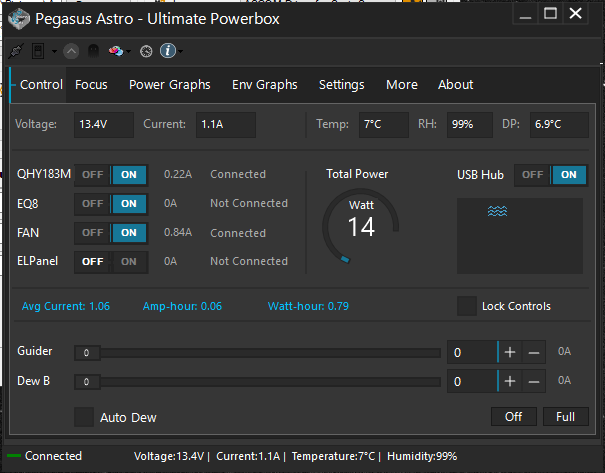
I loaded up the software onto the observatory PC and again pleasantly surprised at how easy it was to get started and configure the names of the powered devices connected as well as names for each of the dew heaters, in the following image you can see my power connected devices and my dew heater for my guider camera:
Screenshot of Control Software
I configured the software to automatically power my devices the moment the unit is switched on, so what do I have connected to the PowerBox?
QHY5L-II Guide Camera
StarlightXpress USB Filterwheel
PrimaluceLabs ROBO Focuser
EQ8 Pro Mount PC-Direct Cable
I didn’t connect my QHY183M at the moment as I discovered that during image download it seemed to cause a timeout on the QHY5L-II Camera, I have raised a ticket with Pegasus Astro on this one. From a Power perspective, I only have my QHY183M and my Rear Fan assembly/heater connected as I currently do not have the power cable to connect directly to the hub for the EQ8 Pro (On Order). There is also a temperature sensor for the ultimate version, which works well as an interface for Sequence Generator Pro and my Auto Focuser routines.
I have been using the Hub now for a good few months, I am pretty happy with it, am I totally happy you might ask, well to be honest there’s a couple of niggly things that I have emailed Pegasus Astro about (awaiting a response):
Voltage. I am running 13.8V regulated bench power supply capable of delivering up to 15A which is powering the hub, however when devices such as the camera, dew heater, fan assembly are all running, the voltage level drops down to around 12V according to the software, I would not expect this to do so, I would expect it to remain 13.8V. My EQ8 Pro mount is powered by the same supply (but not through the hub currently) and during slew the voltage in the software does not change, so it’s obviously something being caluclated within the hub somewhere.
Issue with USB3 Camera (QHY183M) is still outstanding
When you set the power to the dew heater for example I always run it at 170, however when the software restarts you have to manually go and set this again
Ability to reboot or “Disconnect” a specific USB Port remotely would have been nice.
The main reason I wanted something like this was the ability to reboot the hub remotely, with standard USB Hubs this is not possible, as above, I would love to have a bit more granularity on this and have it on a per USB port but it works well for me right now.
After much waiting (due to delays on Sony Sensors) I have finally received my QHY183M ColdMOS camera from QHYCCD which I collected from ModernAstronomy last weekend, so I apologise for the really bad weather we’ve had.
As you all know, for the past few years I have been using an Atik 383L+ Mono 8.3Mpx CCD Camera, so when QHY announced the QHY183C I immediately asked them if there was going to be a mono version to which they said….Yes!
So firstly you might ask why I chose the QHY183 camera? Well the simple reason for this is that it offered me a higher pixel resolution for almost the same field of view that my Atik 383L+ offered, however there were other factors that swayed my decission:
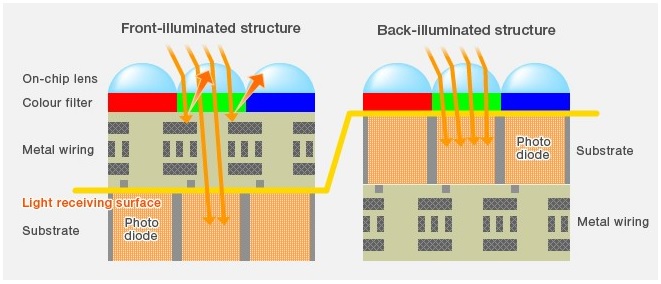
Back Illuminated Sensor
High Quantum Efficiency (QE)
Optimal Cooling
Lightweight
So let’s first of all talk about the back illumination and what this means to astrophotography. Typically CMOS sensors are orientated with the light receiving surface and the transistors/wiring facing the light, so when imaging it is possible to get reflections of light bouncing off the circuitry, with a back illuminated sensor, all the circuitry are on the underside of the surface that faces the light, thus elliminating the possibility of reflections bouncing off the transistors, the following image shows this in a bit more detail (Courtesty of QHYCCD):
So obviously the more light we can get to the imaging surface the better it is for our data acquisition, every photon counts right?!
The QHY183M has an extremely high Quantum Efficiency (QE) of 84% which means that more data is absorbed by the chip than my previous imaging camera which had a QE of just over 60% based on the KAF-8300 sensor from Kodak.
One of the first things I tested when I unpacked the camera was the cooling system, I wanted to know how good the cooling system was, QHY stated between 40-45C Delta, so considering the outside temperature was +5C I managed to get the camera down to -41.6C which was a delta slightly above the 45C promised by QHY, so considering I typically image at -20C this now means I can image when the outside temperature at night is even as high as +25C which typically doesn’t happen in the UK. I also noticed that the QHY183M uses less current than my 383L+ did to get ot the same temperature, so another bonus of less power requirement.
Weight is always an astrophotographers enemy, so it was much to my delight that the QHY183M weighs a lot less than my ATIK 383L+ did, the 383L+ weighed in around 700g and the QHY183M weighs in around 450g.
Out of the box My first impression of the camera is that it is well built, a bit more of a compact design in comparison to my previous camera, has a USB3.0 connector (even though I am still using USB 2.0) and has a port to connect a dessicant tube to if required.
Software Installation Driver installation was relatively straight forward, if you are using a third party imaging program like Sequence Generator Pro, make sure you install the ASCOM drivers so that SGPro can then speak to the camera. In SGPro there are options for Gain settings, according to QHY the unity gain for the 183M is 11, so I have mine set to this value in SGPro.
Image Download Speed
After completing my dark frames library, I noticed that the download speed from Camera to Observatory PC was much much faster than my Atik was, even though I am using the same USB 2.0 Hub, on the Atik it could take anywhere up to 20 seconds to download the image at 1×1 binning, obviously the QHY183M is a much bigger sensor at 20mpx, however the image download time is circa 5 seconds which reduces image acquisition time greatly for multiple exposures.
Dark Frames My dark frame library is completed, below are four different exposure times, 90, 180, 300 and 600 seconds, each image consists of 25 frames combined using PixInsight
90 Seconds:
180 Seconds:
300 Seconds:
600 Seconds:
As you can see the darks are really good, if you stretch out the images you will see the AMP glow on the right side of the image, this will be removed in dark frame subtraction and is a common artifact on all CMOS based imagers.
I did have the occasional icing issue on my 383L+, however the QHY183M has a heated optical window, so time will tell on how often I will need to use the dessicant tube.
Conclusion so far…before imaging
Pros:
Excellent design.
Lightweight.
Very predictable cooling system cools to -45C below ambient.
Cooling system is much quieter than my previous camera
Less current draw versus my previous camera.
Easy software installation.
Very fast download speed of around 5 seconds per frame at 1×1 Binning.
Very high QE of 84%
Cons:
AMP glow, I am probably being a bit mean considering all CMOS based cameras are subjected to this.
M42 thread on the camera is not long enough for the StarlightXpress EFW, I had to place a piece of card between the camera and the Filterwheel otherwise the camera just keeps spinning round and doesn’t tighten.
There’s no electronic shutter like my previous camera, which means for my dark frames it has to be completely dark in the observatory
I hope this review is beneficial to you all, especially if you are considering either the 183C or the 183M. I will post part 2 of my review when I have actually got it all focused and acquired some photons from the sky.