Tag Archives: LRGB

PrimaluceLabs Sesto Senso Robo Focuser

Getting the best FWHM in your images is something that I have struggled with when imaging a whole night. As the temperature fluctuates, so does the FWHM in your images, this was a problem I had with my images at the beginning of the season. I looked around and the only focuser I could find was not a stepper motor focuser, so it didn’t offer predictable results. Since I am using the stock focuser for my Sky-Watcher Quattro 8-CF (and it’s a solid focuser at that), I did not really want to change focuser mid-season, so I did some research and landed upon the PrimaluceLabs Sesto Senso ROBO Focuser.

Now my expectations here were pretty low since I tried an electronic focuser and tried to use some sort of Auto Focus routine without any length of success, but when the Sesto Senso arrived I was excited as I looked at it and thought to myself that this would do the job.

Out of the box the Sesto Senso is very solid, good quality feel to it, and came with a bunch of different adapters for different focusers, one specifically for my Sky-Watcher Focuser too. I read the installation instructions a couple of times and set to work on upgrading my scope.

Installation
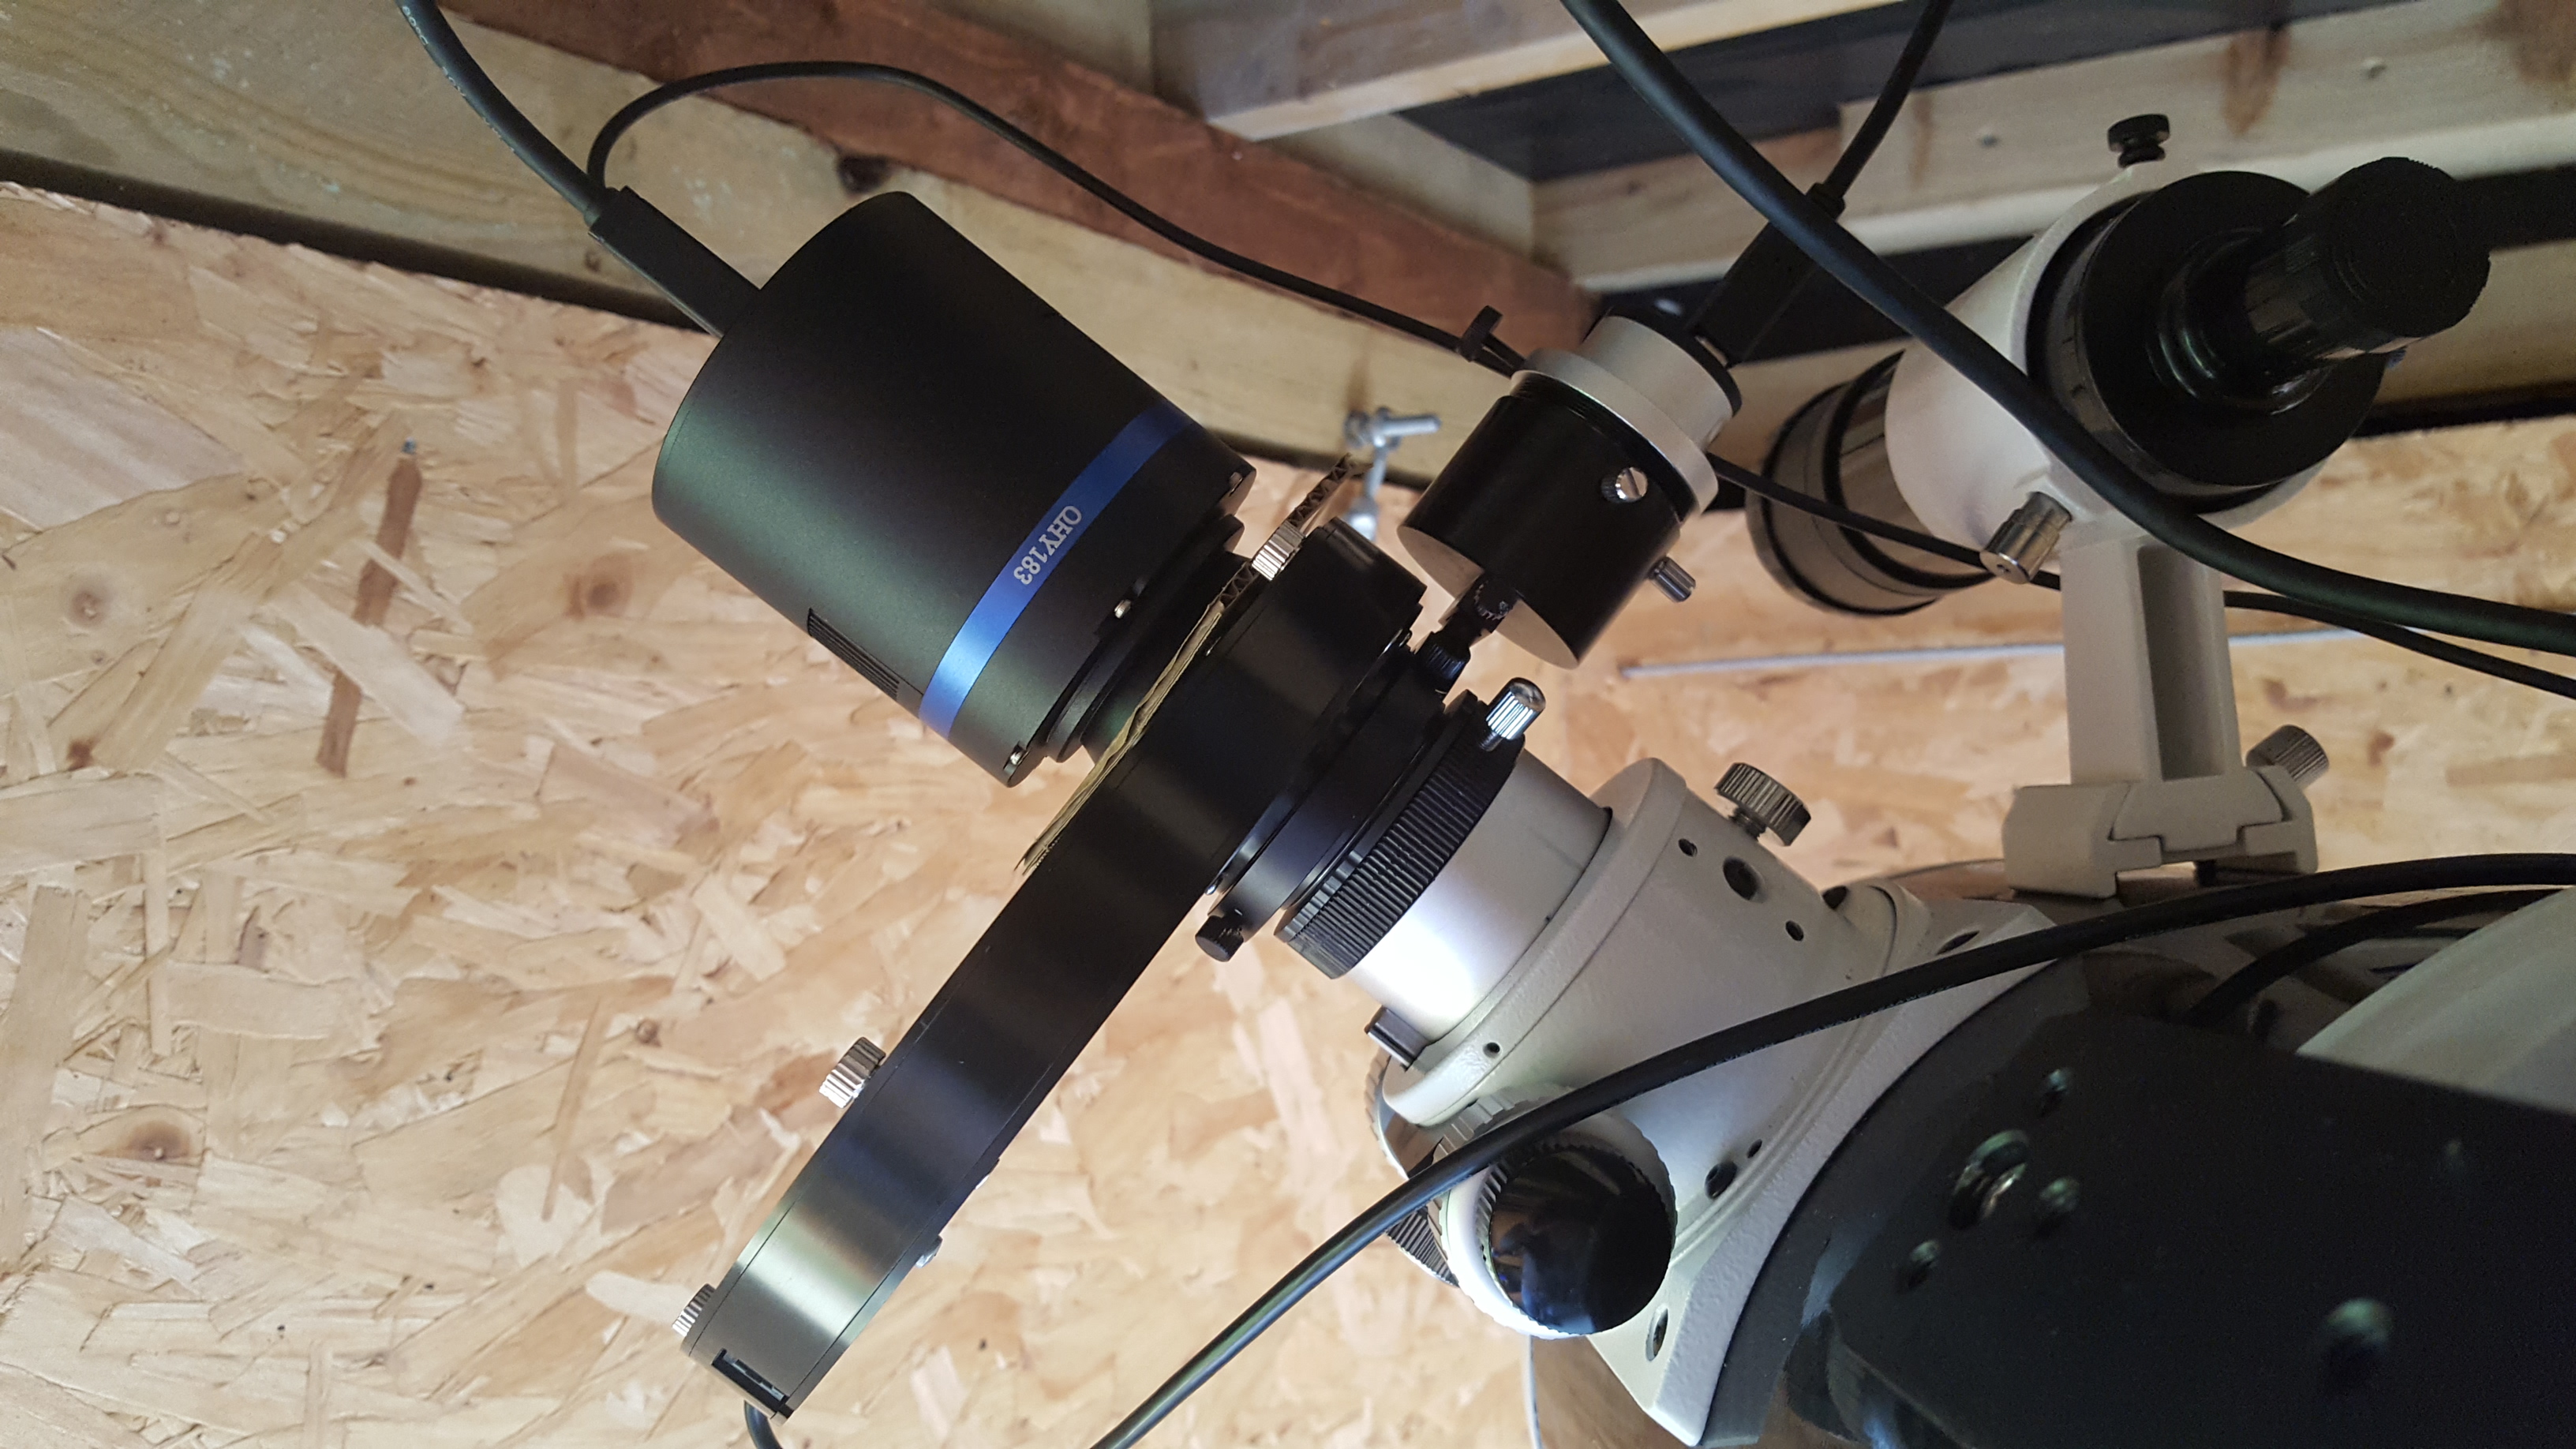
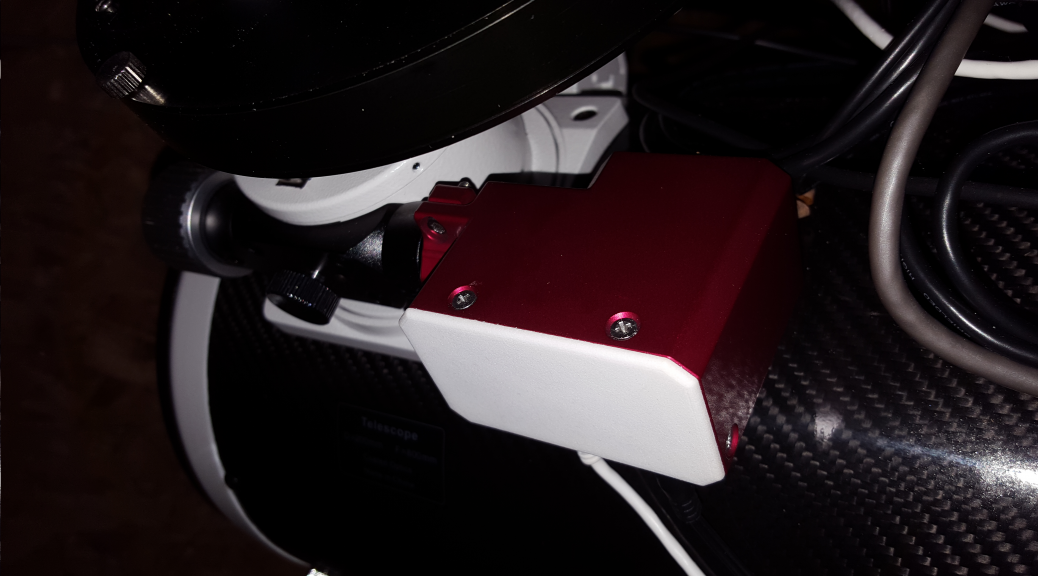
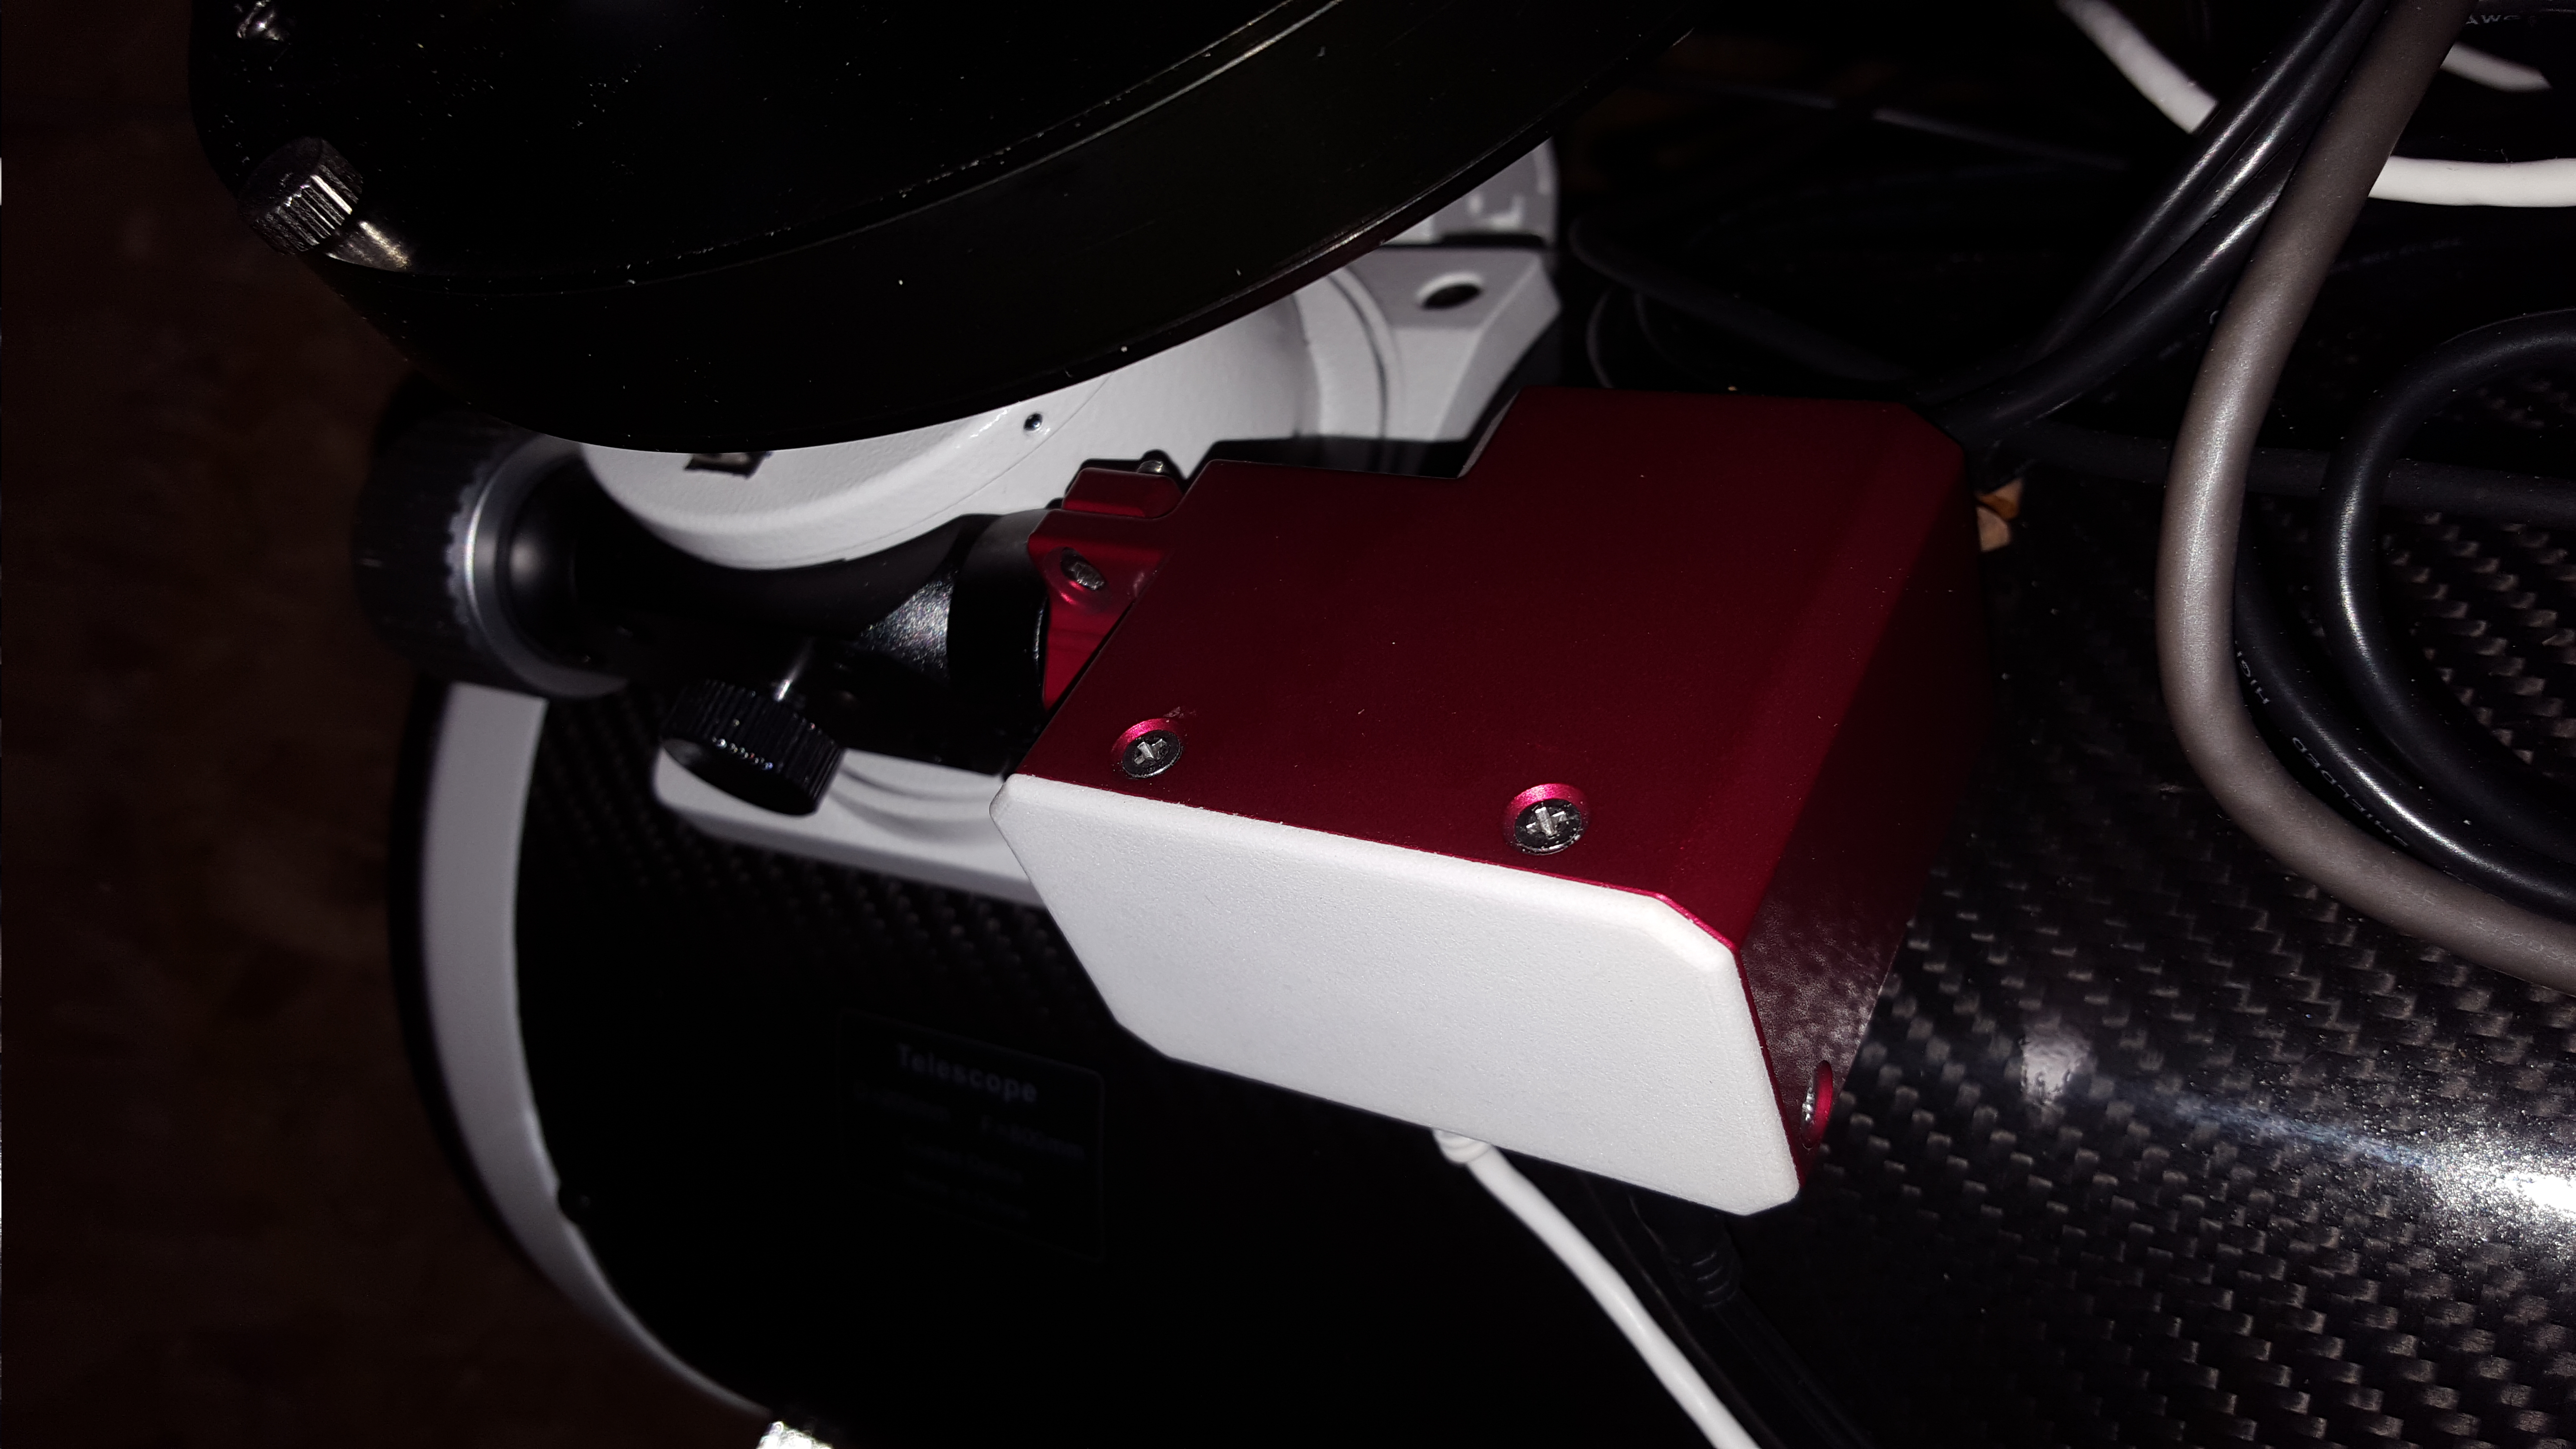
Installation was fairly easy and straight forward, I removed the slow focusing knob off the focuser and attached the adapter for the Sky-Watcher that came with the Sesto Senso, so within 30 minutes it was successfully fitted. And I can still manually focus with the fast focusing knob on the other side of the focuser:

After all the physical installation was done, I then needed to install the software on the observatory PC, since I image using Sequence Generator Pro, I proceeded to install Sesto Software and the ASCOM driver so that SGPro could talk to the focuser, again this was relatively simple to do. Once this was completed it was important to load up the Sesto software and perform a calibration so that the Sesto Senso knows where the most innner and outer focus positions are.

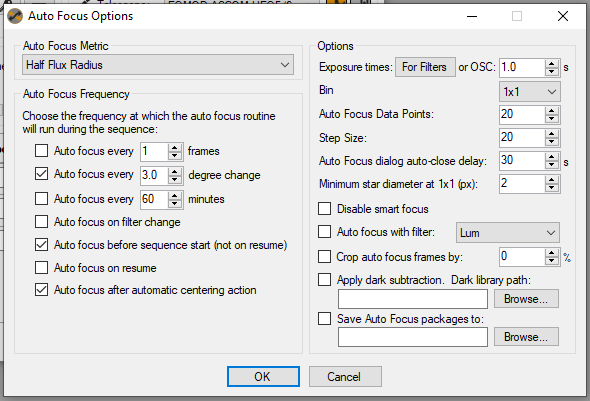
Setting the Focus Control module in SGPro was a breeze, for this I used a Focusing Mask to get a rough focus and set that point for all of my filters, now the following setting are what works for me really well, but basically:

  • I use 20 data points to achieve focus.
  • Step size between focus points is 20
  • Focus frame is 10 seconds for all filters, this is to get a better normalised focus frame, I was finding 5 seconds was too short and gave un-predictable results.
  • I set it to re-focus after a temperature change of 3.0 Degrees C since the last focus.
  • I re-focus on any centering action which is useful if you use a mirrored telescope like me.
Sequence Generate Pro Auto Focus settings
You can see here that my start off point is 50146, so it will go 10 points either direction of this point at 20 steps per point

I have now been using the Sesto Senso for a few months now and it has not failed me, I maintain a good FWHM value throughout the night and it an awesome piece of kit, well done Primaluce Labs. Is there anything that I would change about it?

Only one thing…….It requires separate power, which in all honesty I can understand why but if I could run the power through USB that would be a bonus.

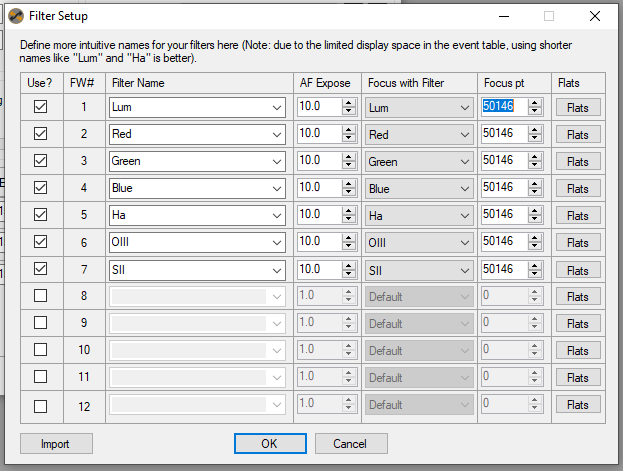
One problem I have with the Auto Focus routine in SGPro is that in the image sequence, since my filters for LRGB are all parfocal, but my Narrowband filters are not, I only wish to focus on a filter change if it’s going from LRGB to Narrowband to LRGB or Narrowband to Narrowband, unfortunately SGPro doesn’t have that intelligence in the sequence, I am trying to persuade Jared to have that in there to make life that bit more simple.

Anyway I hope this review inspires you to consider this awesome piece of kit, it’s certainly helped me!

M51 – Whirlpool Galaxy in LRGB

Another Image that I have previously imaged with the Atik Camera, again demonstrating a different resolution obviously showing off a bit more detail, here’s the image previously:

Equipment Used:
Imaging Scope: Sky-Watcher Quattro 8″ F4 Imaging Newtonian
Imaging Camera: Qhyccd 183M 20mpx ColdMOS Camera at -20C
Guide Scope: Sky-Watcher Finder Scope
Guide Camera: Qhyccd QHY5L-II
Mount: Sky-Watcher EQ8-Pro GEM Goto Mount
Filterwheel: Starlight Xpress Ltd 7x36mm EFW
Filters: Baader Planetarium 36mm LRGB Filters

Software:
Image Acquisition: Main Sequence Software SGPro 3
Guiding: PHD2
Image Processing: PixInsight

Target Details:
Name: M51 / NGC5194 / Whirlpool Galaxy
Constellation:Canes Venatici
RA: 13h 29m 53.00s
Dec: 47° 11′ 51.10″
Distance from Earth: >23 Million Light Years

Image Details:
Luminance: 101×150 Second Exposures
Red: 85×150 Second Exposures
Green: 85×150 Second Exposures
Blue: 85×150 Second Exposures
Total Exposure Time: 14.83 Hours

Acquisition Dates: 6 Apr 2018, 19/20/21 Apr 2018, 5/6/7/8/9 May 2018


Leo Triplet in LRGB

This is not the first time I have imaged this trio of trespassers, I have imaged them before on the same scope but with my previous Atik 383L+ CCD Imager, so again similar to M81 and M82, you can clearly see the difference in resolution the new camera offers, here’s the previous image taken from my previous post here:

Equipment Used:
Imaging Scope: Sky-Watcher Quattro 8″ F4 Imaging Newtonian
Imaging Camera: Qhyccd 183M 20mpx ColdMOS Camera at -20C
Guide Scope: Sky-Watcher Finder Scope
Guide Camera: Qhyccd QHY5L-II
Mount: Sky-Watcher EQ8-Pro GEM Goto Mount
Filterwheel: Starlight Xpress Ltd 7x36mm EFW
Filters: Baader Planetarium 36mm LRGB Filters

Software:
Image Acquisition: Main Sequence Software SGPro 3
Guiding: PHD2
Image Processing: PixInsight

Image Details:
Luminance: 101×150 Second Exposures
Red: 101×150 Second Exposures
Green: 101×150 Second Exposures
Blue: 101×150 Second Exposures
Acquisition Dates: 18/19/20/21 Apr 2018,  4/5/6/7/8/9 May 2018

Total Exposure Time: 16.83 Hours

Target Details: Leo Triplet
Constellation: Leo
RA: 11h 19m 36.15s
Dec: 13° 17′ 2.90″
Distance from Earth: 35 Million Light Years
Galaxies: M65 (Top Right), M66 (Bottom Right) and NGC3628 (Bottom Left) also known as The Hamburger Galaxy or Sarah’s Galaxy

M81 and M82 Bodes Galaxy and Cigar Galaxy in LHaRGB

After much waiting, I finally have the RGB Data to go with the luminance layer, a new learning curve was the HDR Compose process in PixInsight, I used this to include the 300S Exposures I had previously that were burning out the core.

Equipment Used:
Imaging Camera: Qhyccd 183M Back Illuminated ColdMOS Camera at -20C
Imaging Scope: Sky-Watcher 8″ Quattro F4
Mount: Sky-Watcher EQ8 Pro
Guide Camera: Qhyccd QHY5L-II
Guide Scope: Sky-Watcher 90×50 Finder
Filter Wheel: Starlight Xpress Ltd 7x36mm EFW
Filters: Baader Planetarium LRGB + 7nm Ha
Image Acquisition: Main Sequence Software SGPro
Image Processing: PixInsight

Image Details:
101x150S in LRGB, Total 16.83 Hours
25x300S in LRGB, Total 8.33 Hours
25x600S in Ha, Total 4.16 Hours
Total exposure time: 29.32 Hours
BIAS, Darks and Flats subtracted
Target: M81 and M82 in Ursa Major
Acquisition Dates: Feb. 11, 2018,  Feb. 12, 2018,  Feb. 16, 2018,  Feb. 23, 2018,  Feb. 24, 2018,  March 13, 2018,  March 14, 2018,  March 15, 2018,  March 16, 2018,  March 19, 2018,  March 20, 2018

M97 / NGC3587 – Owl Nebula in LHaRGB

I have imaged this before in the same frame as the Surfboard Galaxy, however the 0.62 Arcseconds Per Pixel the Qhyccd 183M gives me on my Sky-Watcher Quattro 8″ F4 gives me a much higher resolution image, so here it is, the Owl Nebula in the constellation of Ursa Major at a distance of 2030 Light years from Earth

Gear:
Imaging Scope: Sky-Watcher Quattro 8″ F4 Imaging Newtonian
Imaging Camera: Qhyccd 183M 20mpx ColdMOS Camera at -20C and DSO Gain
Mount: Sky-Watcher EQ8 Pro
Guide Camera: Qhyccd QHY5L-II Mono
Guide Scope: Sky-Watcher 50×90 Finder Scope
Filter Wheel: Starlight Xpress Ltd 7x36mm EFW
Filters: Baader Planetarium 36mm RGB
Coma Corrector: Sky-Watcher Aplanatic Coma Corrector
Image Acquisition: Main Sequence Software SGPro
Image Processing: PixInsight

Image Details:
Target: M97/NGC3587 – Owl Nebula
Constelation: Ursa Major
Red: 27x300S
Green: 27x300S
Blue: 27x300S
Ha: 25x600S
Darks: 51x300S
Flats: 101
Bias: 251 converted to SuperBIAS and deducted from Flats
Imaging Dates: Feb. 12, 2018,  Feb. 16, 2018,  Feb. 24, 2018,  Feb. 25, 2018

PixInsight Image processing workflow:
1. Calibrated against darks and Bias Subtracted Flats
2. Star Alignment for all RGB and Ha Frames
3. Least noise frame from each colour chosen as Normalization Frame and Dynamic Background Extraction Performed
4. Normalization of all frames
5. Stacking of frames and generation of drizle data (for larger quality image in future)
6. Performed LinearFit using Red stacked image as reference for RGB Frames
7. Performed DynamicCrop on all channels and Ha
8. Performed MultiMedianTransformation to reduce background noise
9. Performed SCNR to remove excessive green in image
10. Stretched the image using HistogramTransformation
11. Performed an Unsharp Mask on RGB and HA Data
12. Performed an ATWT on the Background
11. Merged the Ha Data using the HaRVB-AIP Script in PixInsight
12. Performed a CurvesTransformation to bring out the star colour

IC434 – Horsehead Nebula in LRGB

My first RGB Image from the Qhyccd 183M 20mpx Back Illuminated ColdMOS Camera, so here’s what I hope is one of many images taken with this awesome camera

Gear:
Imaging Scope: Sky-Watcher Quattro 8″ F4 Imaging Newtonian
Imaging Camera: Qhyccd 183M 20mpx ColdMOS Camera at -20C and DSO Gain
Mount: Sky-Watcher EQ8 Pro
Guide Camera: Qhyccd QHY5L-II Mono
Guide Scope: Sky-Watcher 50×90 Finder Scope
Filter Wheel: Starlight Xpress Ltd 7x36mm EFW
Filters: Baader Planetarium 36mm RGB
Coma Corrector: Sky-Watcher Aplanatic Coma Corrector
Image Acquisition: Main Sequence Software SGPro
Image Processing: PixInsight

Image Details:
Target: IC434 – Horsehead Nebula
Constelation: Orion
Red: 19x300S
Green: 19x300S
Blue: 19x300S
Darks: 51x300S
Flats: 101
Bias: 251 converted to SuperBIAS and deducted from Flats

Data acquired on: Feb. 9, 2018,  Feb. 11, 2018,  Feb. 15, 2018

PixInsight Image processing workflow:
1. Calibrated against darks and Bias Subtracted Flats
2. Star Alignment
3. Least noise frame from each colour chosen as Normalization Frame and Dynamic Background Extraction Performed
4. Normalization of all frames
5. Stacking of frames and generation of drizle data (for larger quality image in future)
6. Performed LinearFit using Red stacked image as reference
7. Performed MultiMedianTransformation to reduce background noise
8. Performed SCNR to remove excessive green in image
9. Stretched the image using HistogramTransformation
10. Performed a CurvesTransformation to bring out the star colour

Right now I have not performed any Sharpening of the image, nor have I added the Ha data to this image, I’ll post an updated image when I get round to doing that

QHY183M Review – Part 1

After much waiting (due to delays on Sony Sensors) I have finally received my QHY183M ColdMOS camera from QHYCCD which I collected from ModernAstronomy last weekend, so I apologise for the really bad weather we’ve had.

As you all know, for the past few years I have been using an Atik 383L+ Mono 8.3Mpx CCD Camera, so when QHY announced the QHY183C I immediately asked them if there was going to be a mono version to which they said….Yes!

So firstly you might ask why I chose the QHY183 camera?  Well the simple reason for this is that it offered me a higher pixel resolution for almost the same field of view that my Atik 383L+ offered, however there were other factors that swayed my decission:

  • Back Illuminated Sensor
  • High Quantum Efficiency (QE)
  • Optimal Cooling
  • Lightweight

So let’s first of all talk about the back illumination and what this means to astrophotography.  Typically CMOS sensors are orientated with the light receiving surface and the transistors/wiring facing the light, so when imaging it is possible to get reflections of light bouncing off the circuitry, with a back illuminated sensor, all the circuitry are on the underside of the surface that faces the light, thus elliminating the possibility of reflections bouncing off the transistors, the following image shows this in a bit more detail (Courtesty of QHYCCD):

So obviously the more light we can get to the imaging surface the better it is for our data acquisition, every photon counts right?!

The QHY183M has an extremely high Quantum Efficiency (QE) of 84% which means that more data is absorbed by the chip than my previous imaging camera which had a QE of just over 60% based on the KAF-8300 sensor from Kodak.

One of the first things I tested when I unpacked the camera was the cooling system, I wanted to know how good the cooling system was, QHY stated between 40-45C Delta, so considering the outside temperature was +5C I managed to get the camera down to -41.6C which was a delta slightly above the 45C promised by QHY, so considering I typically image at -20C this now means I can image when the outside temperature at night is even as high as +25C which typically doesn’t happen in the UK.  I also noticed that the QHY183M uses less current than my 383L+ did to get ot the same temperature, so another bonus of less power requirement.

Weight is always an astrophotographers enemy, so it was much to my delight that the QHY183M weighs a lot less than my ATIK 383L+ did, the 383L+ weighed in around 700g and the QHY183M weighs in around 450g.

Out of the box
My first impression of the camera is that it is well built, a bit more of a compact design in comparison to my previous camera, has a USB3.0 connector (even though I am still using USB 2.0) and has a port to connect a dessicant tube to if required.

Software Installation
Driver installation was relatively straight forward, if you are using a third party imaging program like Sequence Generator Pro, make sure you install the ASCOM drivers so that SGPro can then speak to the camera.  In SGPro there are options for Gain settings, according to QHY the unity gain for the 183M is 11, so I have mine set to this value in SGPro.

Image Download Speed
After completing my dark frames library, I noticed that the download speed from Camera to Observatory PC was much much faster than my Atik was, even though I am using the same USB 2.0 Hub, on the Atik it could take anywhere up to 20 seconds to download the image at 1×1 binning, obviously the QHY183M is a much bigger sensor at 20mpx, however the image download time is circa 5 seconds which reduces image acquisition time greatly for multiple exposures.

Dark Frames
My dark frame library is completed, below are four different exposure times, 90, 180, 300 and 600 seconds, each image consists of 25 frames combined using PixInsight

90 Seconds:

180 Seconds:

300 Seconds:

600 Seconds:

As you can see the darks are really good, if you stretch out the images you will see the AMP glow on the right side of the image, this will be removed in dark frame subtraction and is a common artifact on all CMOS based imagers.

I did have the occasional icing issue on my 383L+, however the QHY183M has a heated optical window, so time will tell on how often I will need to use the dessicant tube.

Conclusion so far…before imaging

Pros:

  • Excellent design.
  • Lightweight.
  • Very predictable cooling system cools to -45C below ambient.
  • Cooling system is much quieter than my previous camera
  • Less current draw versus my previous camera.
  • Easy software installation.
  • Very fast download speed of around 5 seconds per frame at 1×1 Binning.
  • Very high QE of 84%

Cons:

  • AMP glow, I am probably being a bit mean considering all CMOS based cameras are subjected to this.
  • M42 thread on the camera is not long enough for the StarlightXpress EFW, I had to place a piece of card between the camera and the Filterwheel otherwise the camera just keeps spinning round and doesn’t tighten.
  • There’s no electronic shutter like my previous camera, which means for my dark frames it has to be completely dark in the observatory

I hope this review is beneficial to you all, especially if you are considering either the 183C or the 183M.  I will post part 2 of my review when I have actually got it all focused and acquired some photons from the sky.

M97 and M108 – Owl Nebula and Surfboard Galaxy in LRGB

M97 and M108

The Owl Nebula (also known as Messier 97, M97 or NGC 3587) is a planetary nebula located approximately 2,030 light years away in the constellation Ursa Major.  It was discovered by French astronomer Pierre Méchain on February 16, 1781

Messier 108 (also known as NGC 3556) is a barred spiral galaxy in the constellation Ursa Major. It was discovered by Pierre Méchain in 1781 or 1782. From the perspective of the Earth, this galaxy is seen almost edge-on.

The image consists of the following
23x180S – Red
23x180S – Green
23x180S – Blue
25x180S – Luminance

25 Darks, 25 Flats and 25 BIAS frames have also been applied

Equipment Used:-
Imaging Scope: Sky-Watcher Quattro Series 8-CF F4 Imaging Newtonian
Flattener: Sky-Watcher Aplanatic Coma Corrector
Imaging Camera: Atik Cameras 383L+ Mono CCD -20C
Guide Scope: Celestron Telescopes C80ED Reftractor
Guide Camera: Qhyccd QHY5L-II
Mount: Sky-Watcher EQ8 Pro
Filterwheel: Starlight Xpress Ltd 7x36mm EFW
Filters: Baader Planetarium 36mm Unmounted LRGB
Image Capture: Main Sequence Software SGPro
Image Stacking: Maxim-DL
Image Processing: PixInsight

Leo Triplet of Galaxies

Leo Triplet In LRGB (above) and LRGB+HA (below)

The Leo Triplet consists of three galaxies at a distance of around 35 million light years, M65 (top right), M66 (bottom right) and NGC3628 (left).  I have always aimed at imaging the triplet since I started imaging but never got around to it.

M65 (NGC 3623) and M66 (NGC 3627) are classed as intermiediate spiral galaxies and NGC3628 is also known as the Hamburger Galaxy or Sarah’s Galaxy and is classed as an Unbarred Spiral Galaxy.

The image consists of:-
29x300S of Luminance
14x300S Red, Green and Blue
15x600S of 7nm HA in the LRGB+HA Image
25 Darks and flats subtracted from all frames

Equipment Details:
Imaging Telescope: Sky-Watcher Quattro 8-CF F4 Imaging Newtonian
Imaging Camera: Atik Cameras 383L+ Mono CCD
Coma Corrector: Sky-Watcher Aplanatic Coma Corrector
Guide Camera: Qhyccd QHY5L-II
Guide Scoope: Celestron Telescopes C80ED Refractor
Mount: Sky-Watcher EQ8 Pro
Filter Wheel: Starlight Xpress Ltd 7x36mm USB EFW
Filters: Baader Planetarium LRGB + 7NM HA

Image Aquisition: Main Sequence Software SGPro
Image Pre-Processing and STacking: Maxim-DL
Post Processing: PixInsight

In my opinion, there’s only a subtle difference between the LRGB and LRGBHA images, personally I preffer the LRGB Version, the data was captured over multiple nights since the beginning of 2017 but in total gives 5.91 Hours on the LRGB Image and 8.41 Hours for the LRGB+HA Image

M81 and M82 Galaxies in LRGB+HA

By far my biggest challenging project to date, maybe not by image acquisition, but by processing.  The above two galaxies caused me lots of grief when trying to process, they just did not come out right with my normal method of processing, so I turned to PixInsight to process them, and I anm so glad I did, the whole learning curve put me back to almost the same level I was at in 2008, but the steep learning curve paid off

M81 and M82 Galaxies in Ursa Major

Image Details
29x300S in LRGB
17x600S in 7nm HA
25 Darks and 25 Flats applied

Equipment Details:
Mount: Sky-Watcher EQ8 Pro
Imaging Scope: Sky-Watcher Quattro 8-CF 8″ Newtonian F4
Imaging Camera: Atik Cameras 383L+
Guide Scope: Celestron Telescopes C80ED
Guide Camera: Qhyccd QHY5L-II
Filter Wheel: Starlight Xpress Ltd 7x36mm
Filters: Baader Planetarium LRGB+HA 36mm Unmounted

Proccessing:
Stacking and Combining: Maxim DL
Processing: PixInsight 1.8 x64

The images were taken over a number of nights since the beginning of december and totals 12.5 Hours of exposure time