Tag Archives: Quattro

The source to the halo around bright stars

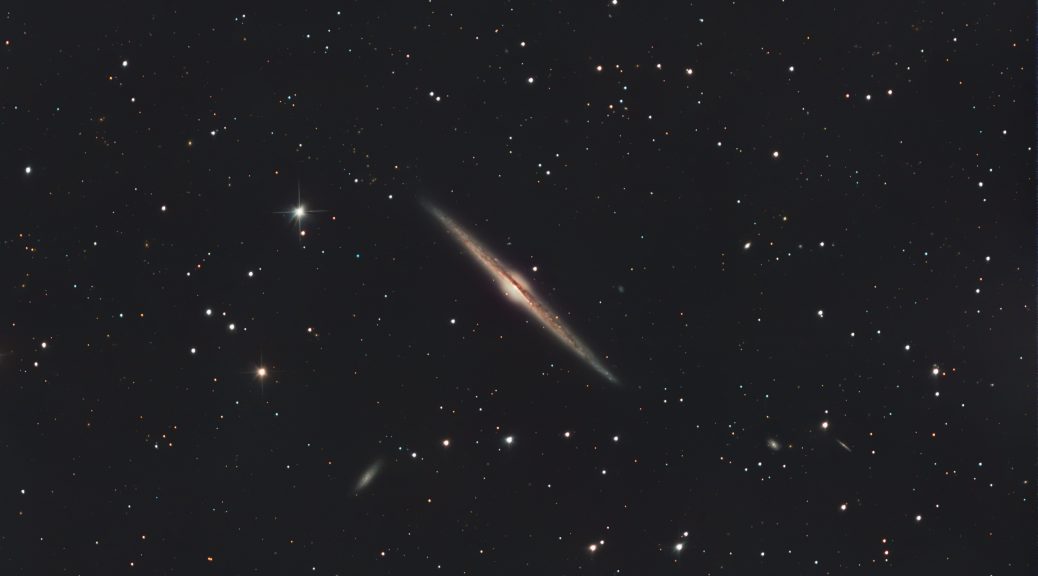
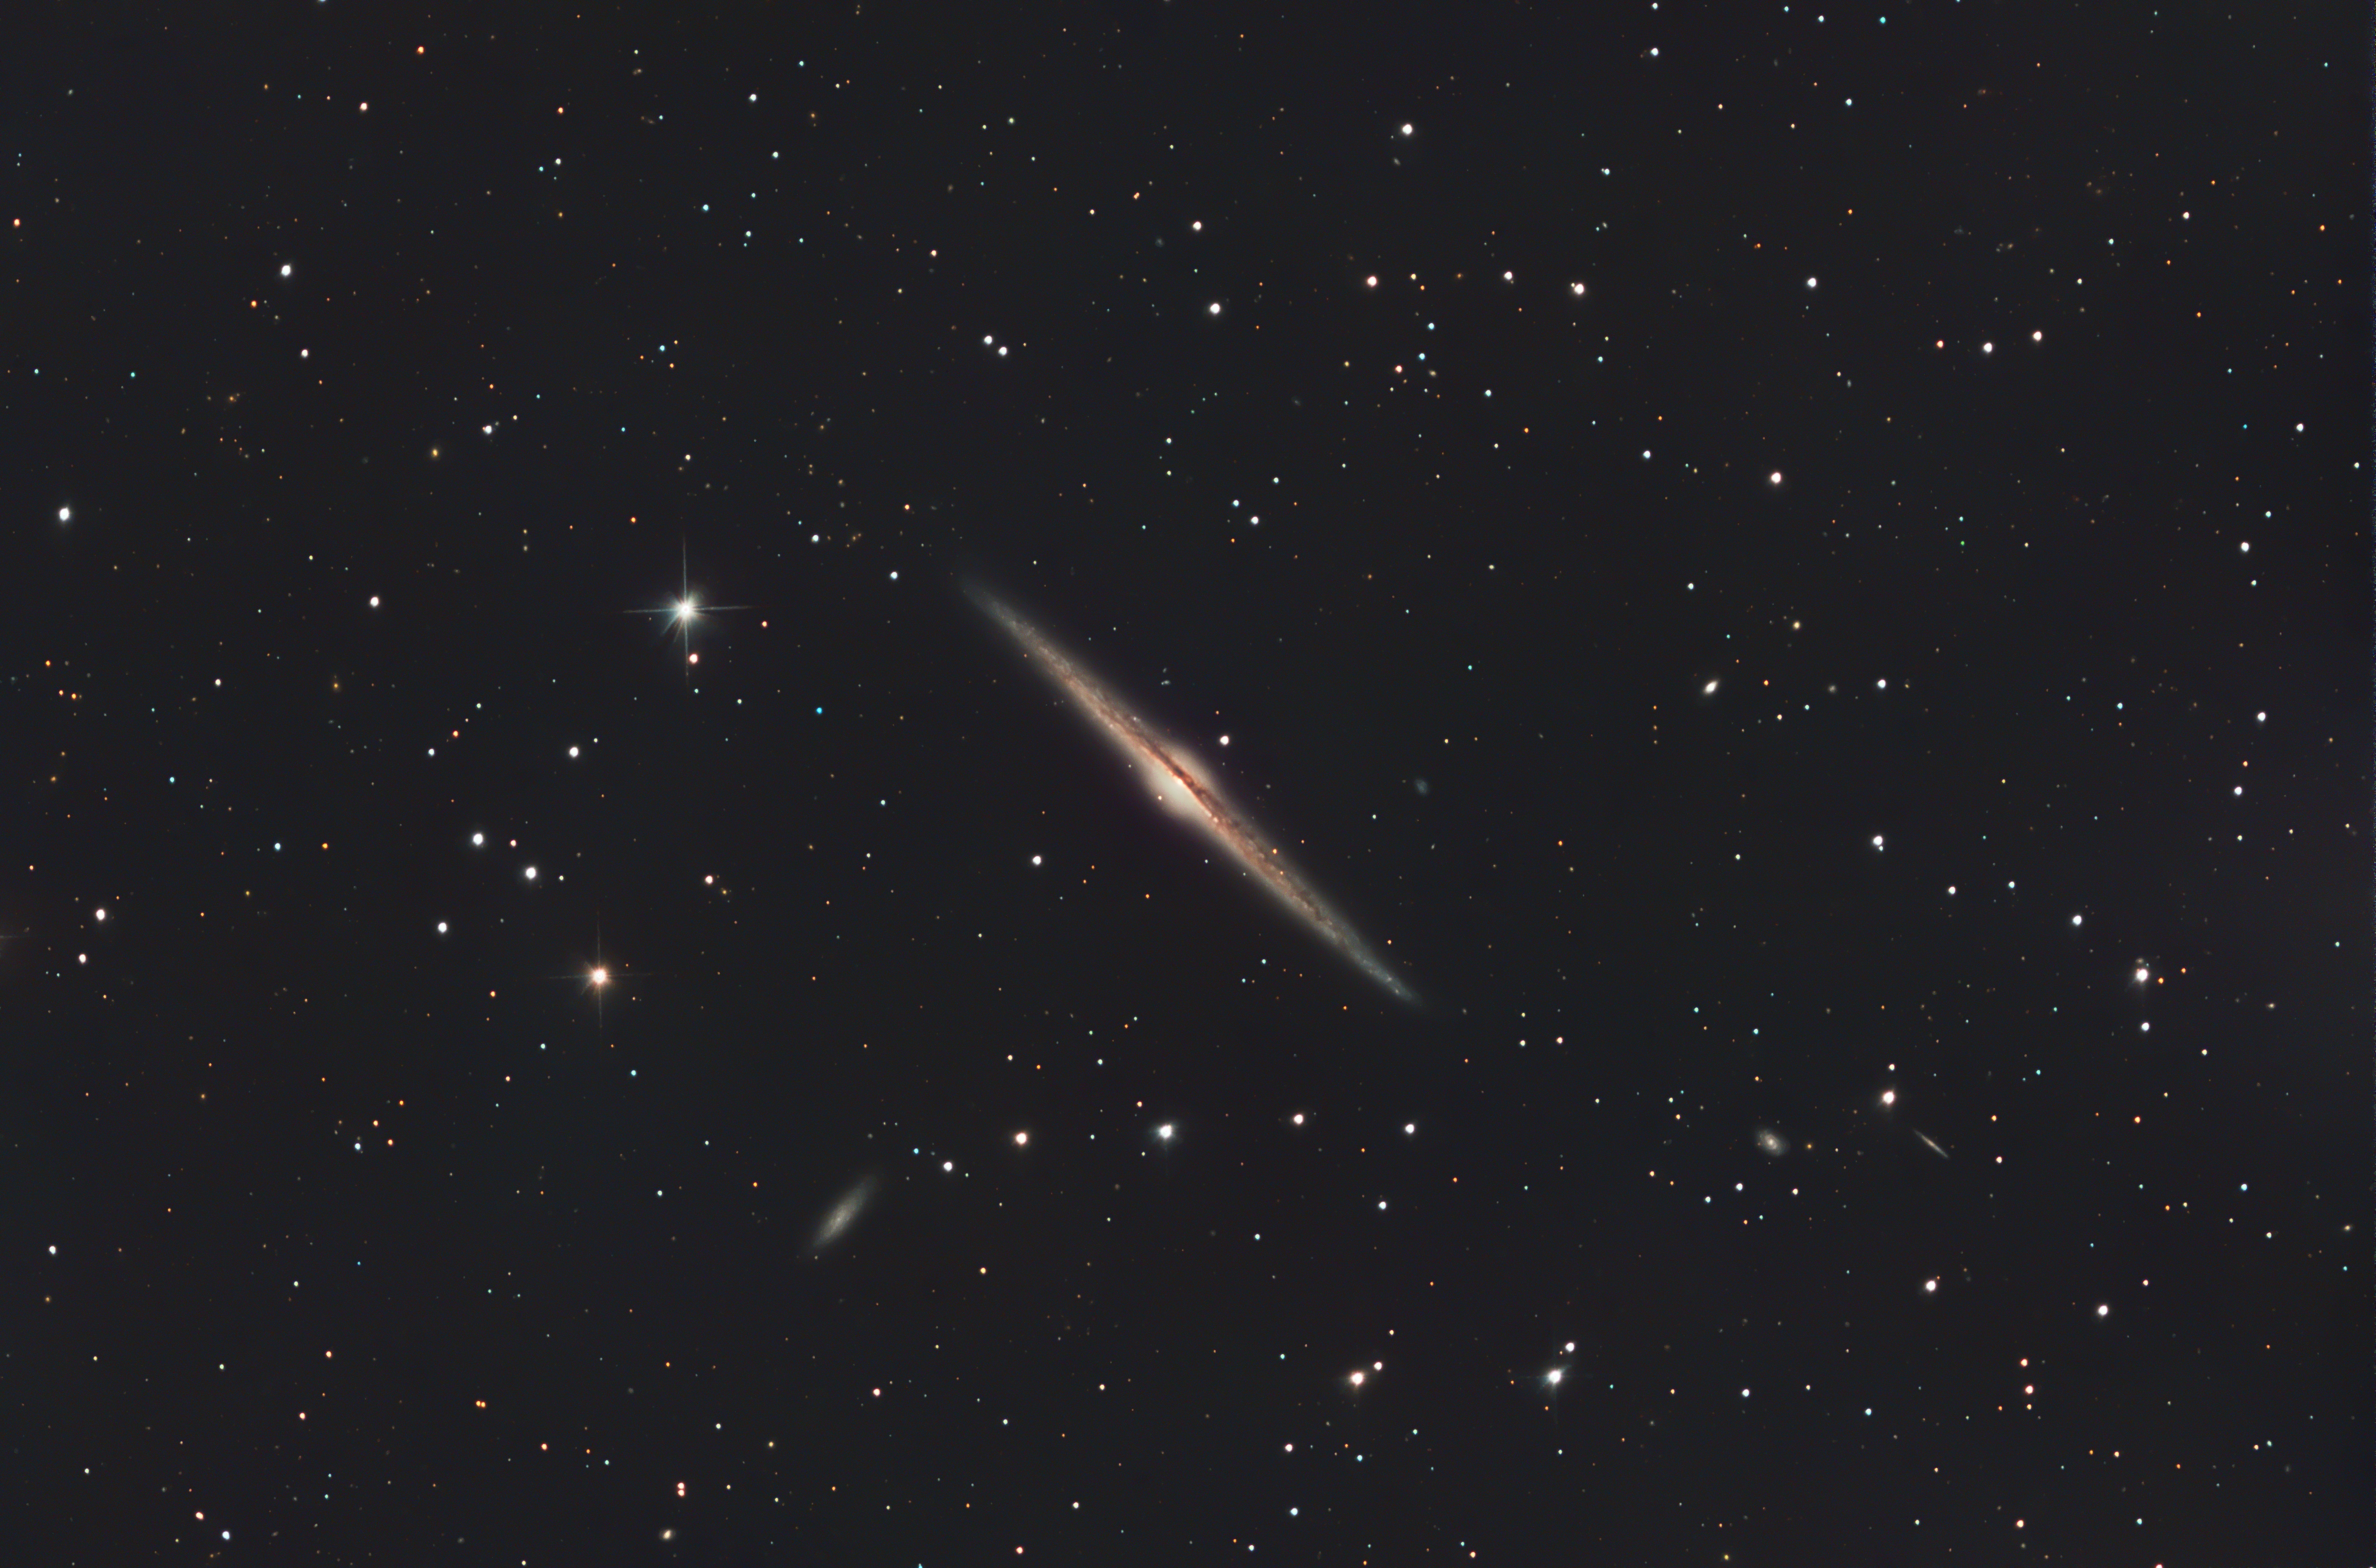
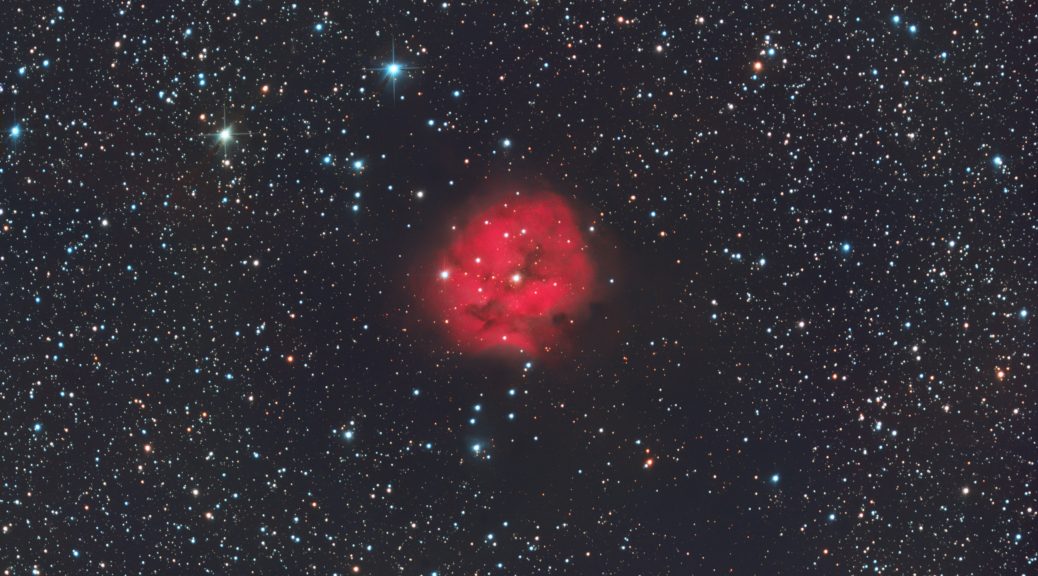
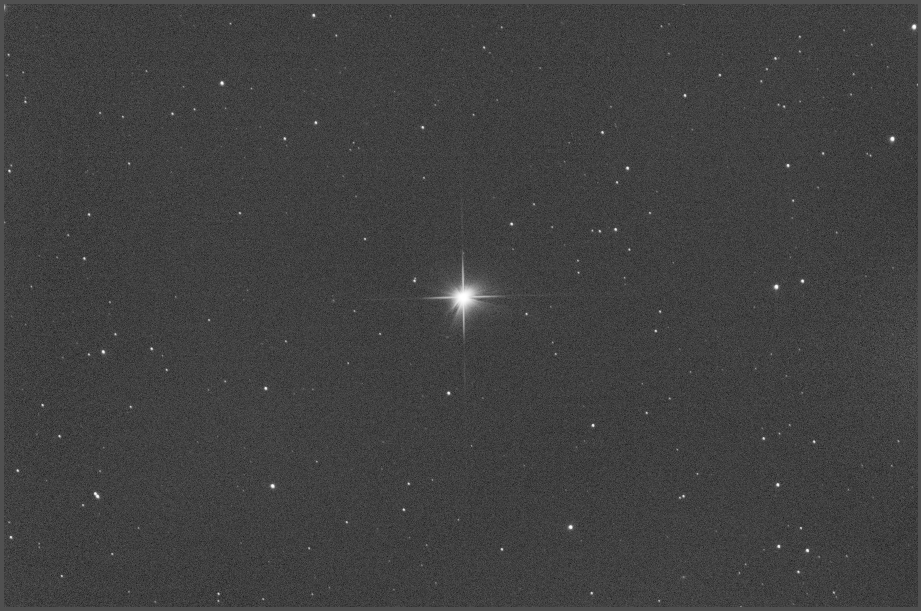
When I moved to the Sky-Watcher Quattro telescope I noticed some bizzare halo’s around bright stars in my images, this was evident in both my Atik 383L+ CCD Camera as well as my QHY183M ColdMOS Camera when using the Quattro 8-CF at F4, if you browse my galleries you will see what I mean, and it was more noticable in my Narrowband images. Below is one of my recent images where you can see the halo around Magnitude 3.9 star 15 Mon in the Christmas Tree Cluster / NGC2264.

I contacted Baader back in February 2019 since all of my filters were Baader, and I noticed that the Halo was present in all of my filters but significantly less in Red, but more prevalent in Narrowband filters, so the logical cause would be the filters. Baader immediately dismissed this to be the fault of their filters and suggested that my Coma Corrector be the root cause.

Not convinced that the Coma Corrector was causing the issue, I did some research online and came across a brilliant page on the Astronomik website where they claim to have resolved the majority of the Halo issue, and after reading the following line from the page I was convinced the filters were my issue:

In recent years very fast optical systems have become popular for imaging. The energy in a filter induced halo grows exponentially as the f-ratio decreases. Additional to this, the smaller the FWHM band pass of the filter, the stronger the halo.

The above line described my issue perfectly so I mentioned this to Baader who again dismissed the possibility of it being their filters and again put the blame firmly to my optical train. Again not happy, I contacted Astronomik and Eric emailed me back very promptly and offered to send me out one of their 6nm Ha filters to test. A few days ago the filter arrived and I was able to perform some testing against the Baader filter also for comparison on the same star.

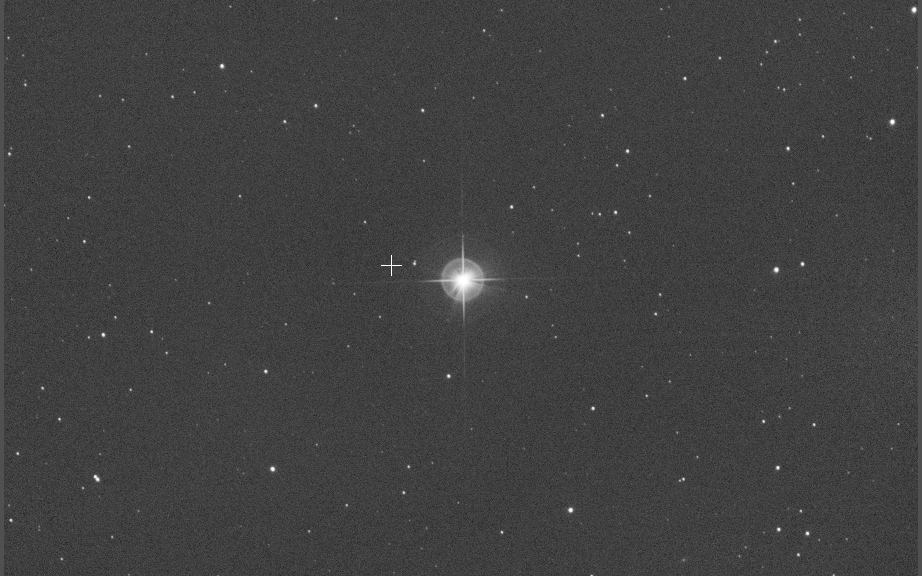
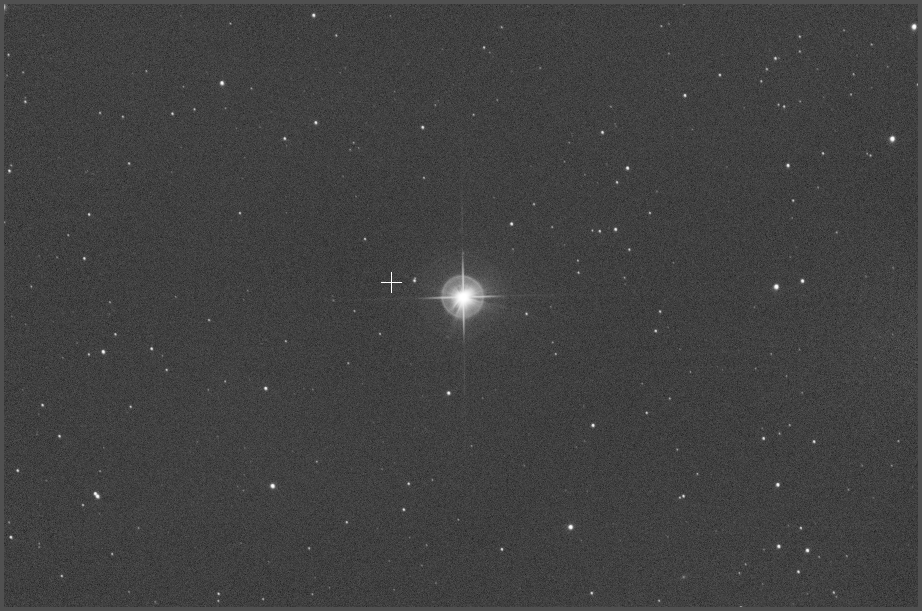
Since the star in my image above was of magnitude 3.9, I wanted to find something similar, so I found star Alhaud VI and proceeded to obtain 15x300S Exposures for each filter, and here are the results:

Astronomik 6nm HA filter, 15x300S with Darks and Flats applied
Baader 7nm Ha filter, 15x300S with Darks and Flats applied

So as you can see the Baader filter shows a high amount of Halo around the bright star and the Astronomik filter does not, now if this was something to do with the rest of the optical train there would be evidence in the Astronomik filter also.

Now I agree there will be some reflection in the optical train, all that glass in the coma corrector, the glass on the camera etc, so I thought I would have a look at both images in a bit more detail, zoomed in on the stars there is what appears to be a slight halo in the same place on both images:

Astronomik 6nm Ha Filter
Baader 7nm Ha Filter

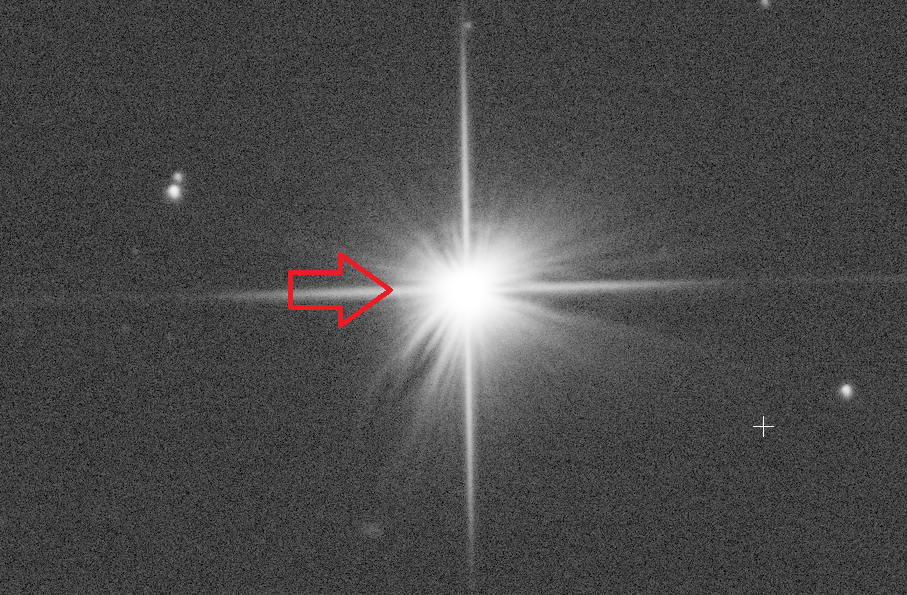
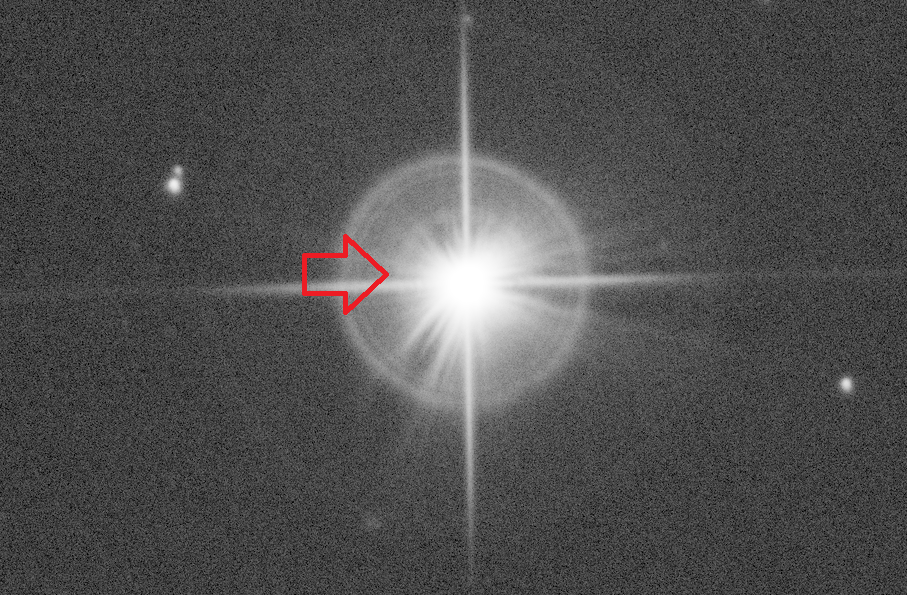
So both filters show the Inner Halo which in my opinion would not be visible in an image, but again clearly the Baader filter has some reflection issues happening as you can clearly see two additional Halos. The interesting thing about all three Halos is that the central one visible in both filters has no relationship to the distances between the other two in the Baader, however the two outer Halos on the baader are the same distance apart as the middle halo is from the star, so clearly this is some sort of reflection.

Conclusion:
Astronomik have done a fantastic job at eliminating Halo artifacts around bright stars, clearly the Baader filters are causing major Halo artifacts because if this was the optical train then it would be evident in the Astronimik filters also, I suspect that the Baader filters are not optimised for faster focal ratio imaging systems. I have provided this information to Baader and await a response from them.

Good job Astronomik Filters

M101 / NGC 5457 – Pinwheel Galaxy in RGB

M101 / NGC5457 or most commonly known as the Pinwheel Galaxy is a face on spiral galaxy in Ursa Major and has a distance of around 21 million light years from Earth.

The QHY183M picks up quite a lot of the Ha detail in this galaxy without me having to image separate Ha Filter data

Image Details:
101x150S in R
101x150S in G
101x150S in B

Total Capture time: 12.6 Hours

Acquisition Dates: Feb. 27, 2019, March 29, 2019, March 30, 2019, April 1, 2019, April 11, 2019, April 12, 2019, April 14, 2019

All frames had 101 Darks and Flats applied

Equipment Details:
Imaging Camera: Qhyccd 183M Mono ColdMOS Camera at -20C
Imaging Scope: Sky-Watcher Quattro 8″ F4 Imaging Newtonian
Guide Camera: Qhyccd QHY5L-II
Guide Scope: Sky-Watcher Finder Scope
Mount: Sky-Watcher EQ8 Pro
Focuser: Primalucelab ROBO Focuser
FIlterwheel: Starlight Xpress Ltd 7x36mm EFW
Filters: Baader Planetarium RGB
Power and USB Control: Pegasus Astro USB Ultimate Hub Pro
Acquisition Software: Main-Sequence Software Inc. Sequence Generator Pro
Processing Software: PixInsight 1.8.6

NGC4565 – Needle Galaxy in RGB

The Needle Galaxy is located int he constellation of Coma Berencies and is an edge on spiral galaxy at a distance of 30-50 million light years from earth

Image Details:
101x150S in R
101x150S in G
101x150S in B

Total Capture time: 12.6 Hours

Acquisition Dates: Jan. 28, 2019, Feb. 3, 2019, Feb. 25, 2019, Feb. 26, 2019, Feb. 27, 2019, March 26, 2019, March 29, 2019, March 30, 2019, April 1, 2019

Equipment Details:
Imaging Camera: Qhyccd 183M Mono ColdMOS Camera at -20C
Imaging Scope: Sky-Watcher Quattro 8″ F4 Imaging Newtonian
Guide Camera: Qhyccd QHY5L-II
Guide Scope: Sky-Watcher Finder Scope
Mount: Sky-Watcher EQ8 Pro
Focuser: Primalucelab ROBO Focuser
FIlterwheel: Starlight Xpress Ltd 7x36mm EFW
Filters: Baader Planetarium RGB
Power and USB Control: Pegasus Astro USB Ultimate Hub Pro
Acquisition Software: Main-Sequence Software Inc. Sequence Generator Pro
Processing Software: PixInsight 1.8.6

M78 / NGC 2068 in RGB

This is the first time I have ever imaged this object, I will re-visit next year when I will image at F2.8 with a wider field of view using a keller reducer.

Since this object is in the southern area of sky, I am limited by trees and the house on the data I can capture in a single night

Image Details:
101x150S – Red
101x150S – Green
101x150S – Blue

101 Darks, Flats and Dark Flats

Image Acquisition Dates: Jan. 1, 2019, Jan. 2, 2019, Jan. 8, 2019, Jan. 9, 2019, Jan. 27, 2019, Jan. 28, 2019, Jan. 30, 2019, Feb. 10, 2019, Feb. 20, 2019, Feb. 23, 2019, Feb. 24, 2019, Feb. 25, 2019

Equipment Used:
Imaging Camera: Qhyccd 183M Mono ColdMOS Camera at -20C
Imaging Scope: Sky-Watcher Quattro 8″ F4 Imaging Newtonian
Guide Camera: Qhyccd QHY5L-II
Guide Scope: Sky-Watcher Finder Scope
Mount: Sky-Watcher EQ8 Pro
Focuser: Primalucelab ROBO Focuser
FIlterwheel: Starlight Xpress Ltd 7x36mm EFW
Filters: Baader Planetarium RGB and Ha
Power and USB Control: Pegasus Astro USB Ultimate Hub Pro
Acquisition Software: Main-Sequence Software Inc. Sequence Generator Pro
Processing Software: PixInsight 1.8.6

PrimaluceLabs Sesto Senso Robo Focuser

Getting the best FWHM in your images is something that I have struggled with when imaging a whole night. As the temperature fluctuates, so does the FWHM in your images, this was a problem I had with my images at the beginning of the season. I looked around and the only focuser I could find was not a stepper motor focuser, so it didn’t offer predictable results. Since I am using the stock focuser for my Sky-Watcher Quattro 8-CF (and it’s a solid focuser at that), I did not really want to change focuser mid-season, so I did some research and landed upon the PrimaluceLabs Sesto Senso ROBO Focuser.

Now my expectations here were pretty low since I tried an electronic focuser and tried to use some sort of Auto Focus routine without any length of success, but when the Sesto Senso arrived I was excited as I looked at it and thought to myself that this would do the job.

Out of the box the Sesto Senso is very solid, good quality feel to it, and came with a bunch of different adapters for different focusers, one specifically for my Sky-Watcher Focuser too. I read the installation instructions a couple of times and set to work on upgrading my scope.

Installation
Installation was fairly easy and straight forward, I removed the slow focusing knob off the focuser and attached the adapter for the Sky-Watcher that came with the Sesto Senso, so within 30 minutes it was successfully fitted. And I can still manually focus with the fast focusing knob on the other side of the focuser:

After all the physical installation was done, I then needed to install the software on the observatory PC, since I image using Sequence Generator Pro, I proceeded to install Sesto Software and the ASCOM driver so that SGPro could talk to the focuser, again this was relatively simple to do. Once this was completed it was important to load up the Sesto software and perform a calibration so that the Sesto Senso knows where the most innner and outer focus positions are.

Setting the Focus Control module in SGPro was a breeze, for this I used a Focusing Mask to get a rough focus and set that point for all of my filters, now the following setting are what works for me really well, but basically:

  • I use 20 data points to achieve focus.
  • Step size between focus points is 20
  • Focus frame is 10 seconds for all filters, this is to get a better normalised focus frame, I was finding 5 seconds was too short and gave un-predictable results.
  • I set it to re-focus after a temperature change of 3.0 Degrees C since the last focus.
  • I re-focus on any centering action which is useful if you use a mirrored telescope like me.
Sequence Generate Pro Auto Focus settings
You can see here that my start off point is 50146, so it will go 10 points either direction of this point at 20 steps per point

I have now been using the Sesto Senso for a few months now and it has not failed me, I maintain a good FWHM value throughout the night and it an awesome piece of kit, well done Primaluce Labs. Is there anything that I would change about it?

Only one thing…….It requires separate power, which in all honesty I can understand why but if I could run the power through USB that would be a bonus.

One problem I have with the Auto Focus routine in SGPro is that in the image sequence, since my filters for LRGB are all parfocal, but my Narrowband filters are not, I only wish to focus on a filter change if it’s going from LRGB to Narrowband to LRGB or Narrowband to Narrowband, unfortunately SGPro doesn’t have that intelligence in the sequence, I am trying to persuade Jared to have that in there to make life that bit more simple.

Anyway I hope this review inspires you to consider this awesome piece of kit, it’s certainly helped me!