Tag Archives: collimation

Sharpstar 20032PNT F3.2 Paraboloid Astrograph Review

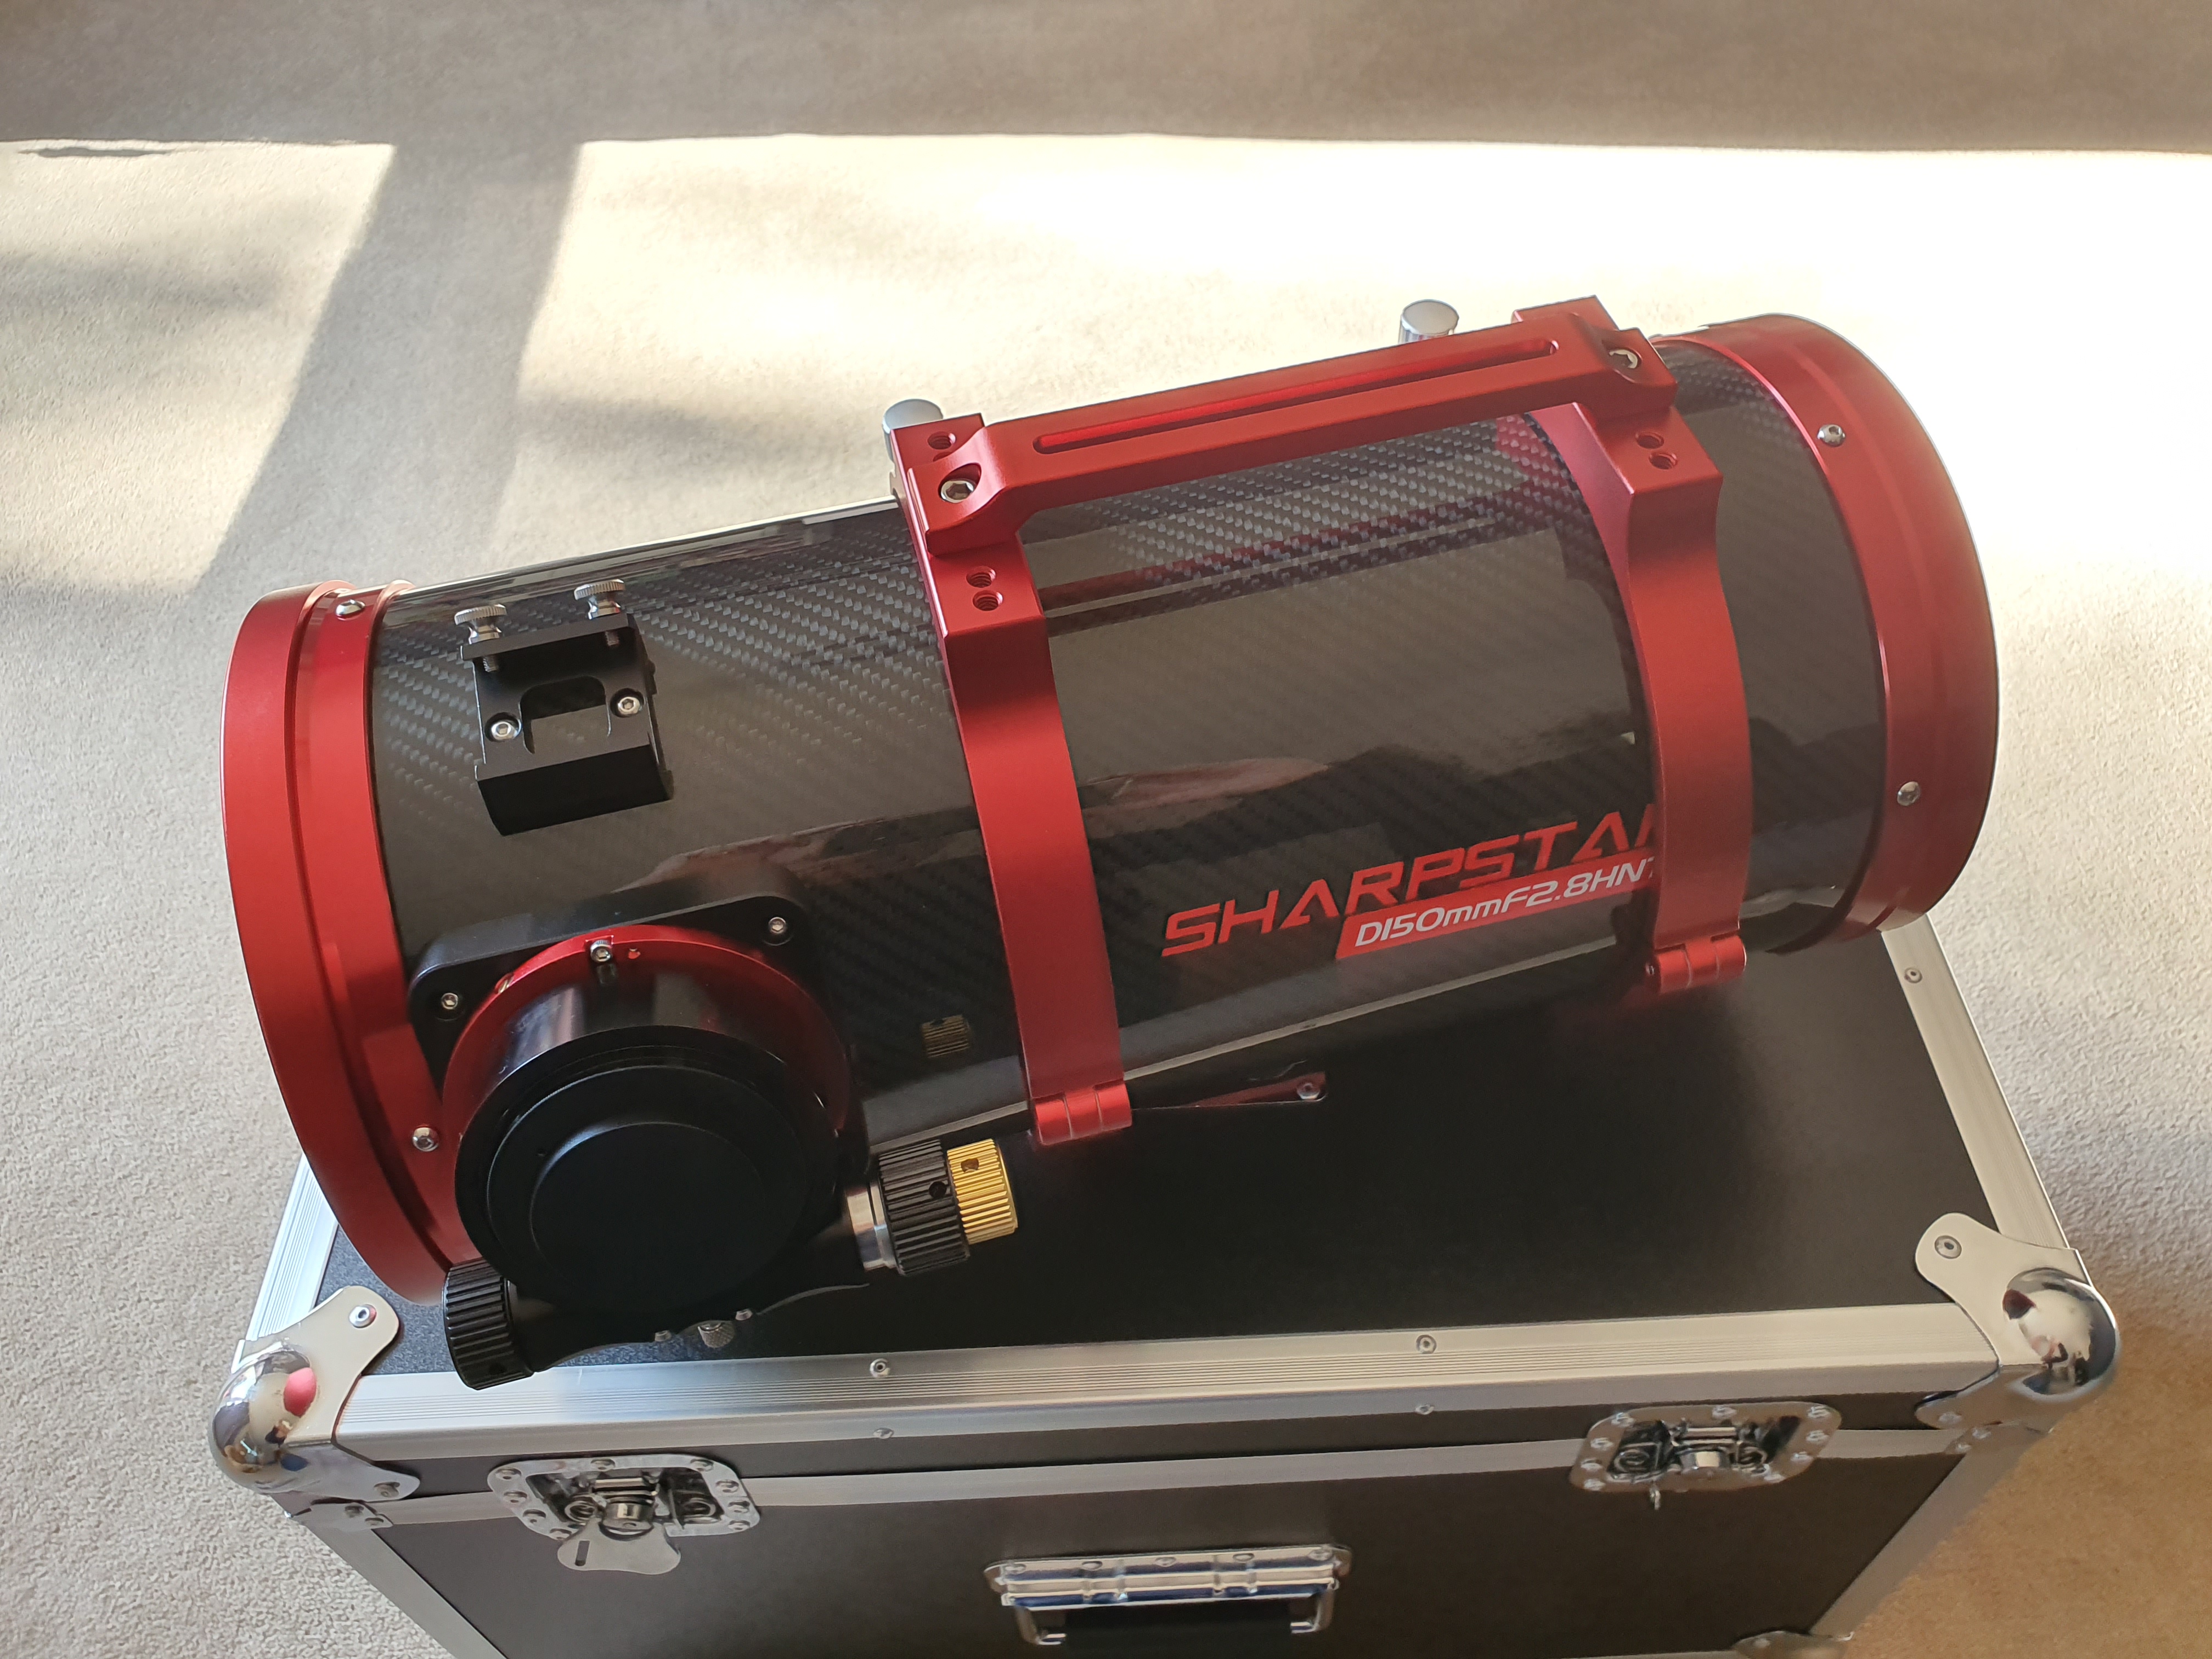
Having owned the Sharpstar 15028HNT, I decided I wanted a larger light bucket without really sacrificing on speed, so I opted for the big brother of the 15028HNT which is the SharpStar 20032PNT.

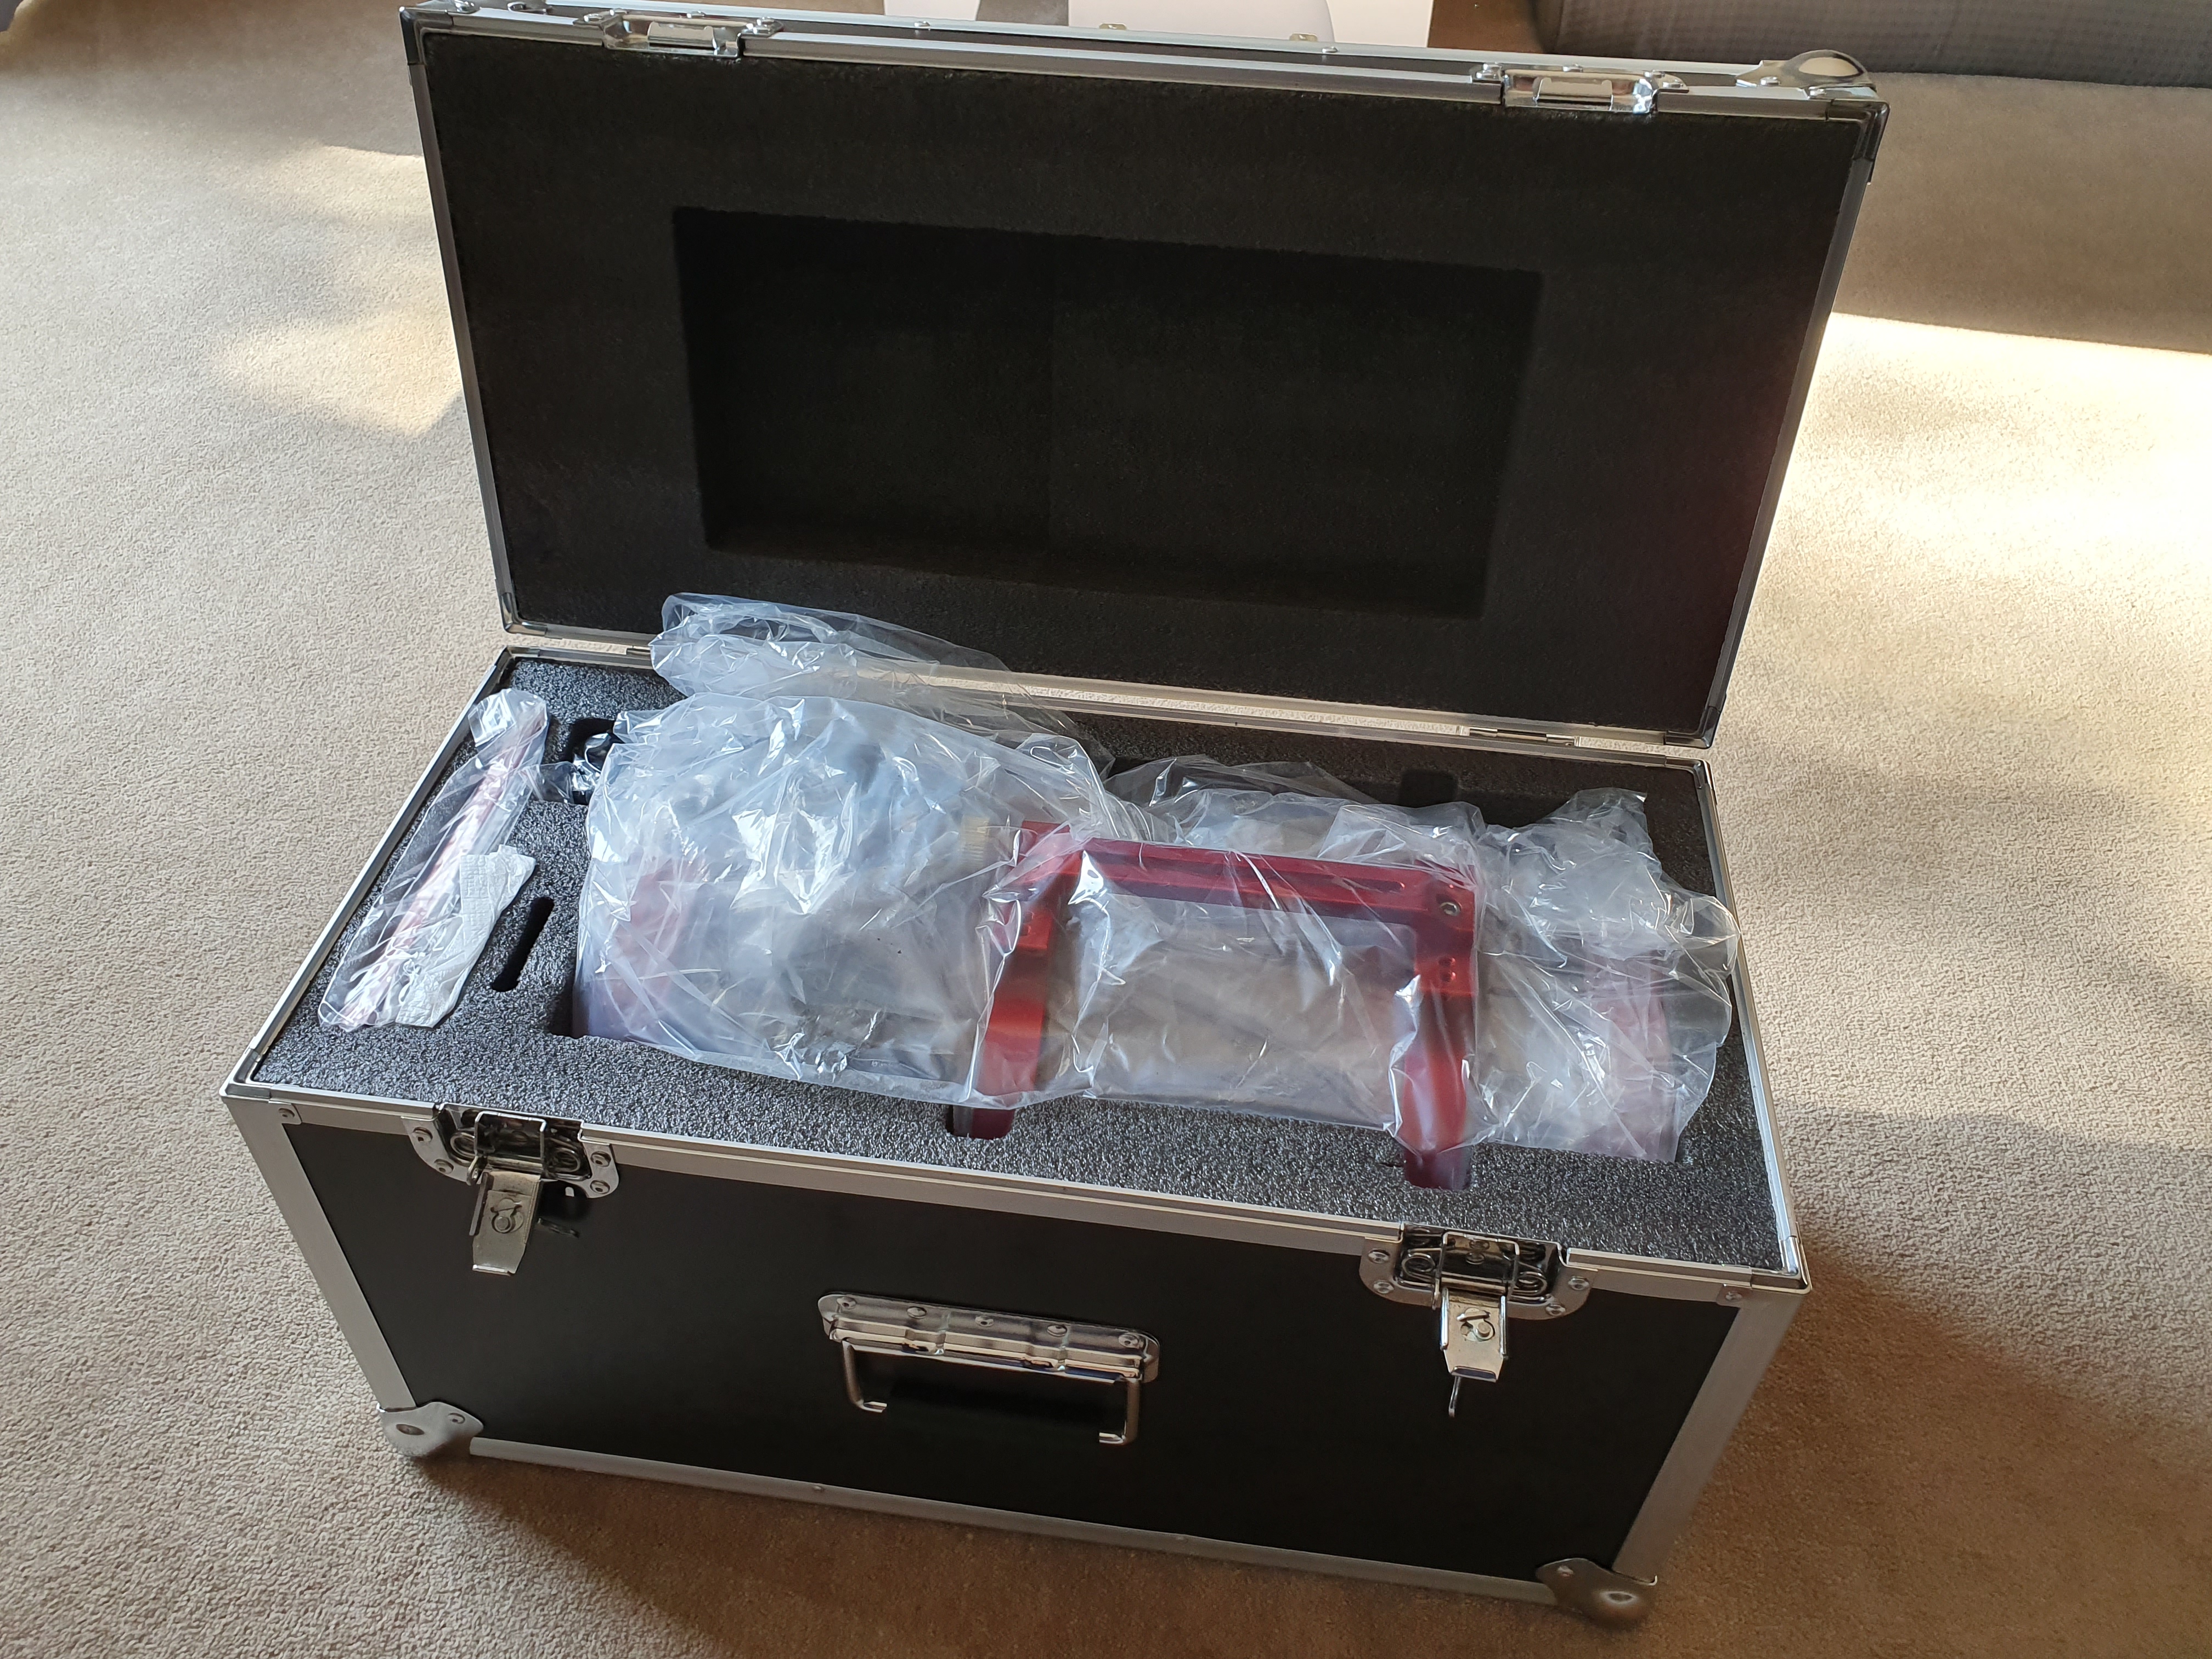
I picked up my 20032PNT from Zoltan at 365Astronomy, and could not wait to get it home and unbox it, so after removing it from not just one carboard box, but two, I was presented with a very large flight case, which evidently is a larger version than the one that came with the 15028HNT.

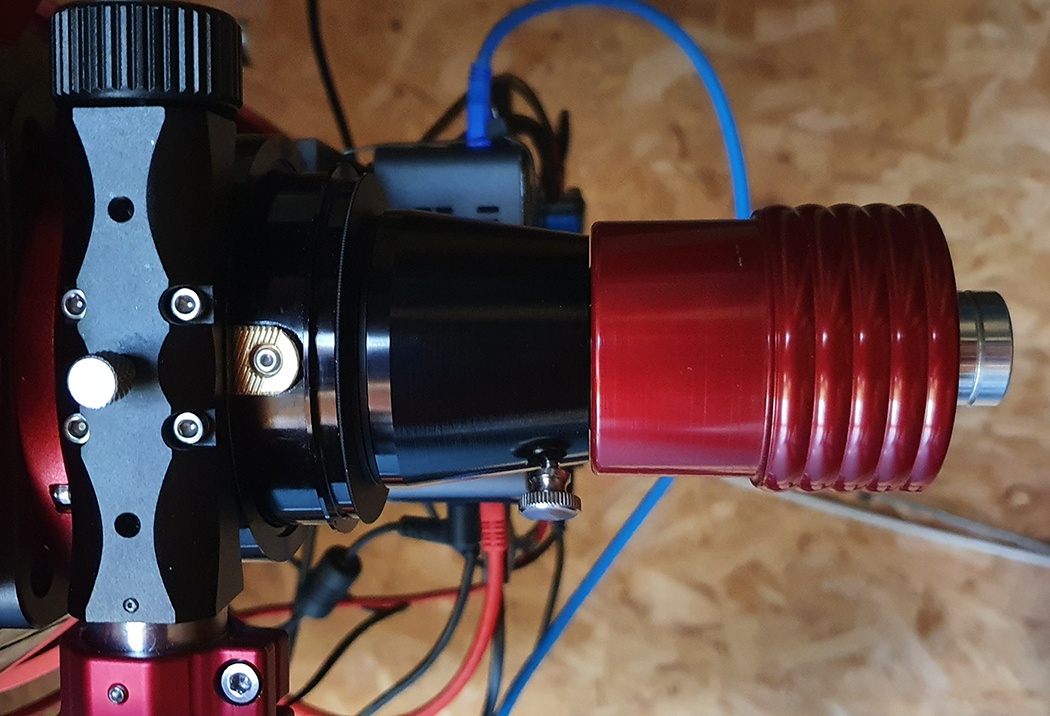
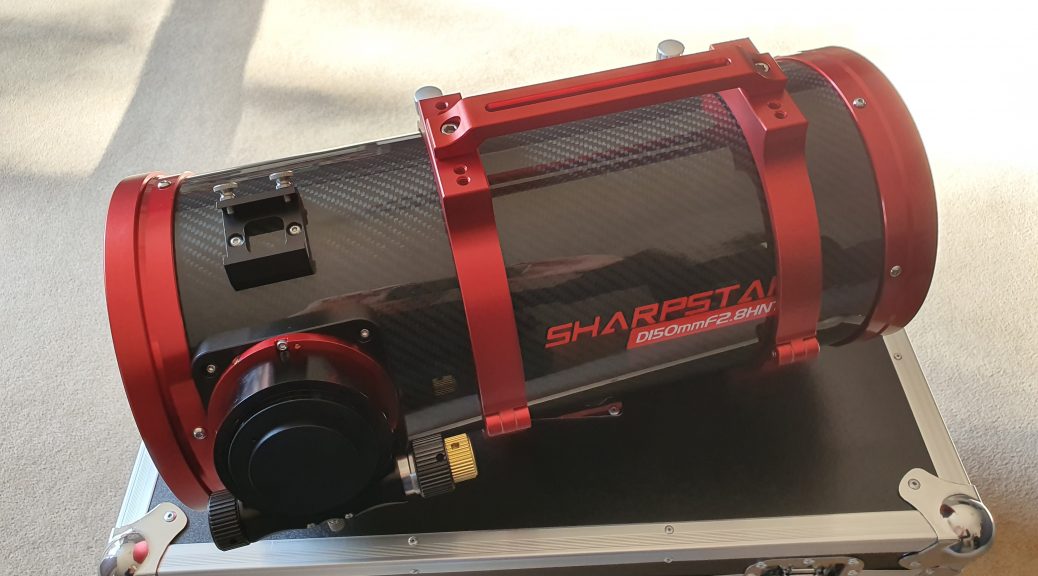
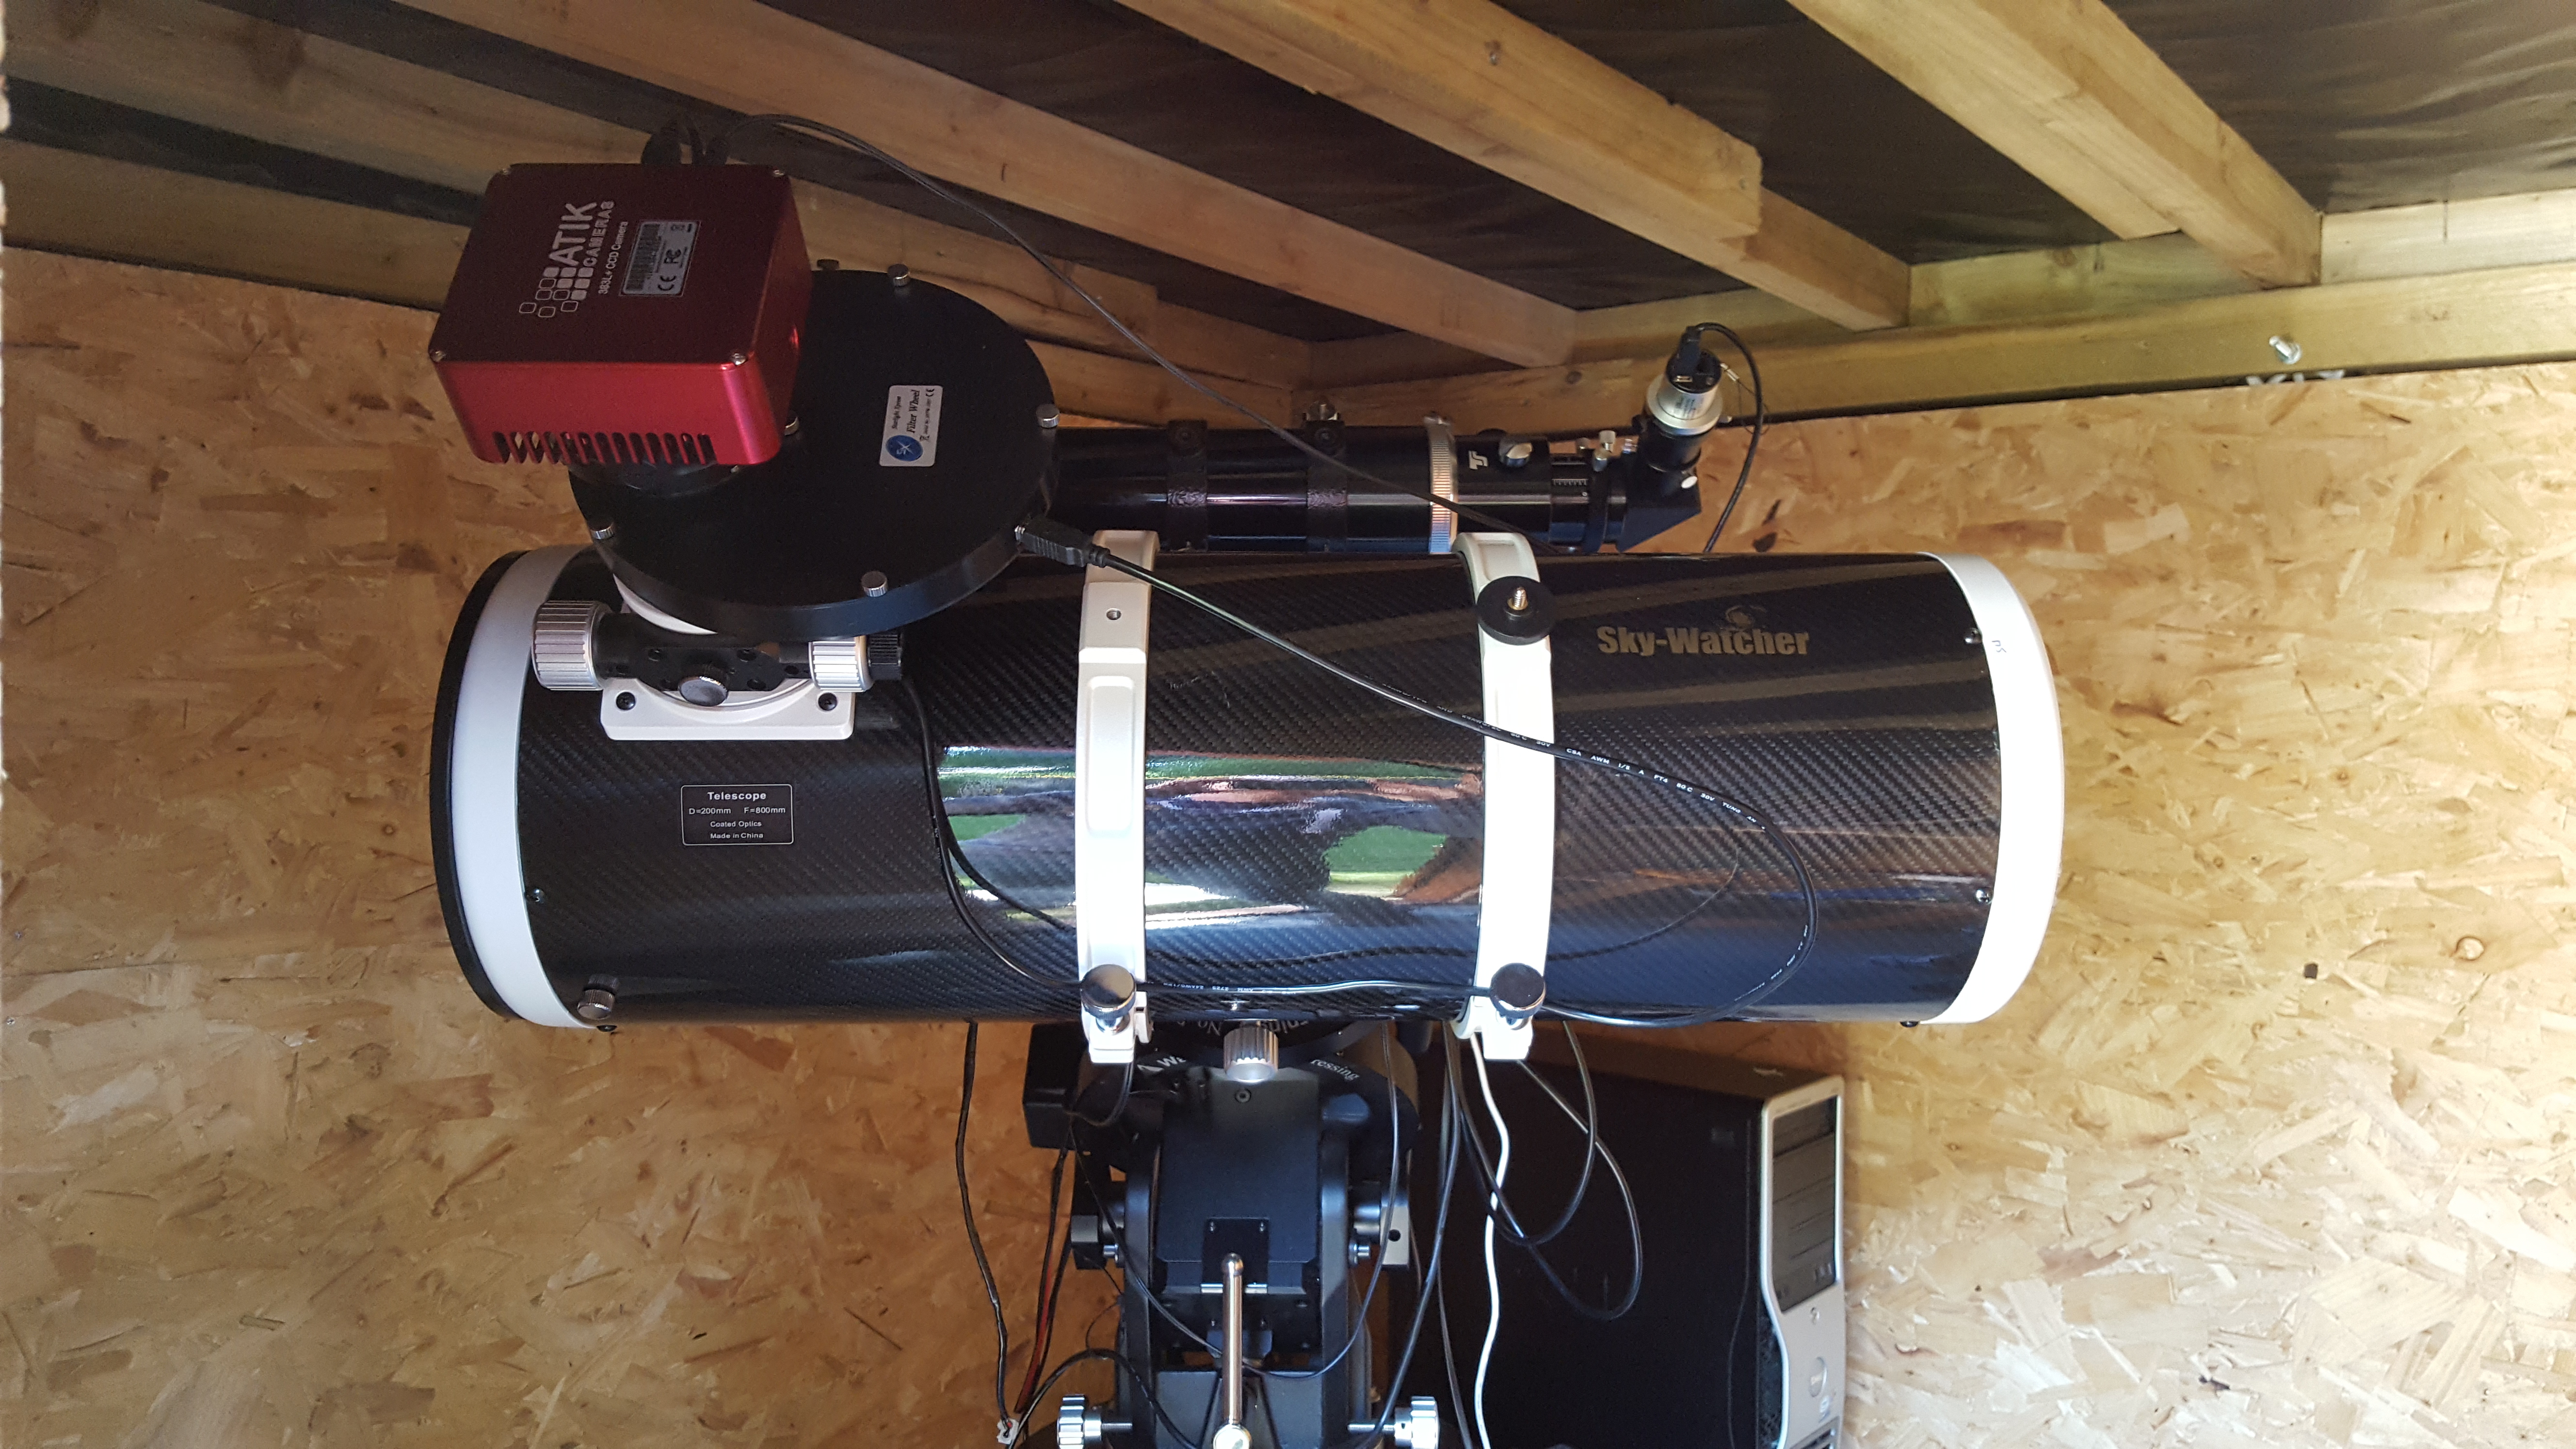
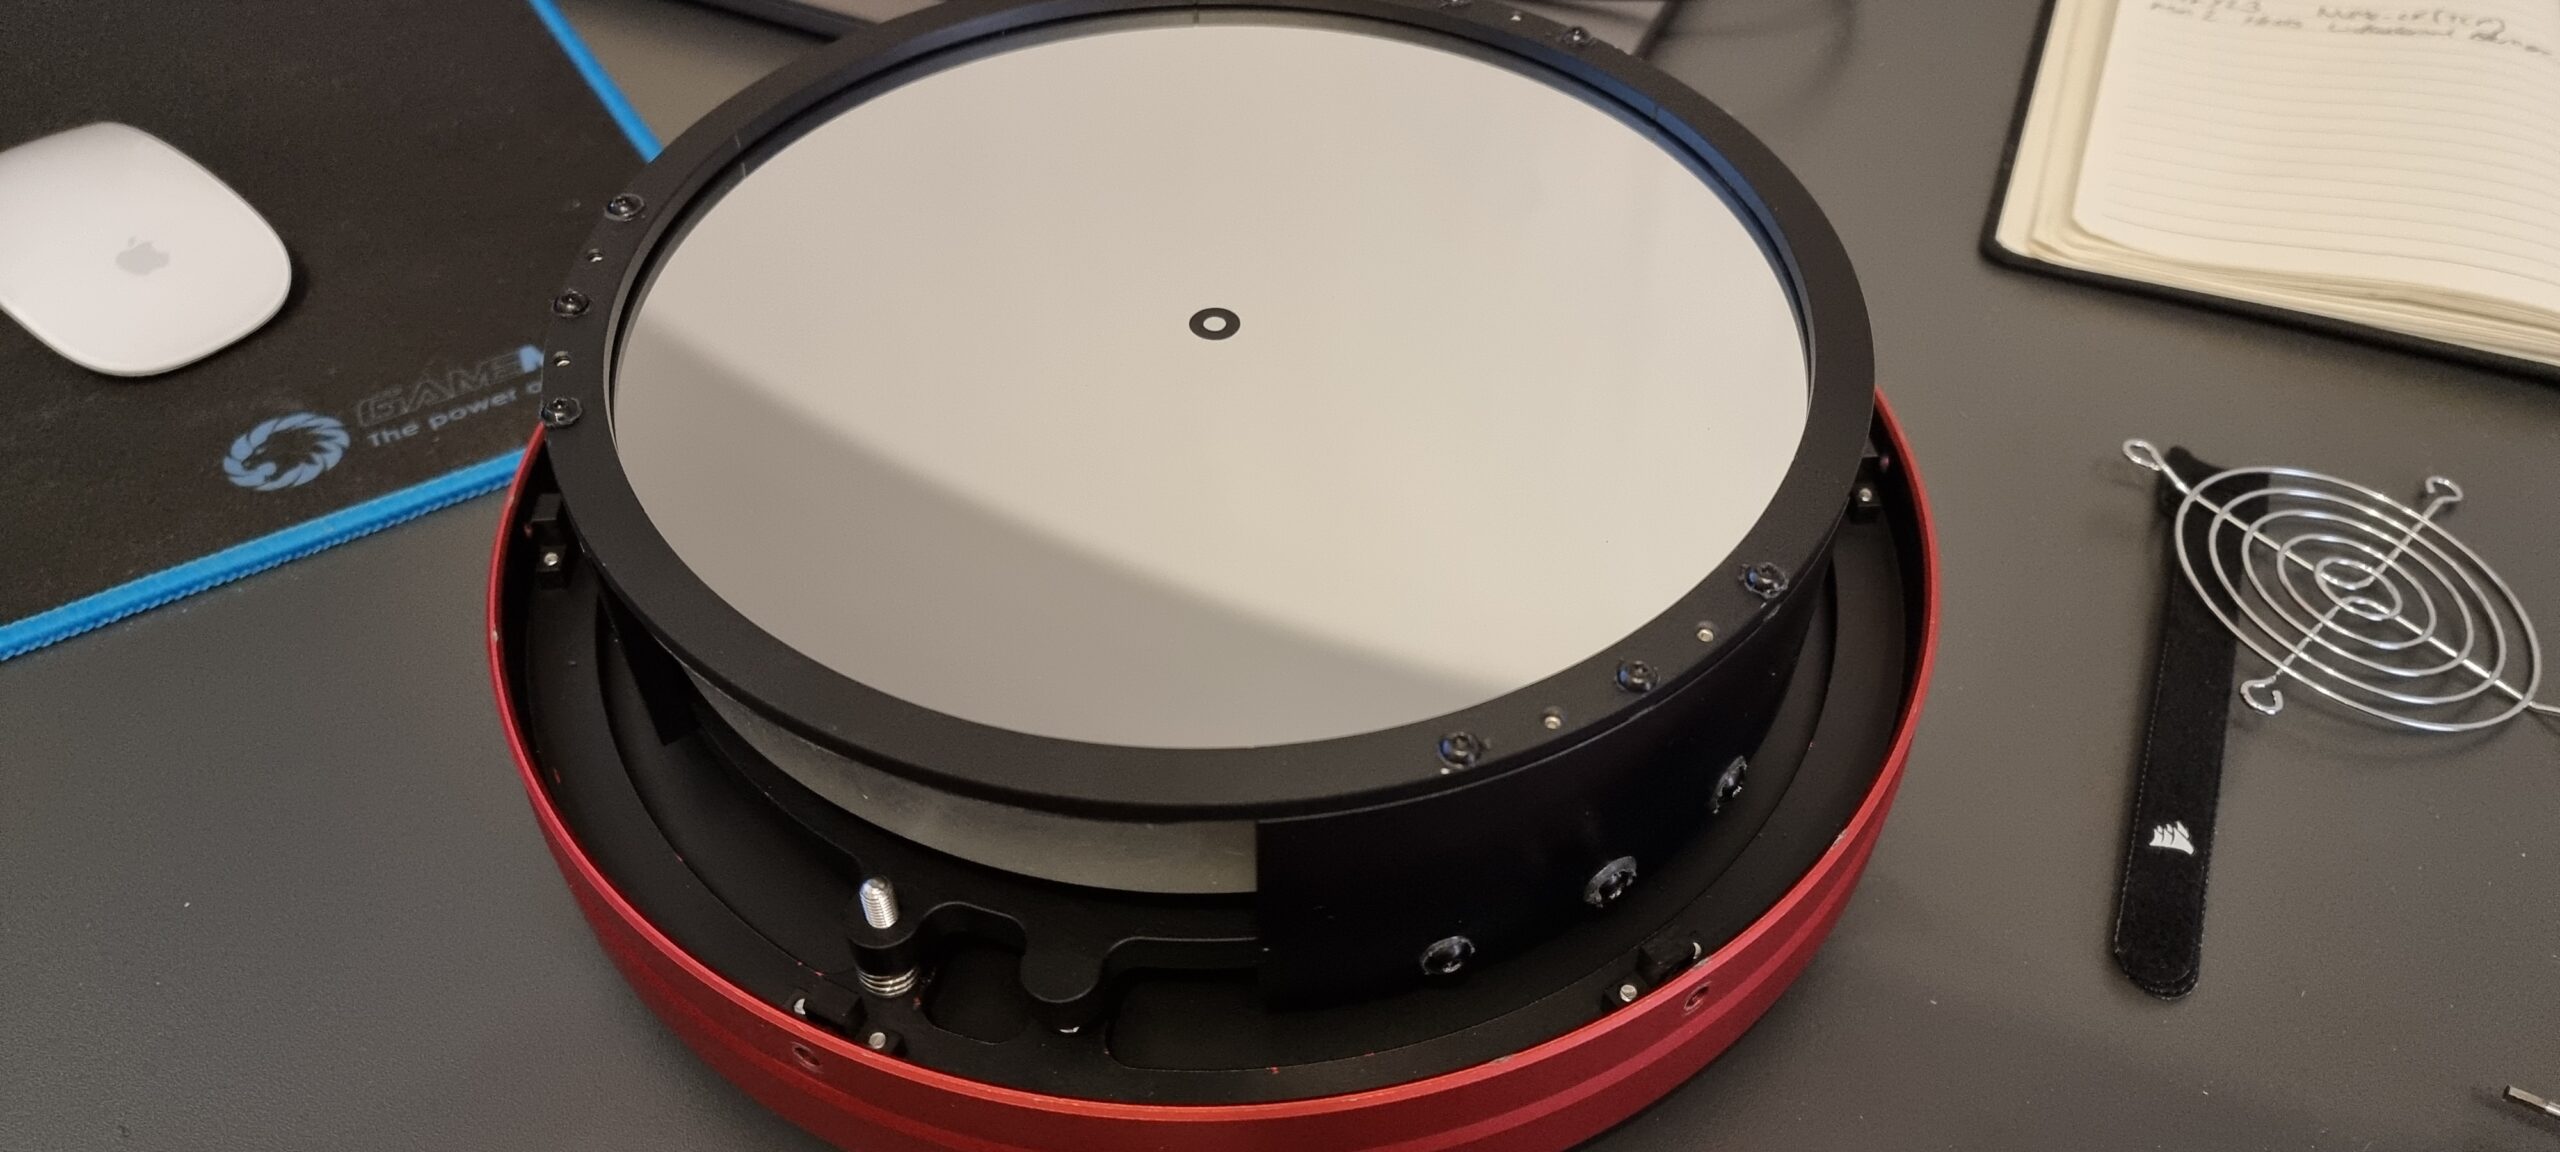
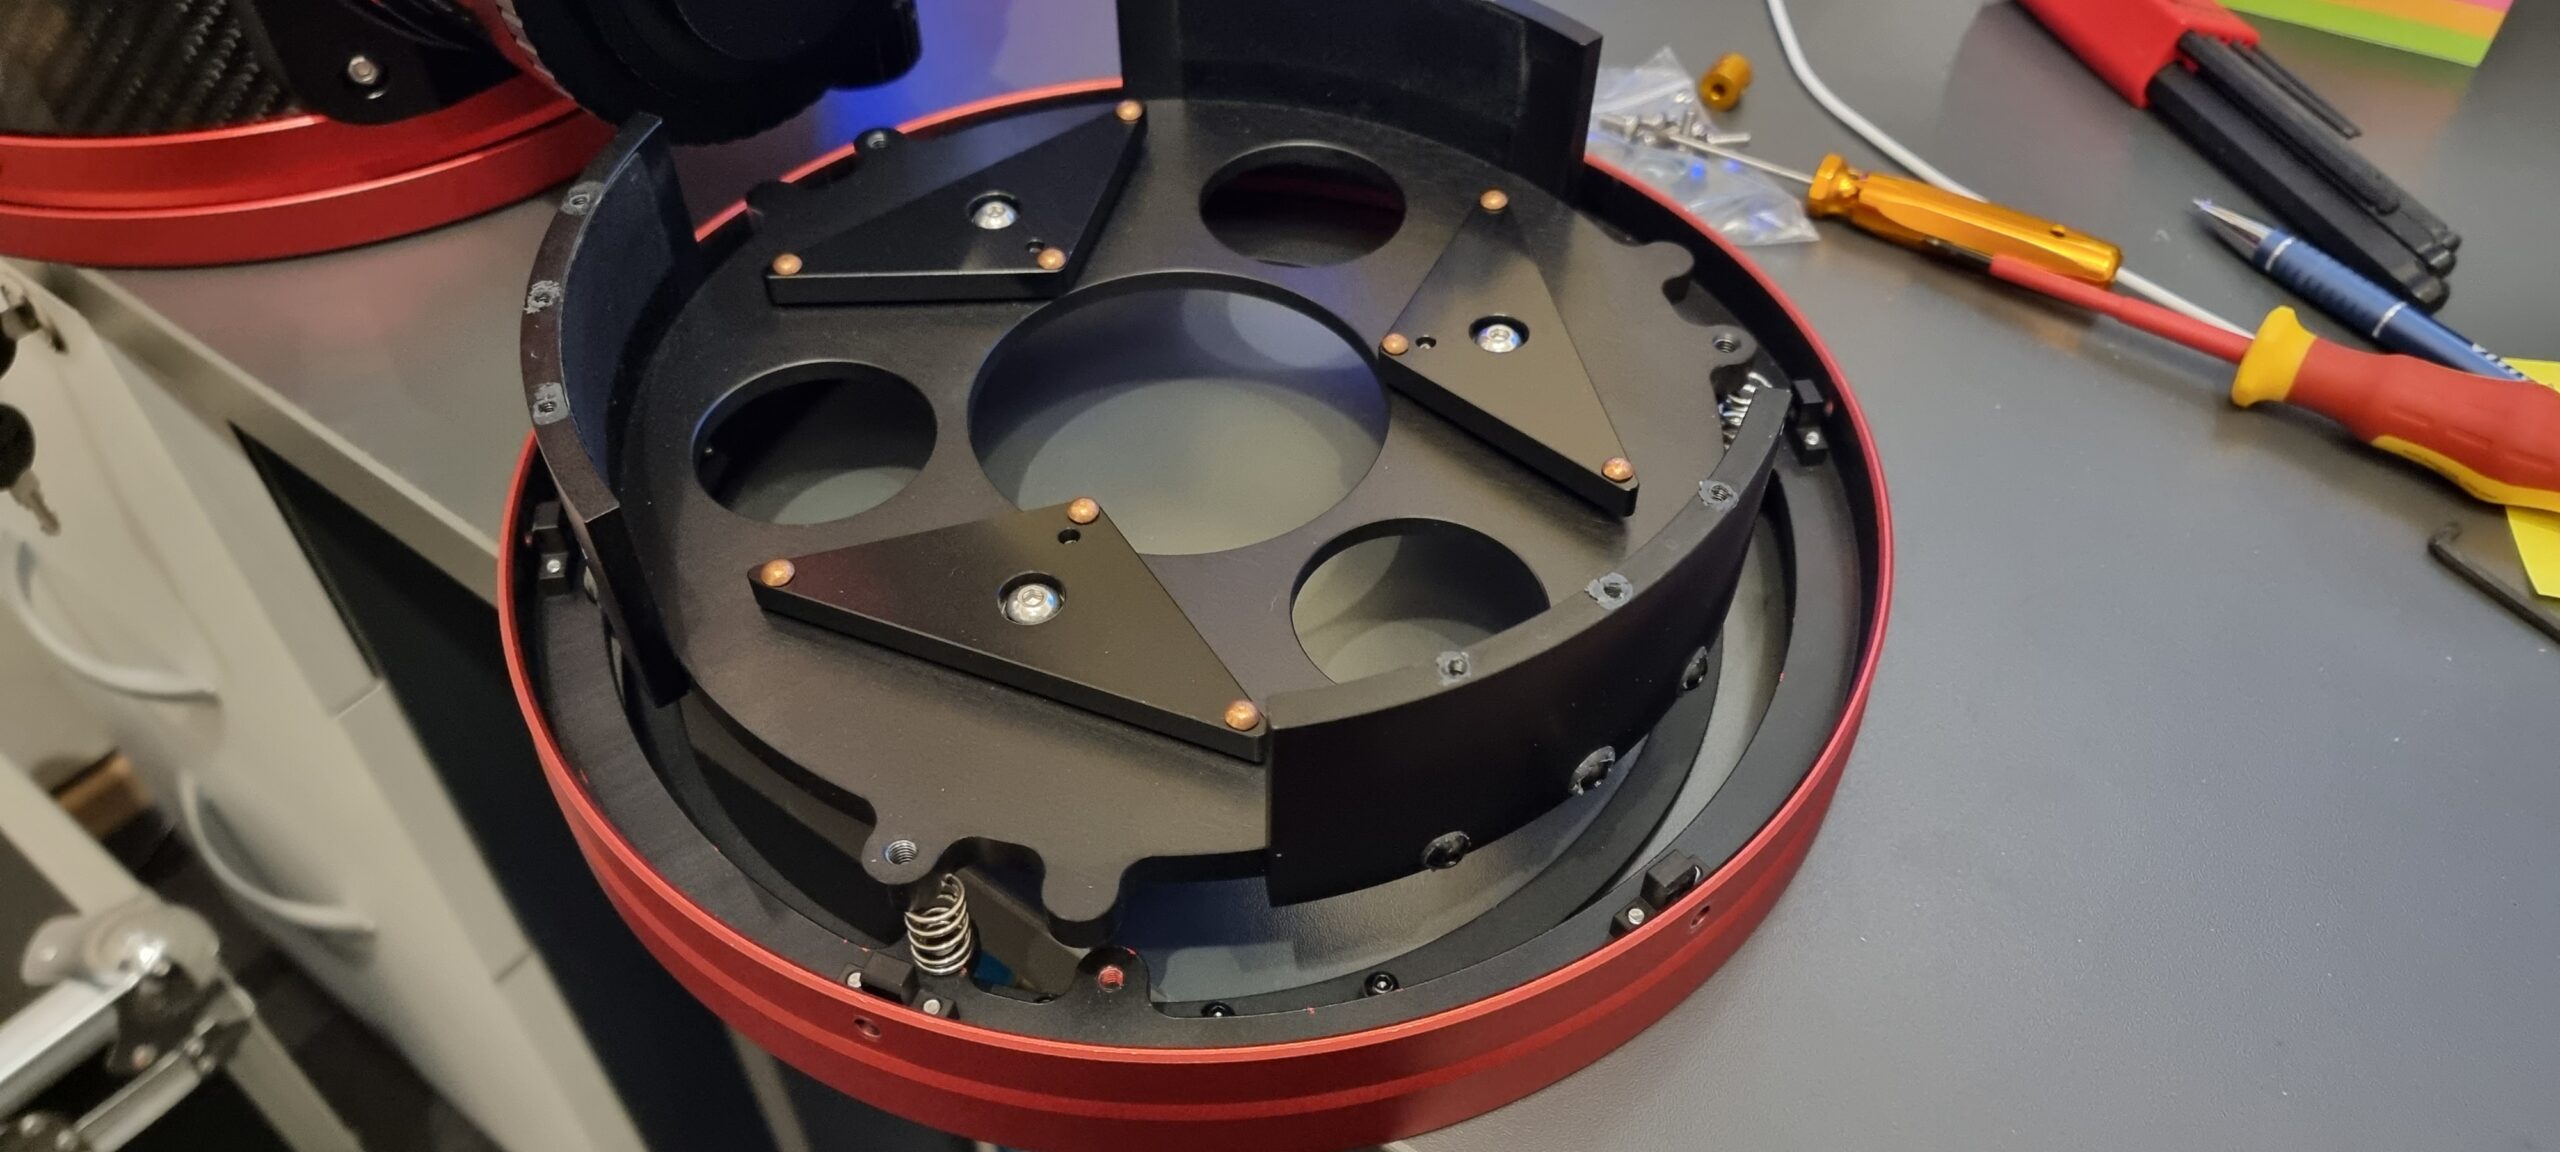
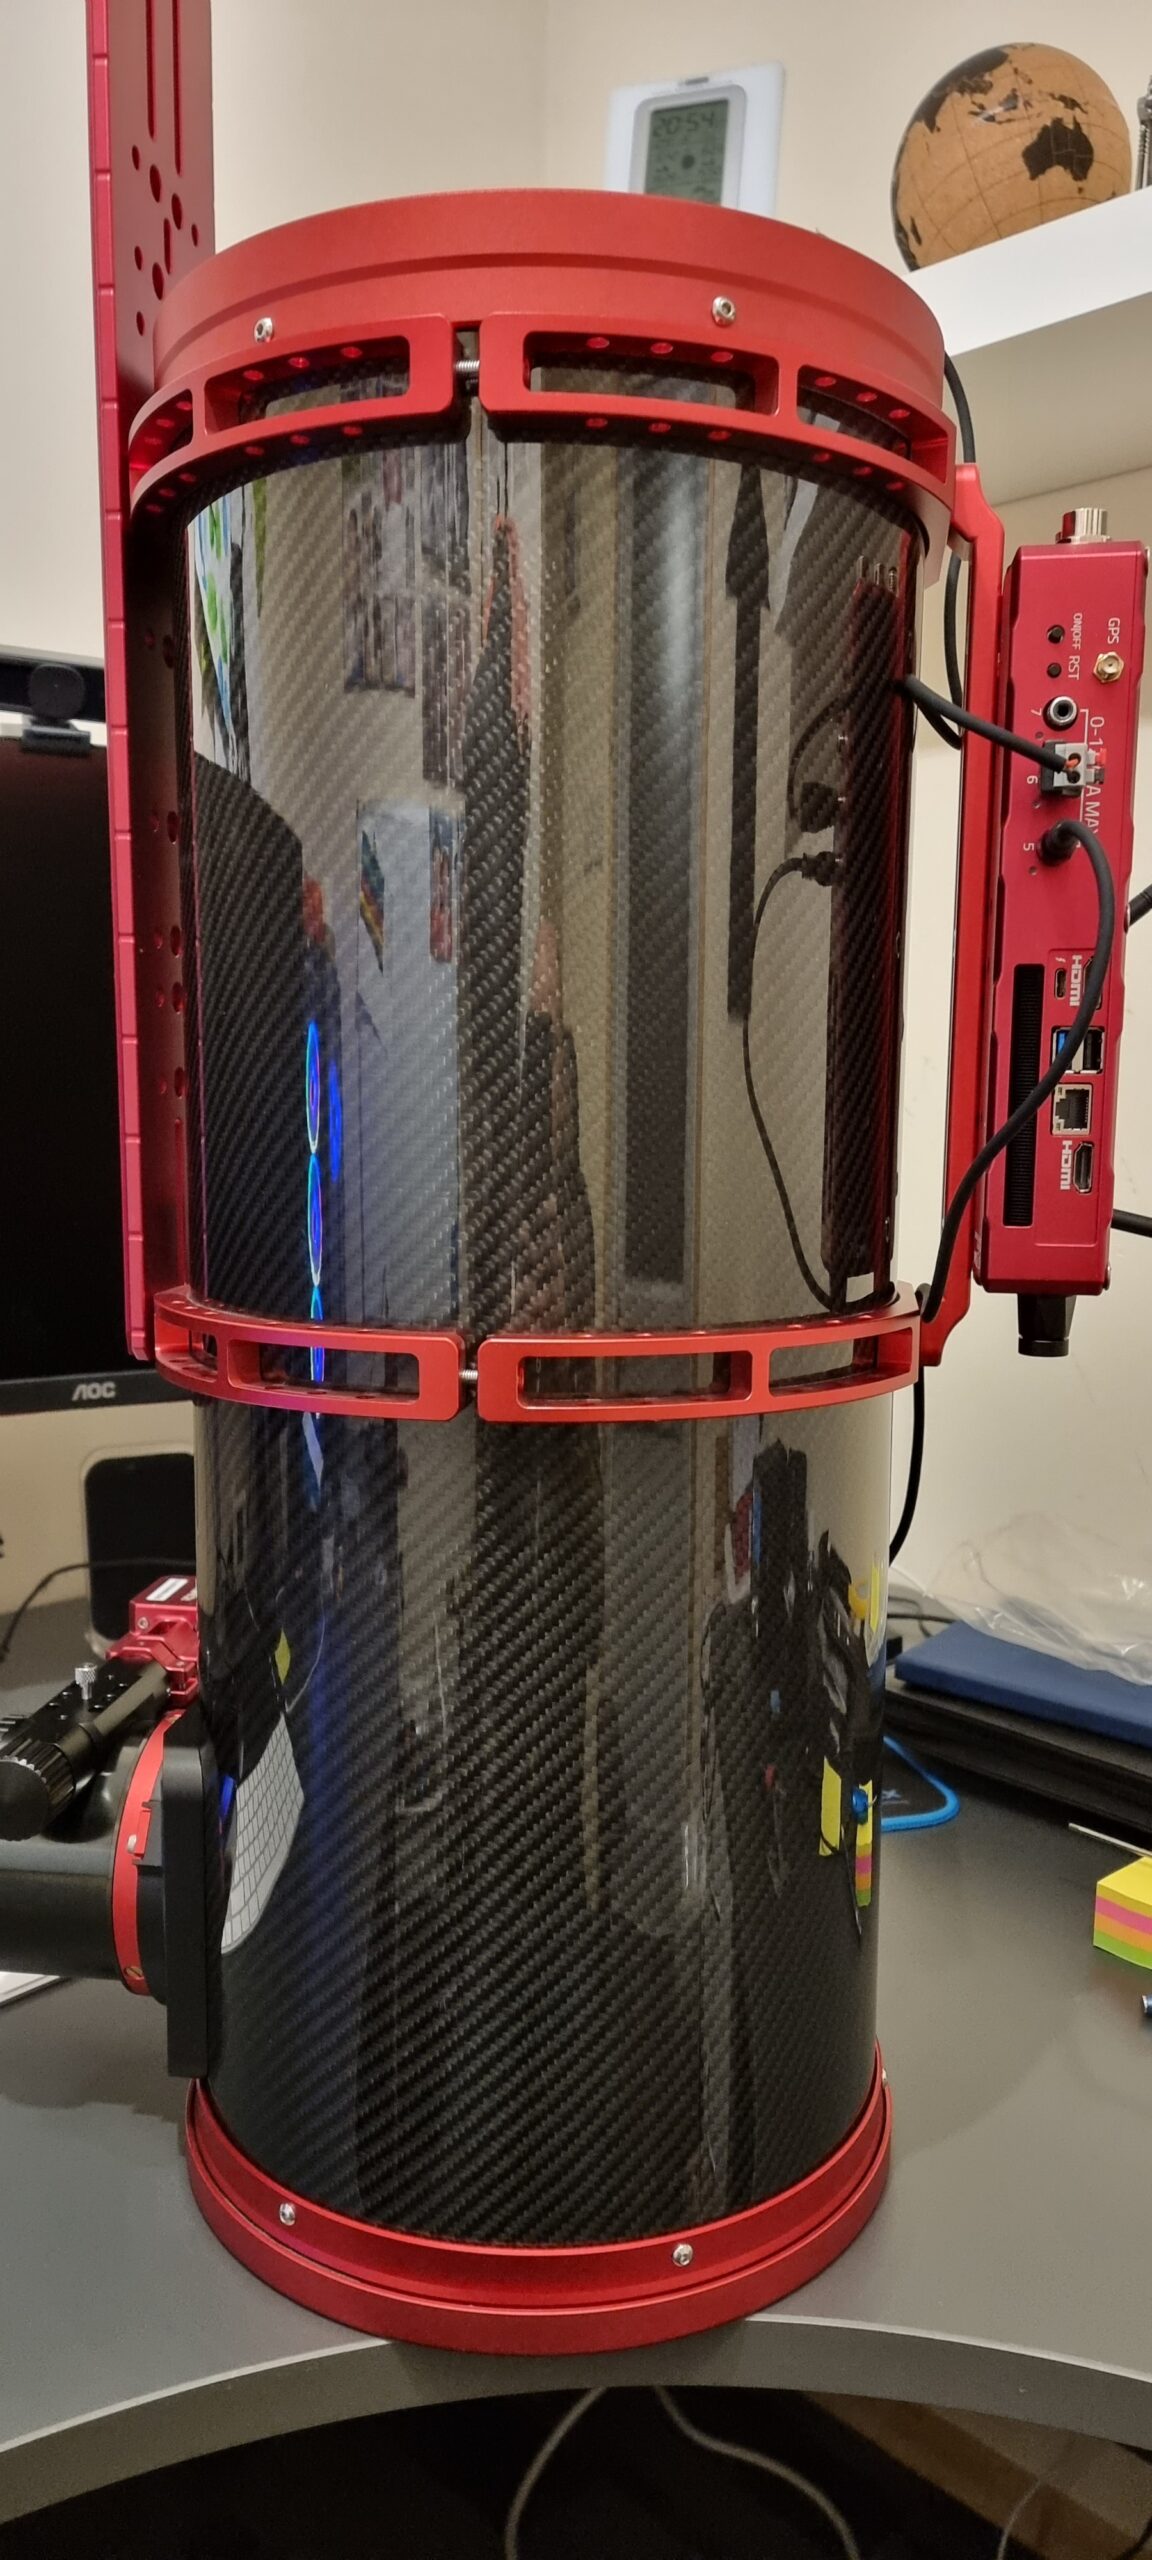
Once I had the scope unpacked and inspected everything, the first thing I noticed was the focuser, the 20032PNT has a large focuser, which is big enough to accomodate the reducer/corrector that has an M68 connector thread as well as an M54 and an M48 connector thread.

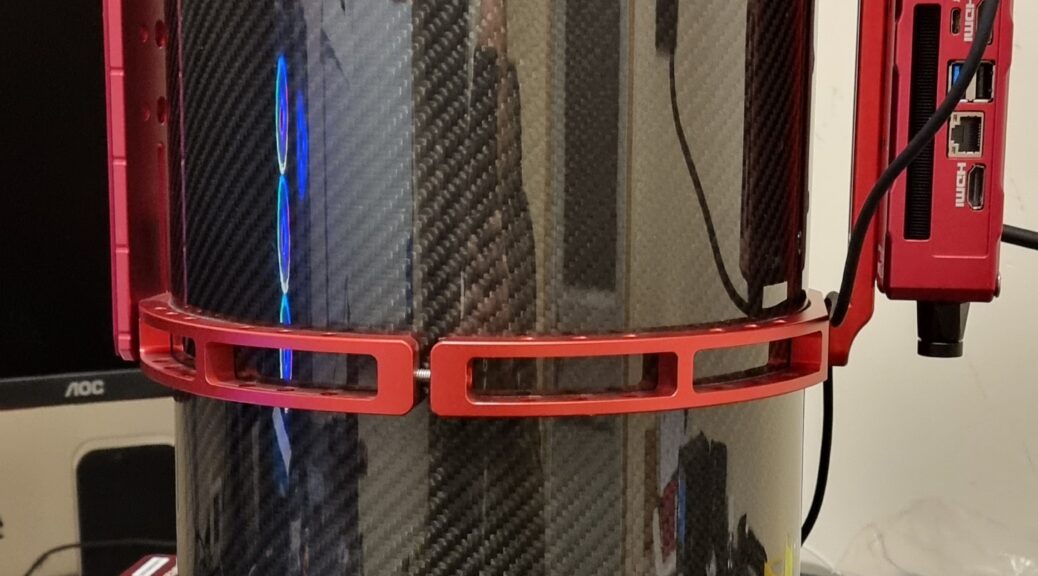
The scope is well built, as I would expect from the build quality of the 15028HNT, the red annodised alluminium tube rings just give that final touch of finese. The 3 inch focuser is very smooth, and will no doubt be able to handle quite a load of equipment.

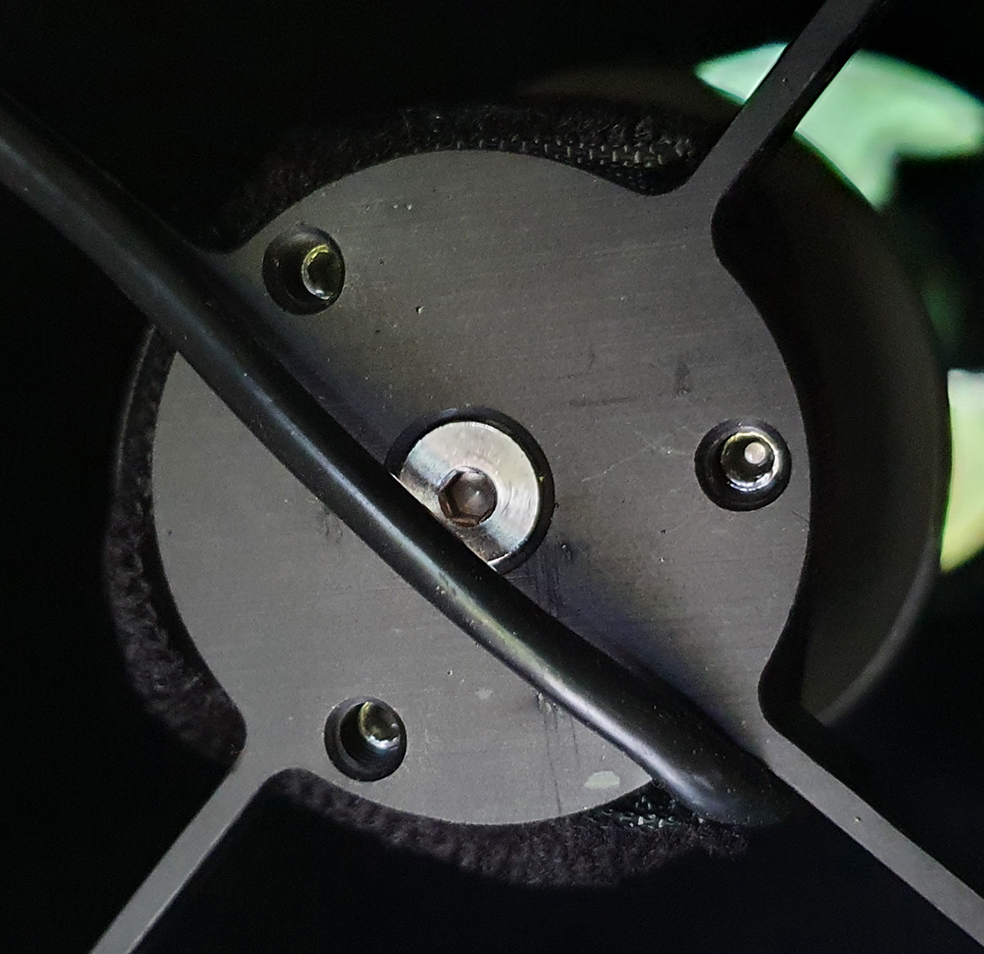
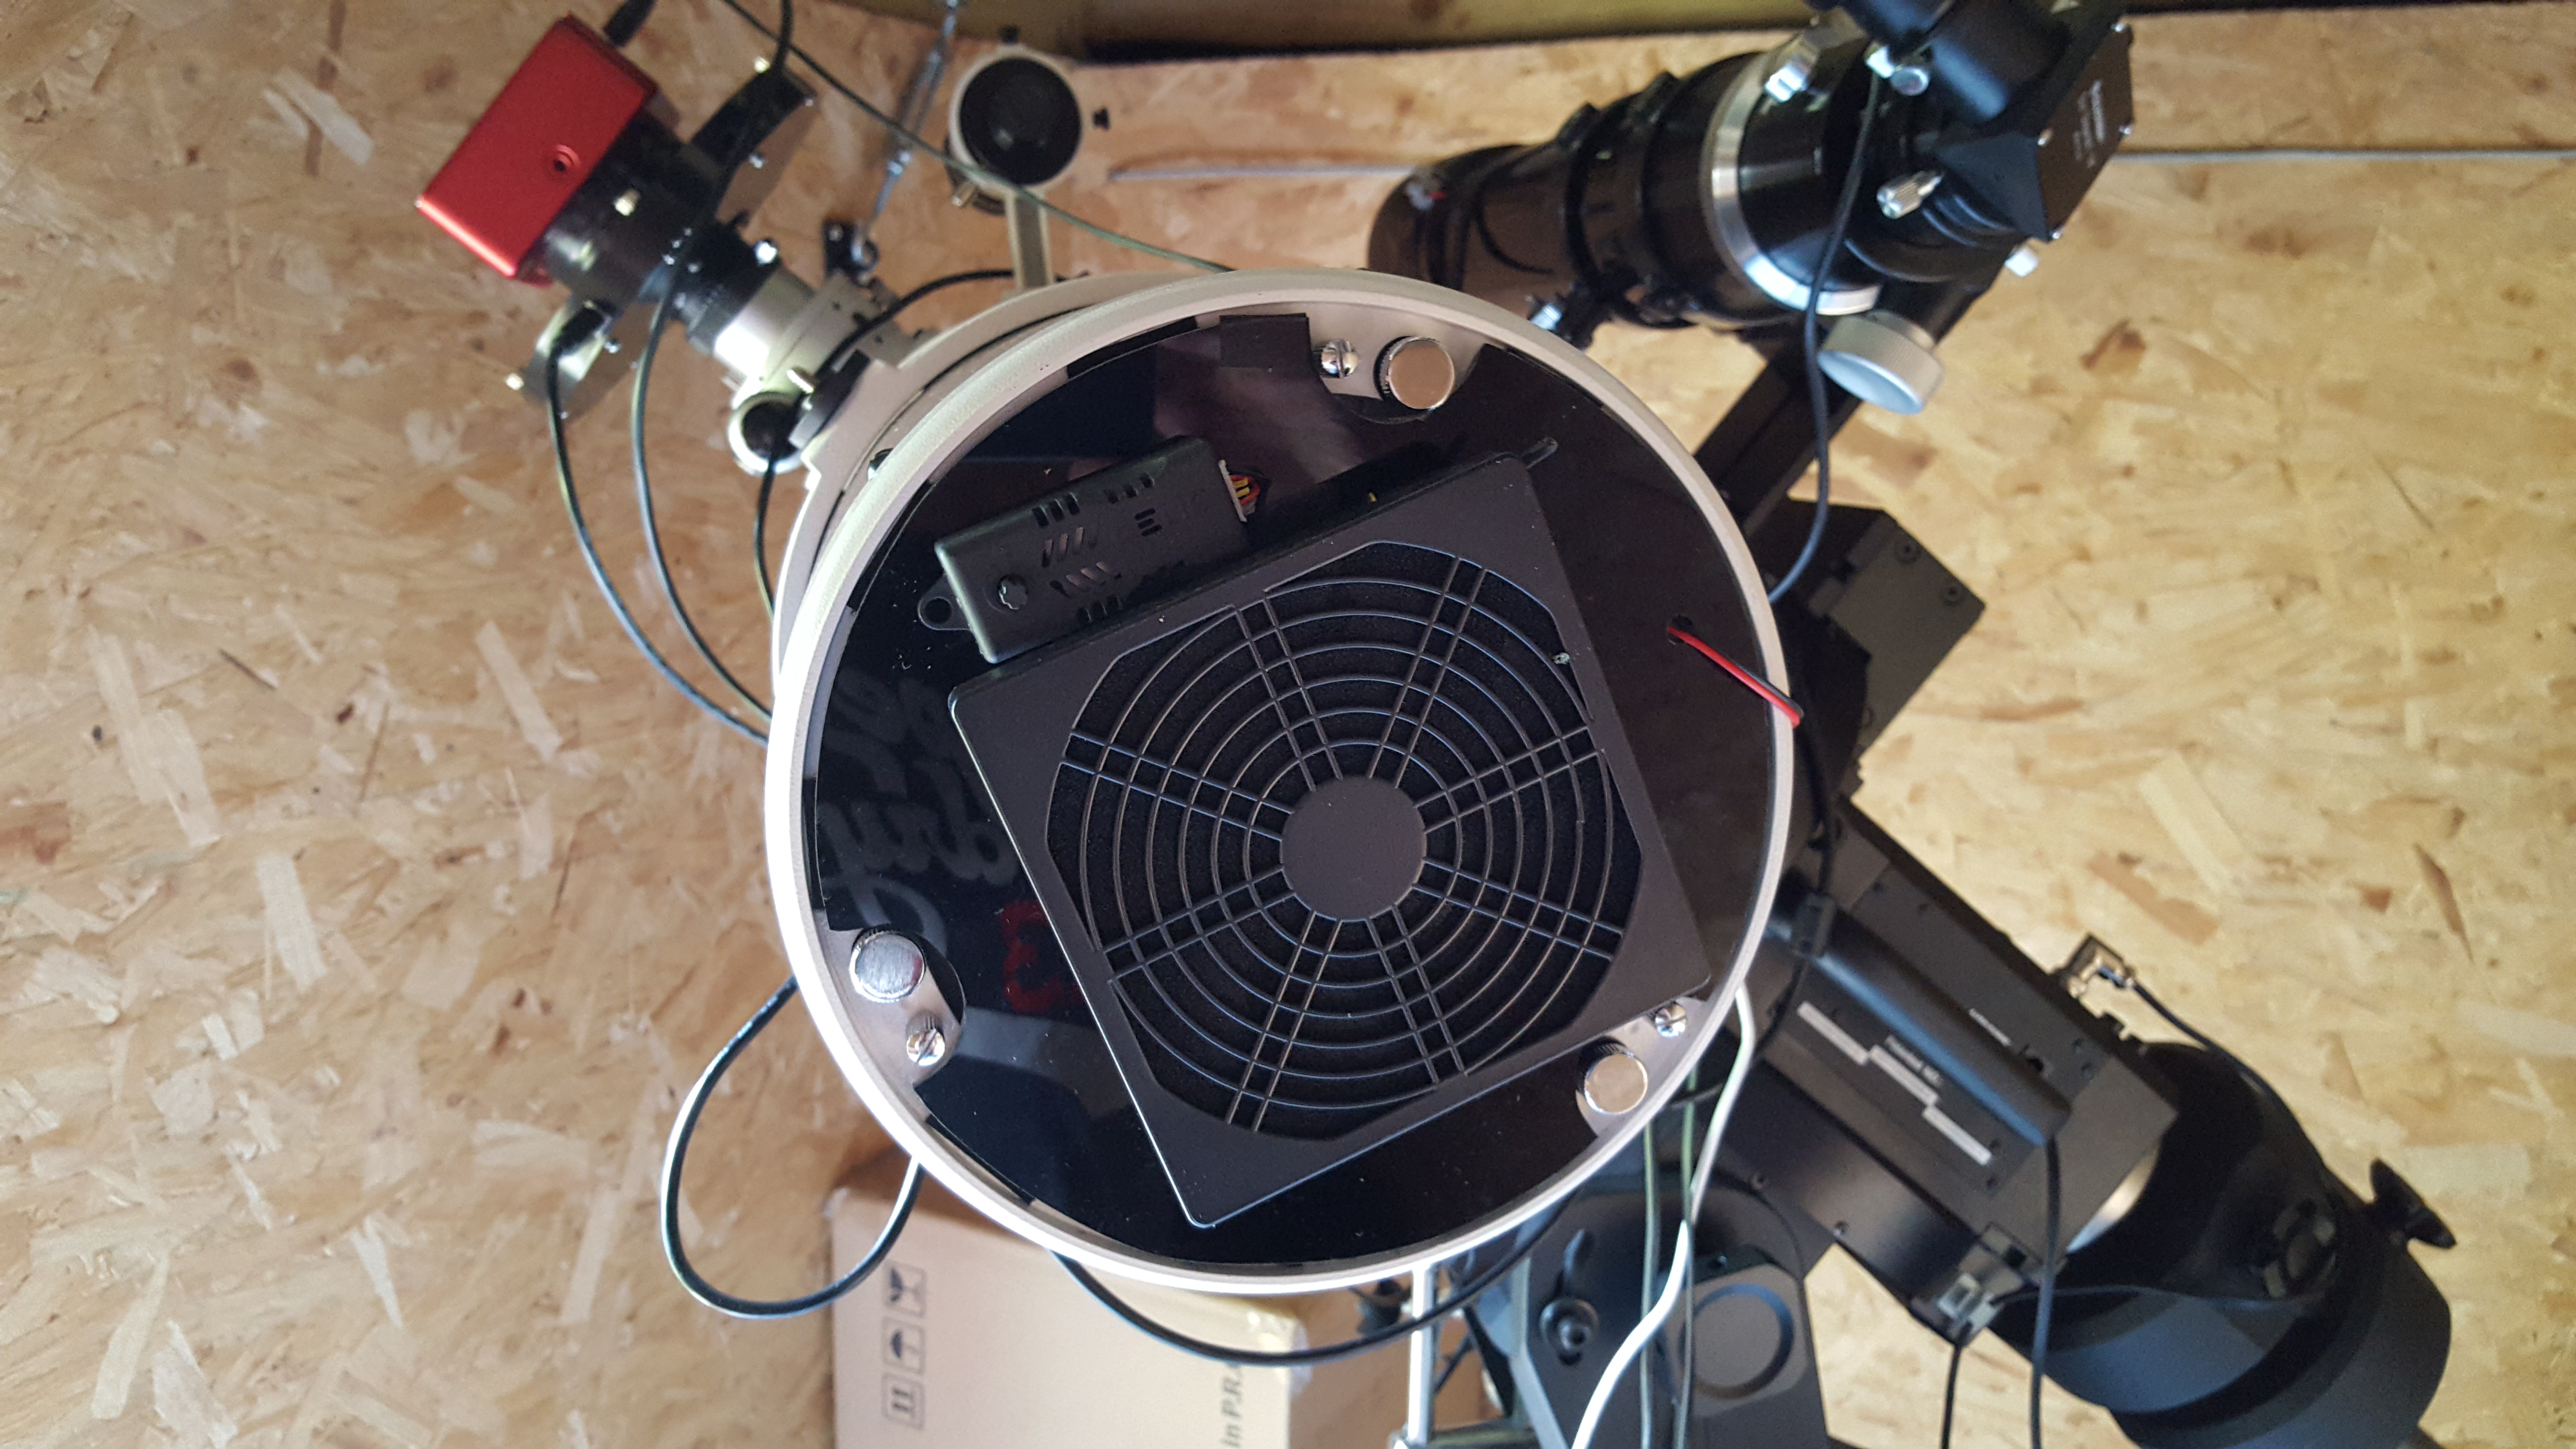
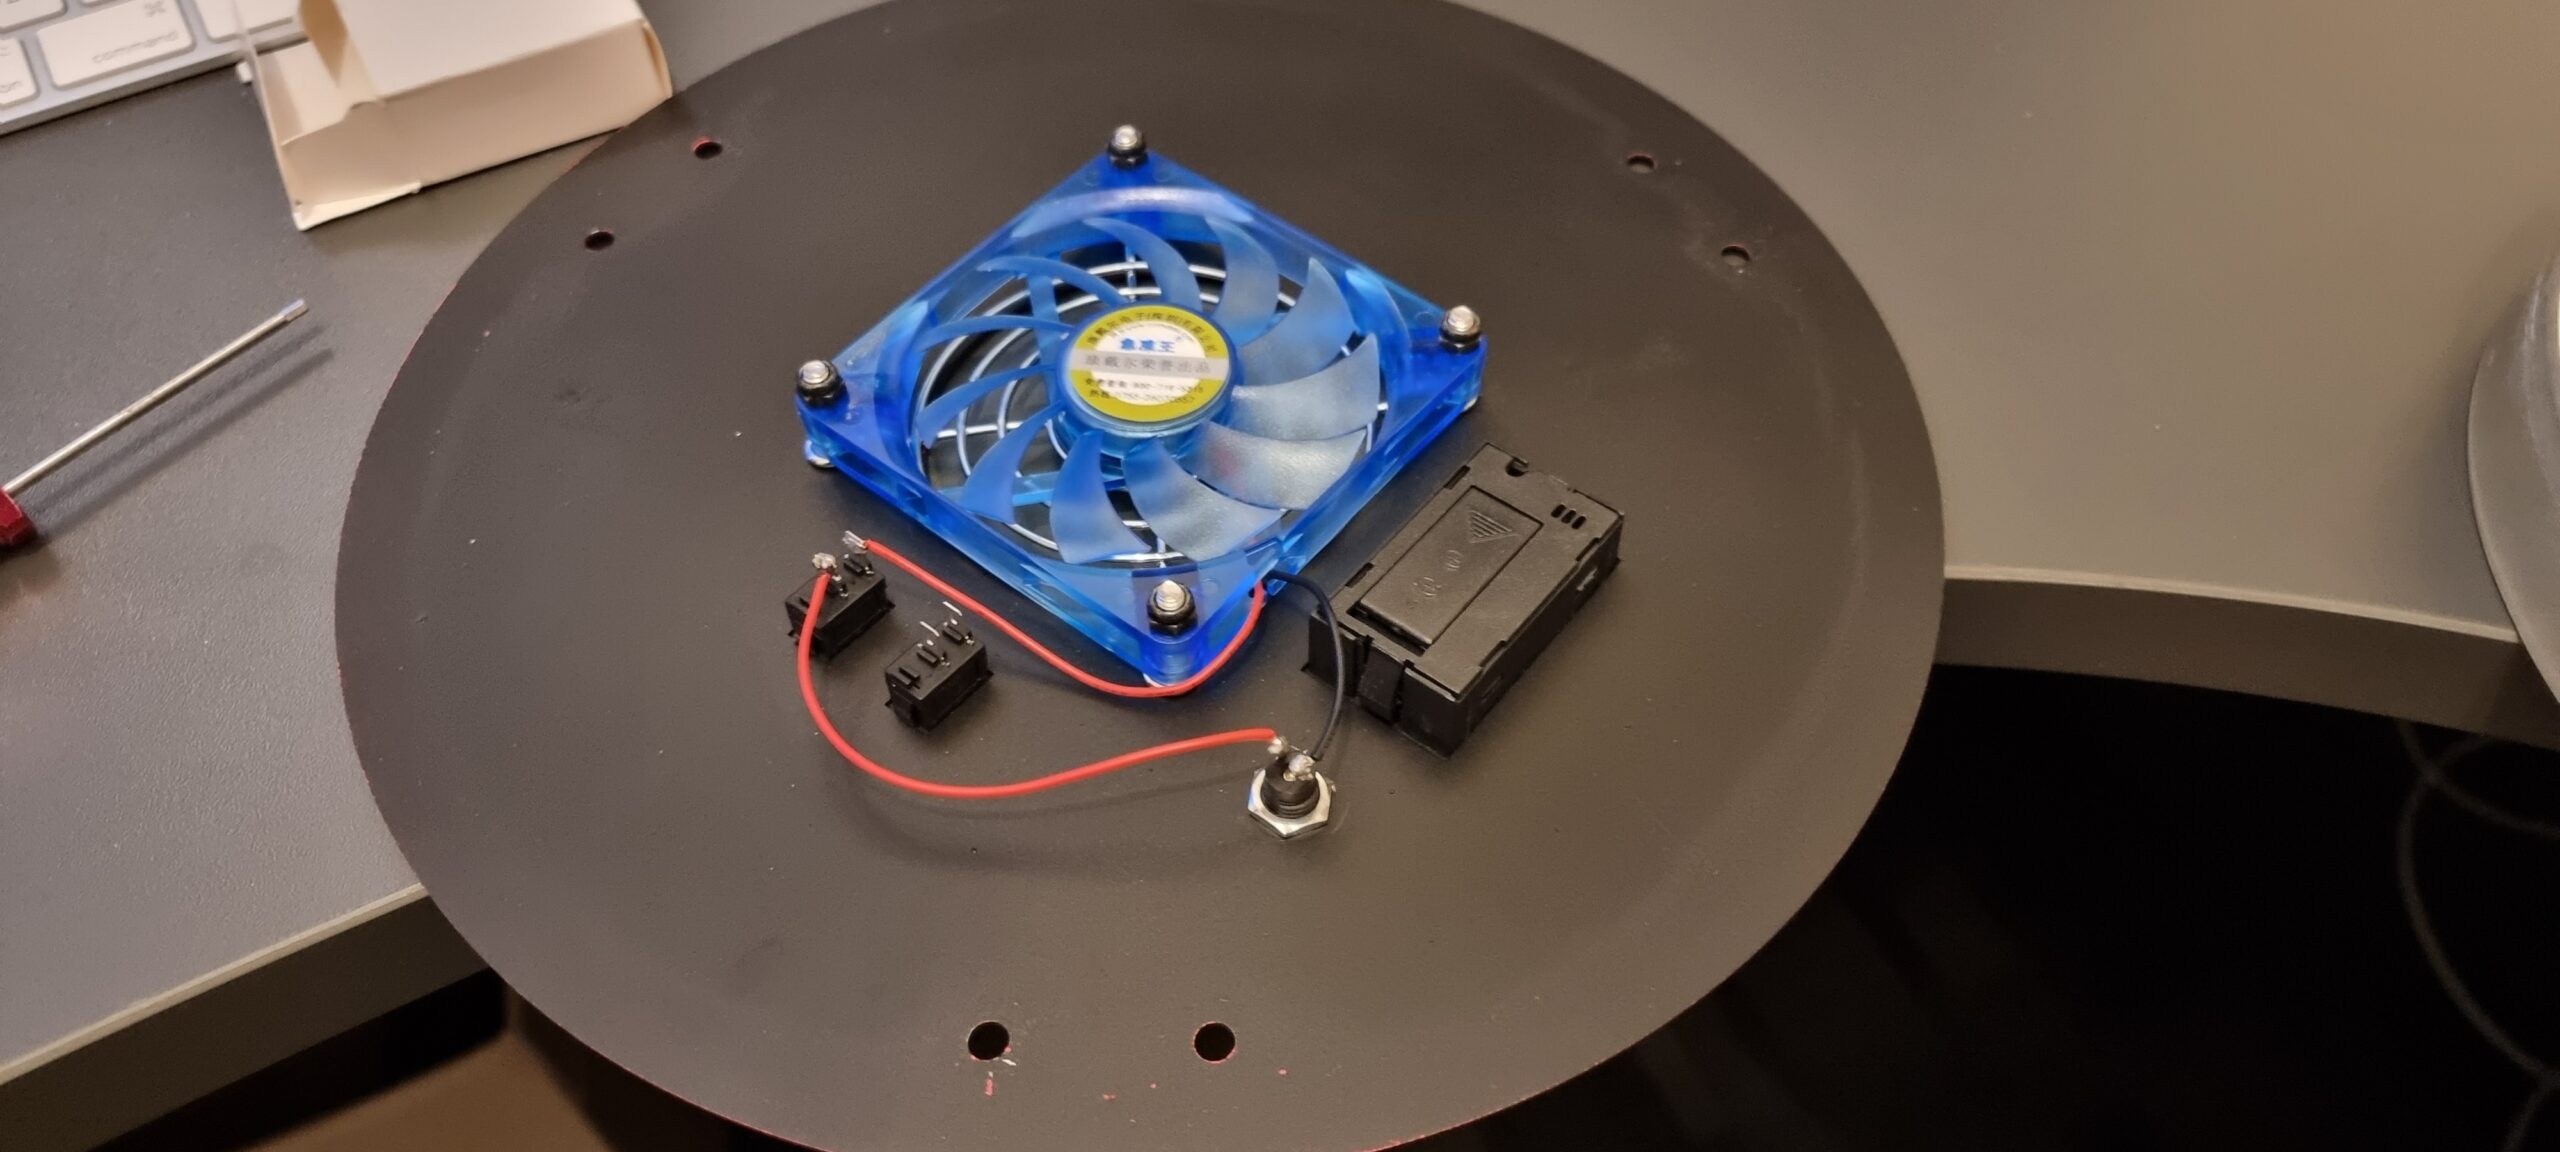
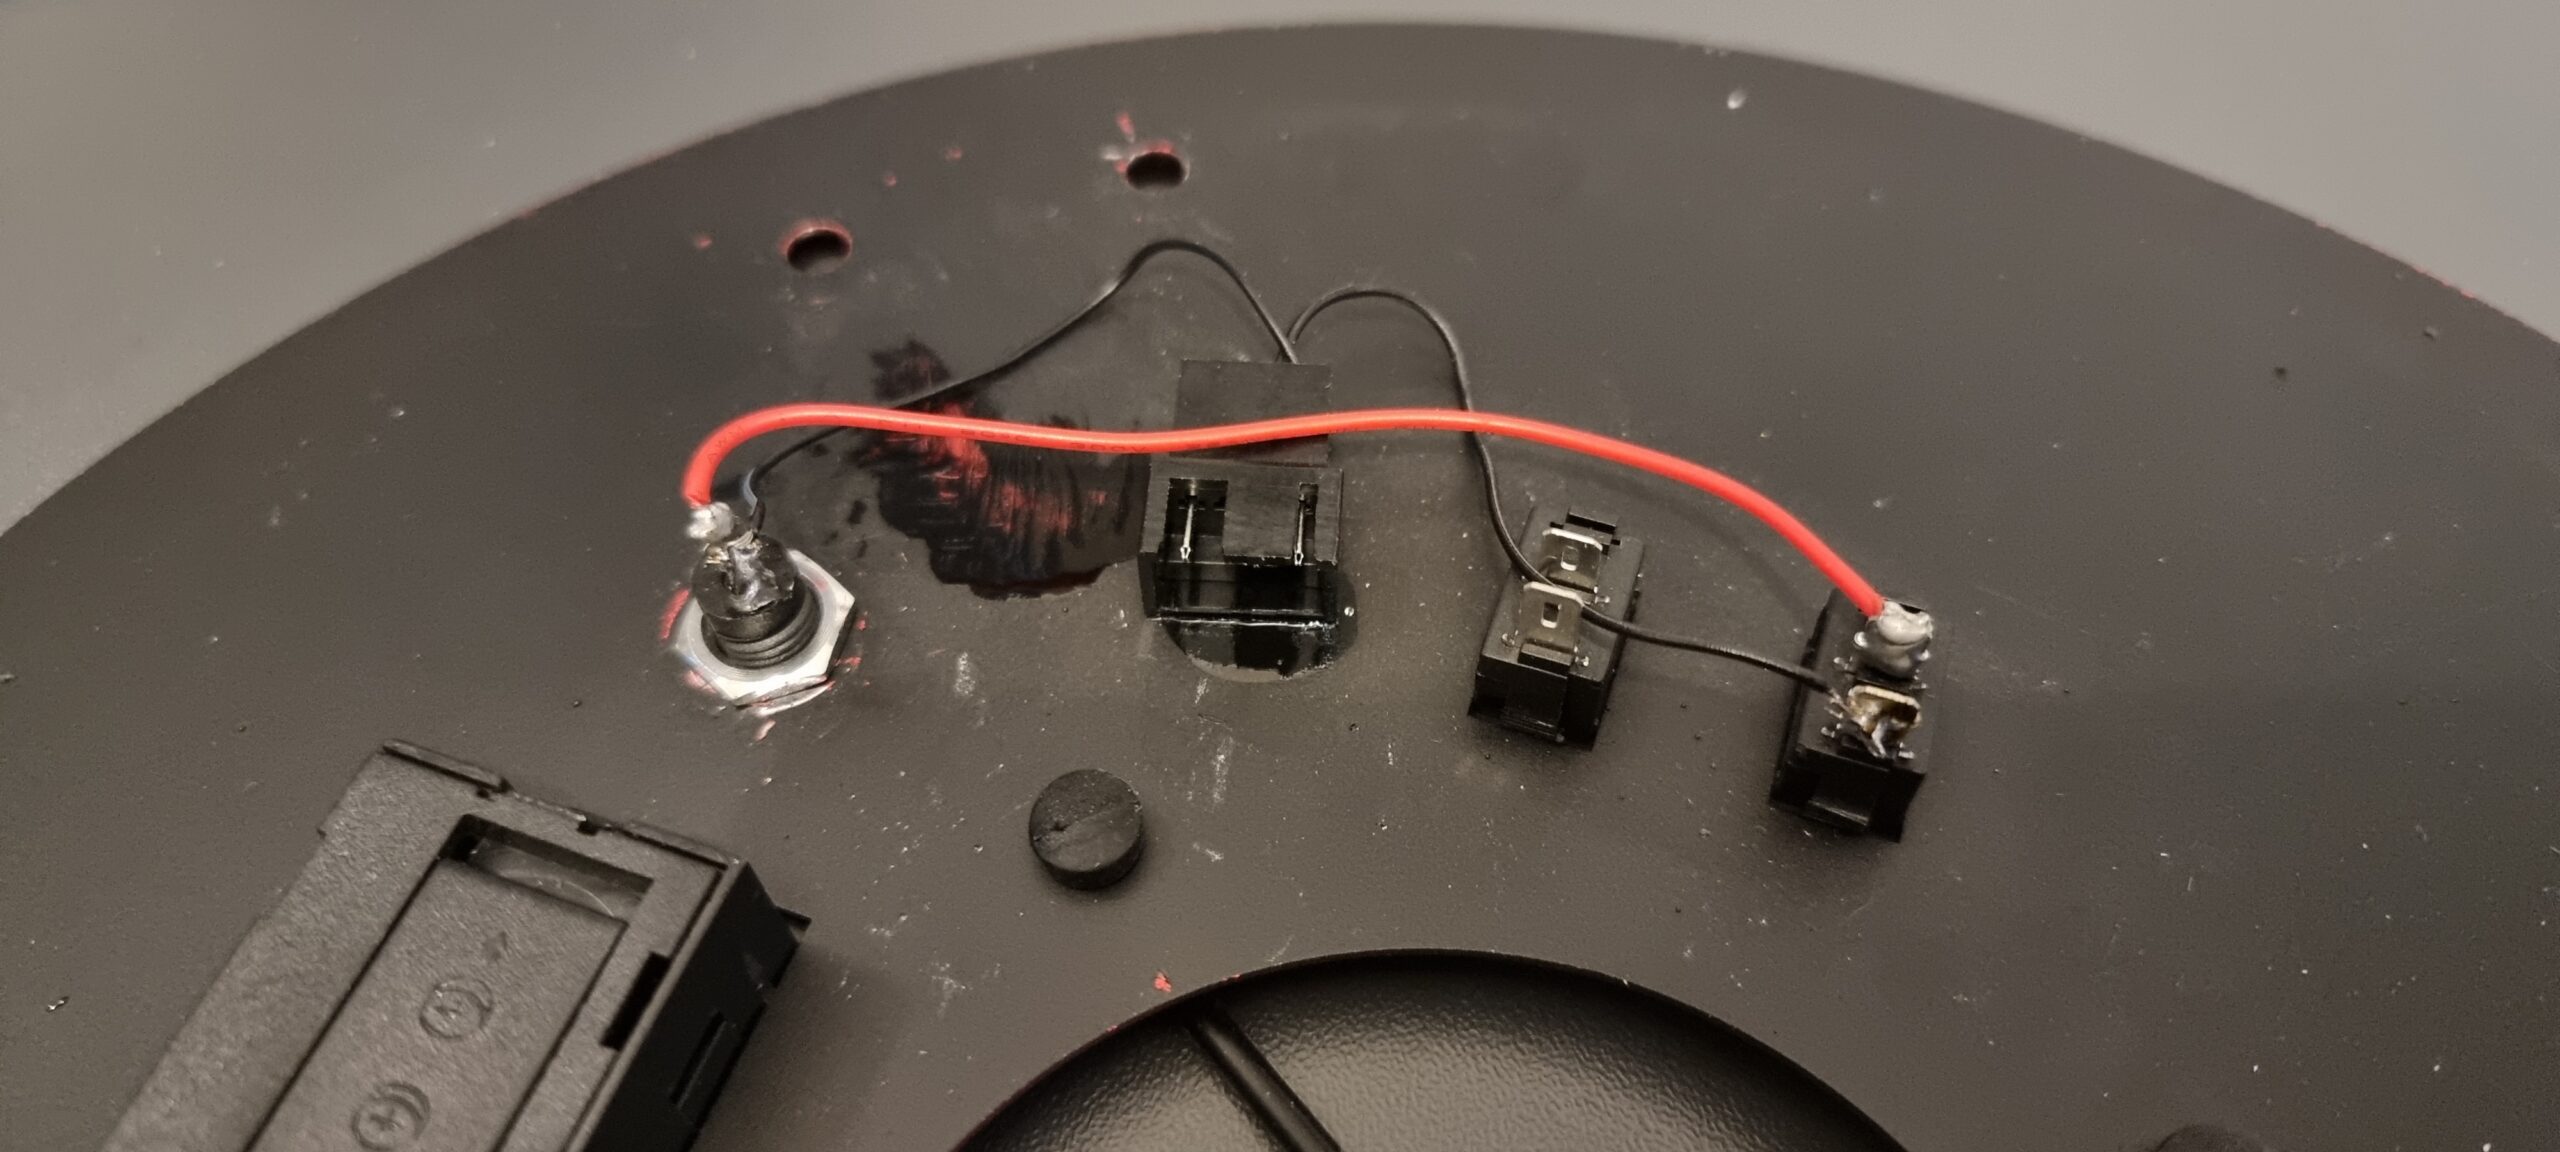
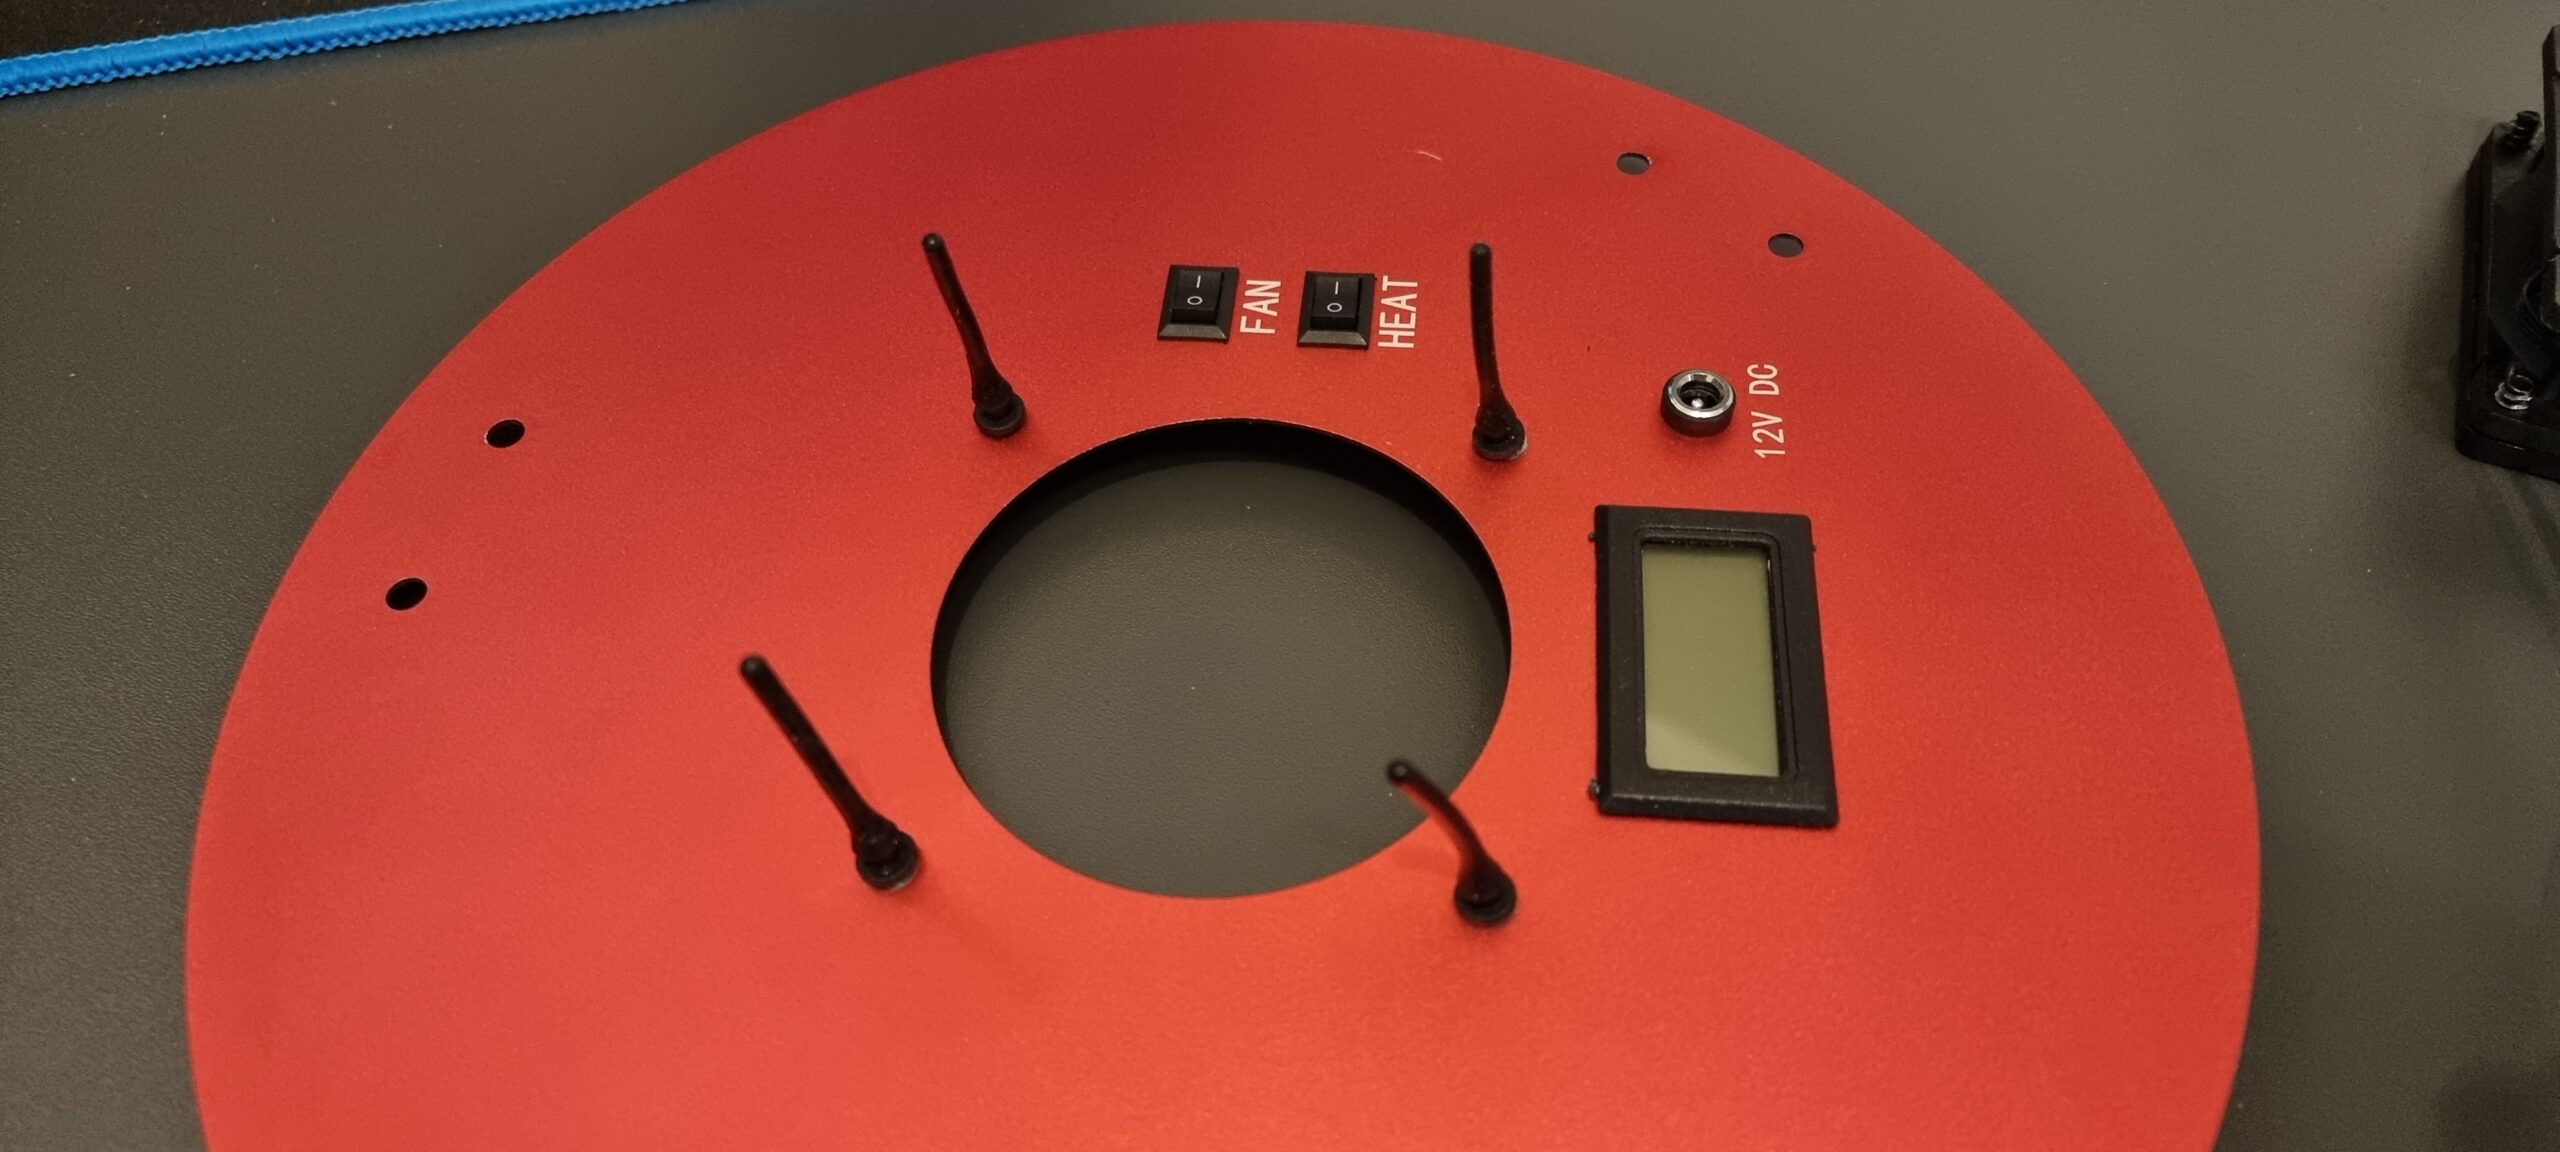
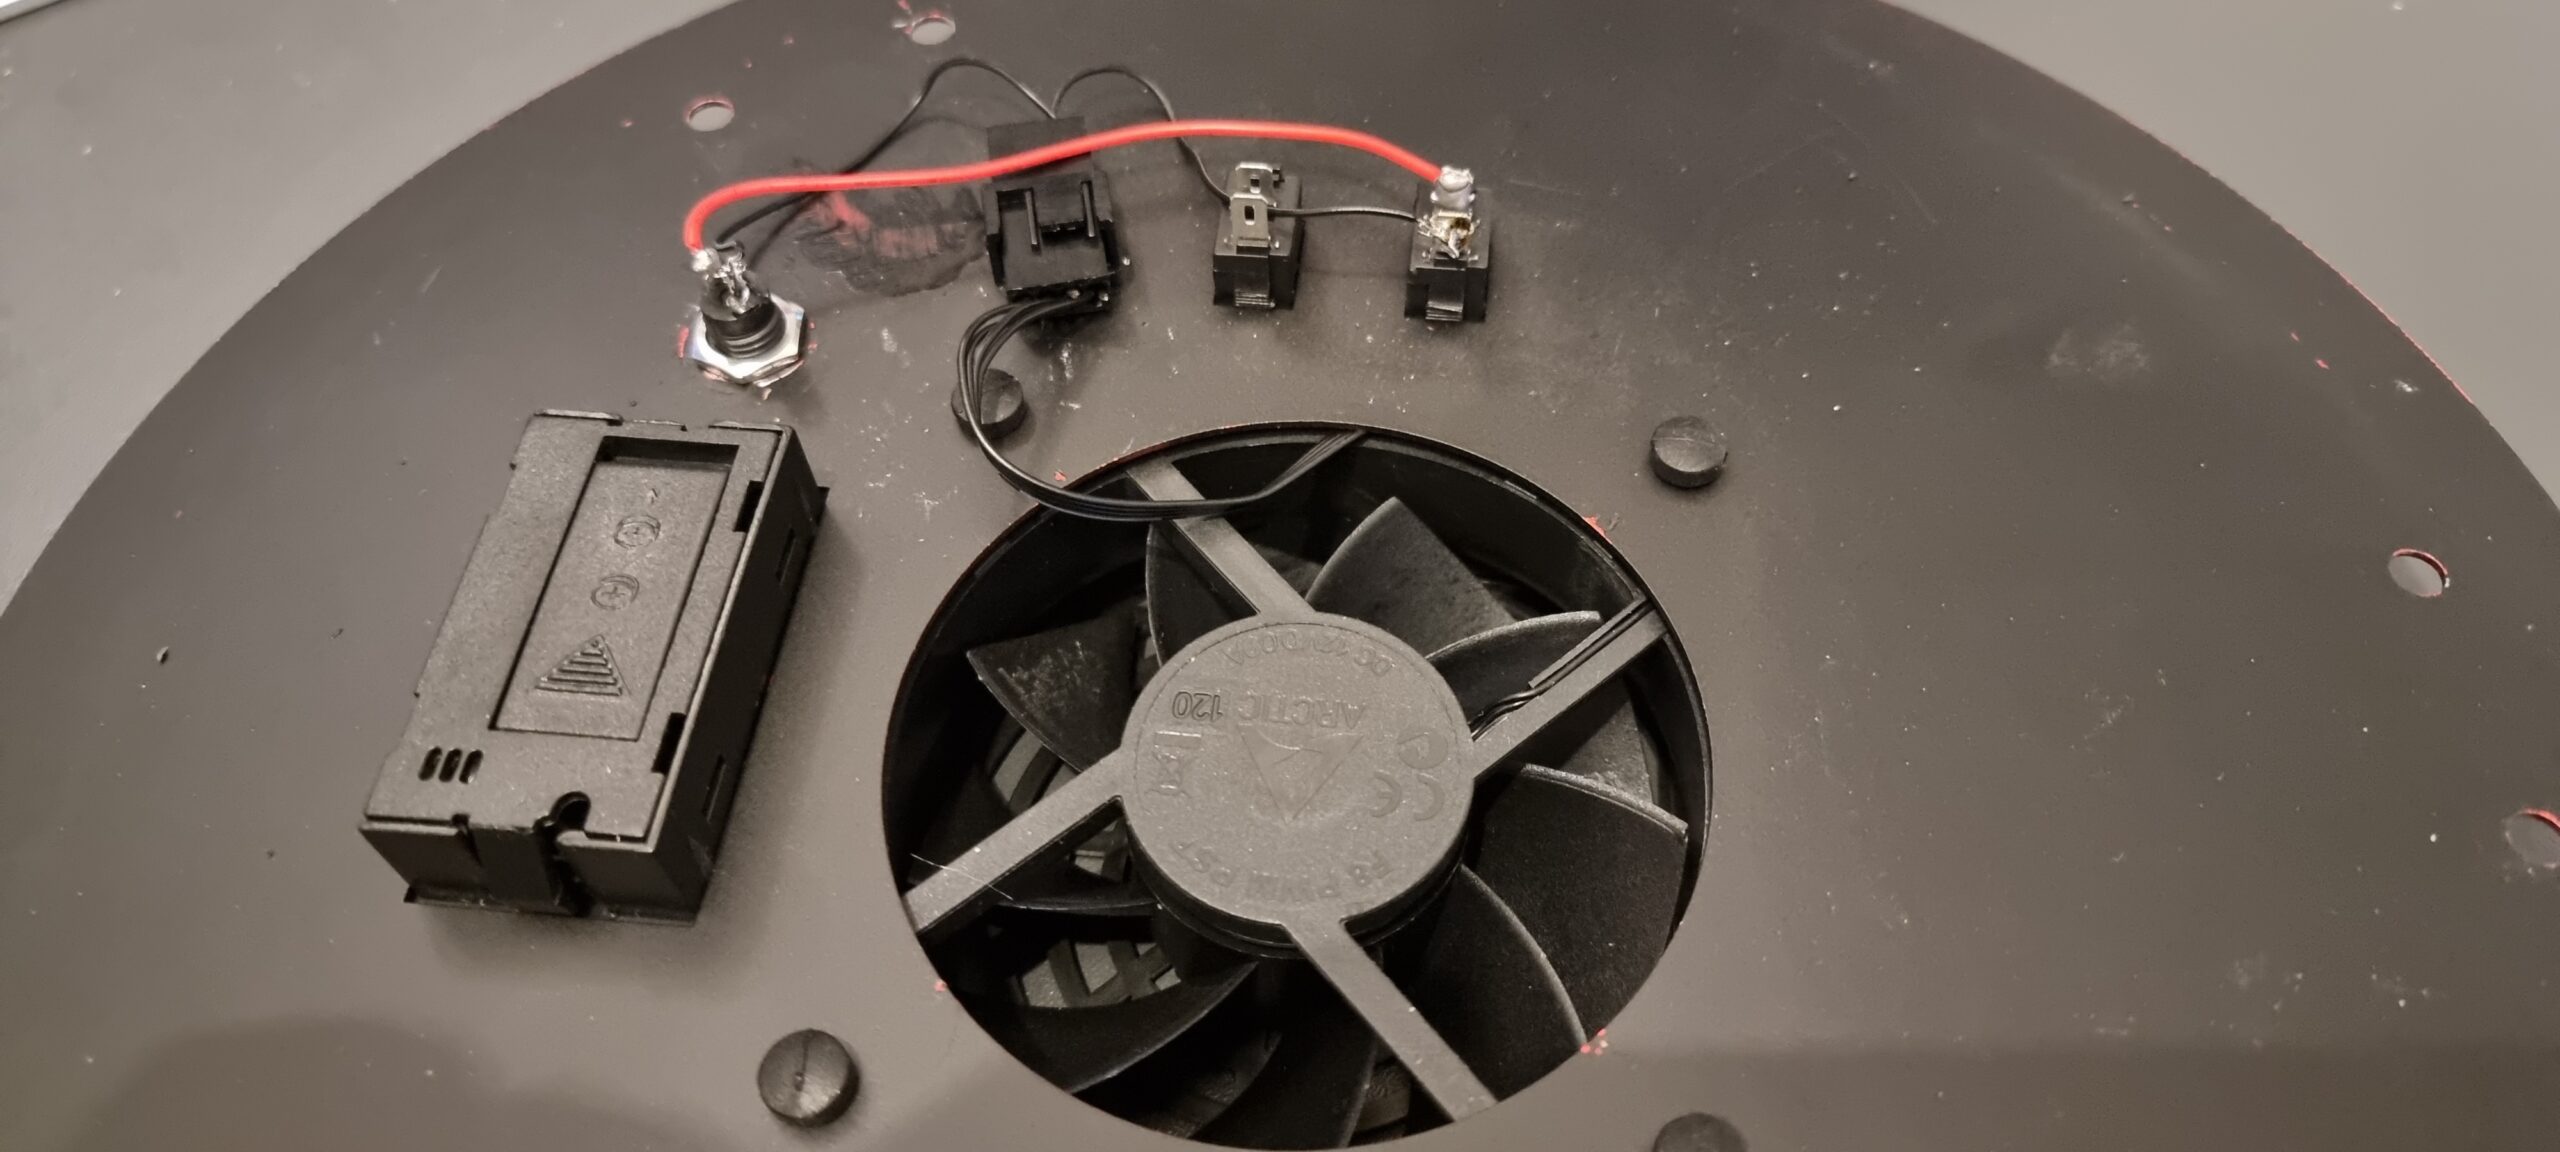
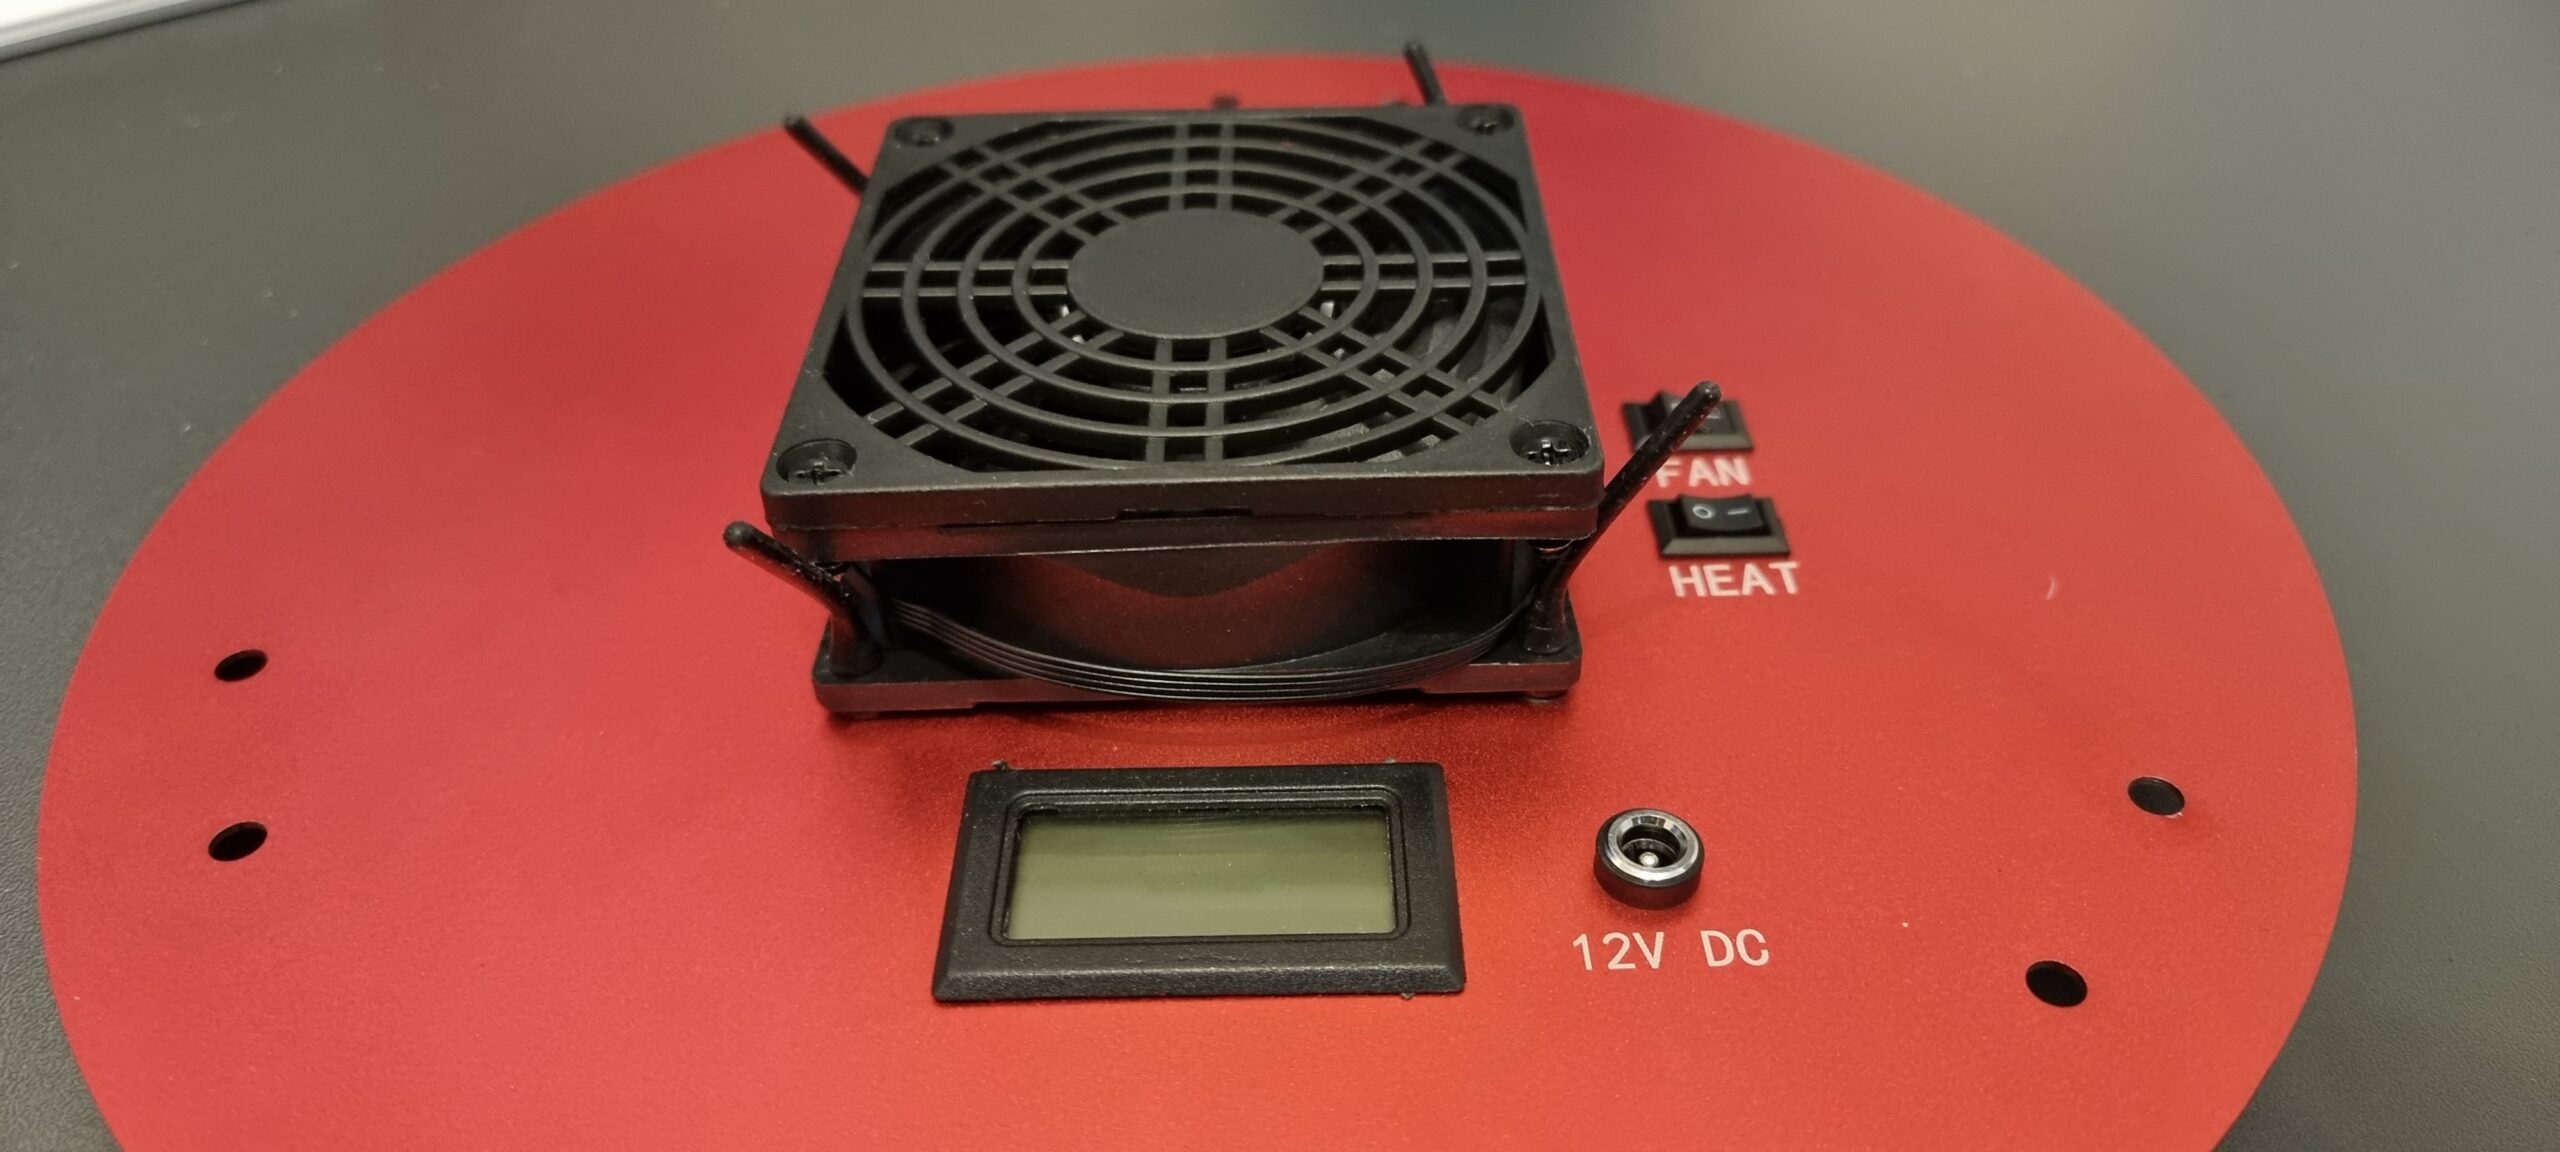
The first thing I planned to do was ensure that the primary mirror was secure and did not rock back and forward as well as replace the stock fan. I have fed back to SharpStar that they should mount the fan externally and also mount it with shock absorbing rubber mounters, and have the airflow into the tube from the back, rather than drawing air down the tube from the secondary. Here are my images of the fan replacement:

Primary Mirror assembly removed from OTA
Fan assembly with mirror removed
Stock Fan

Stock fan removed and added in a PWM fan connector should the fan ever need to be replaced, it can be replaced without removing the mirror assembly
Anti vibration fan mounting points
External fan connected to PWM connector
How the fan looks from the outside, the image is missing the fan filter which I added afterwards

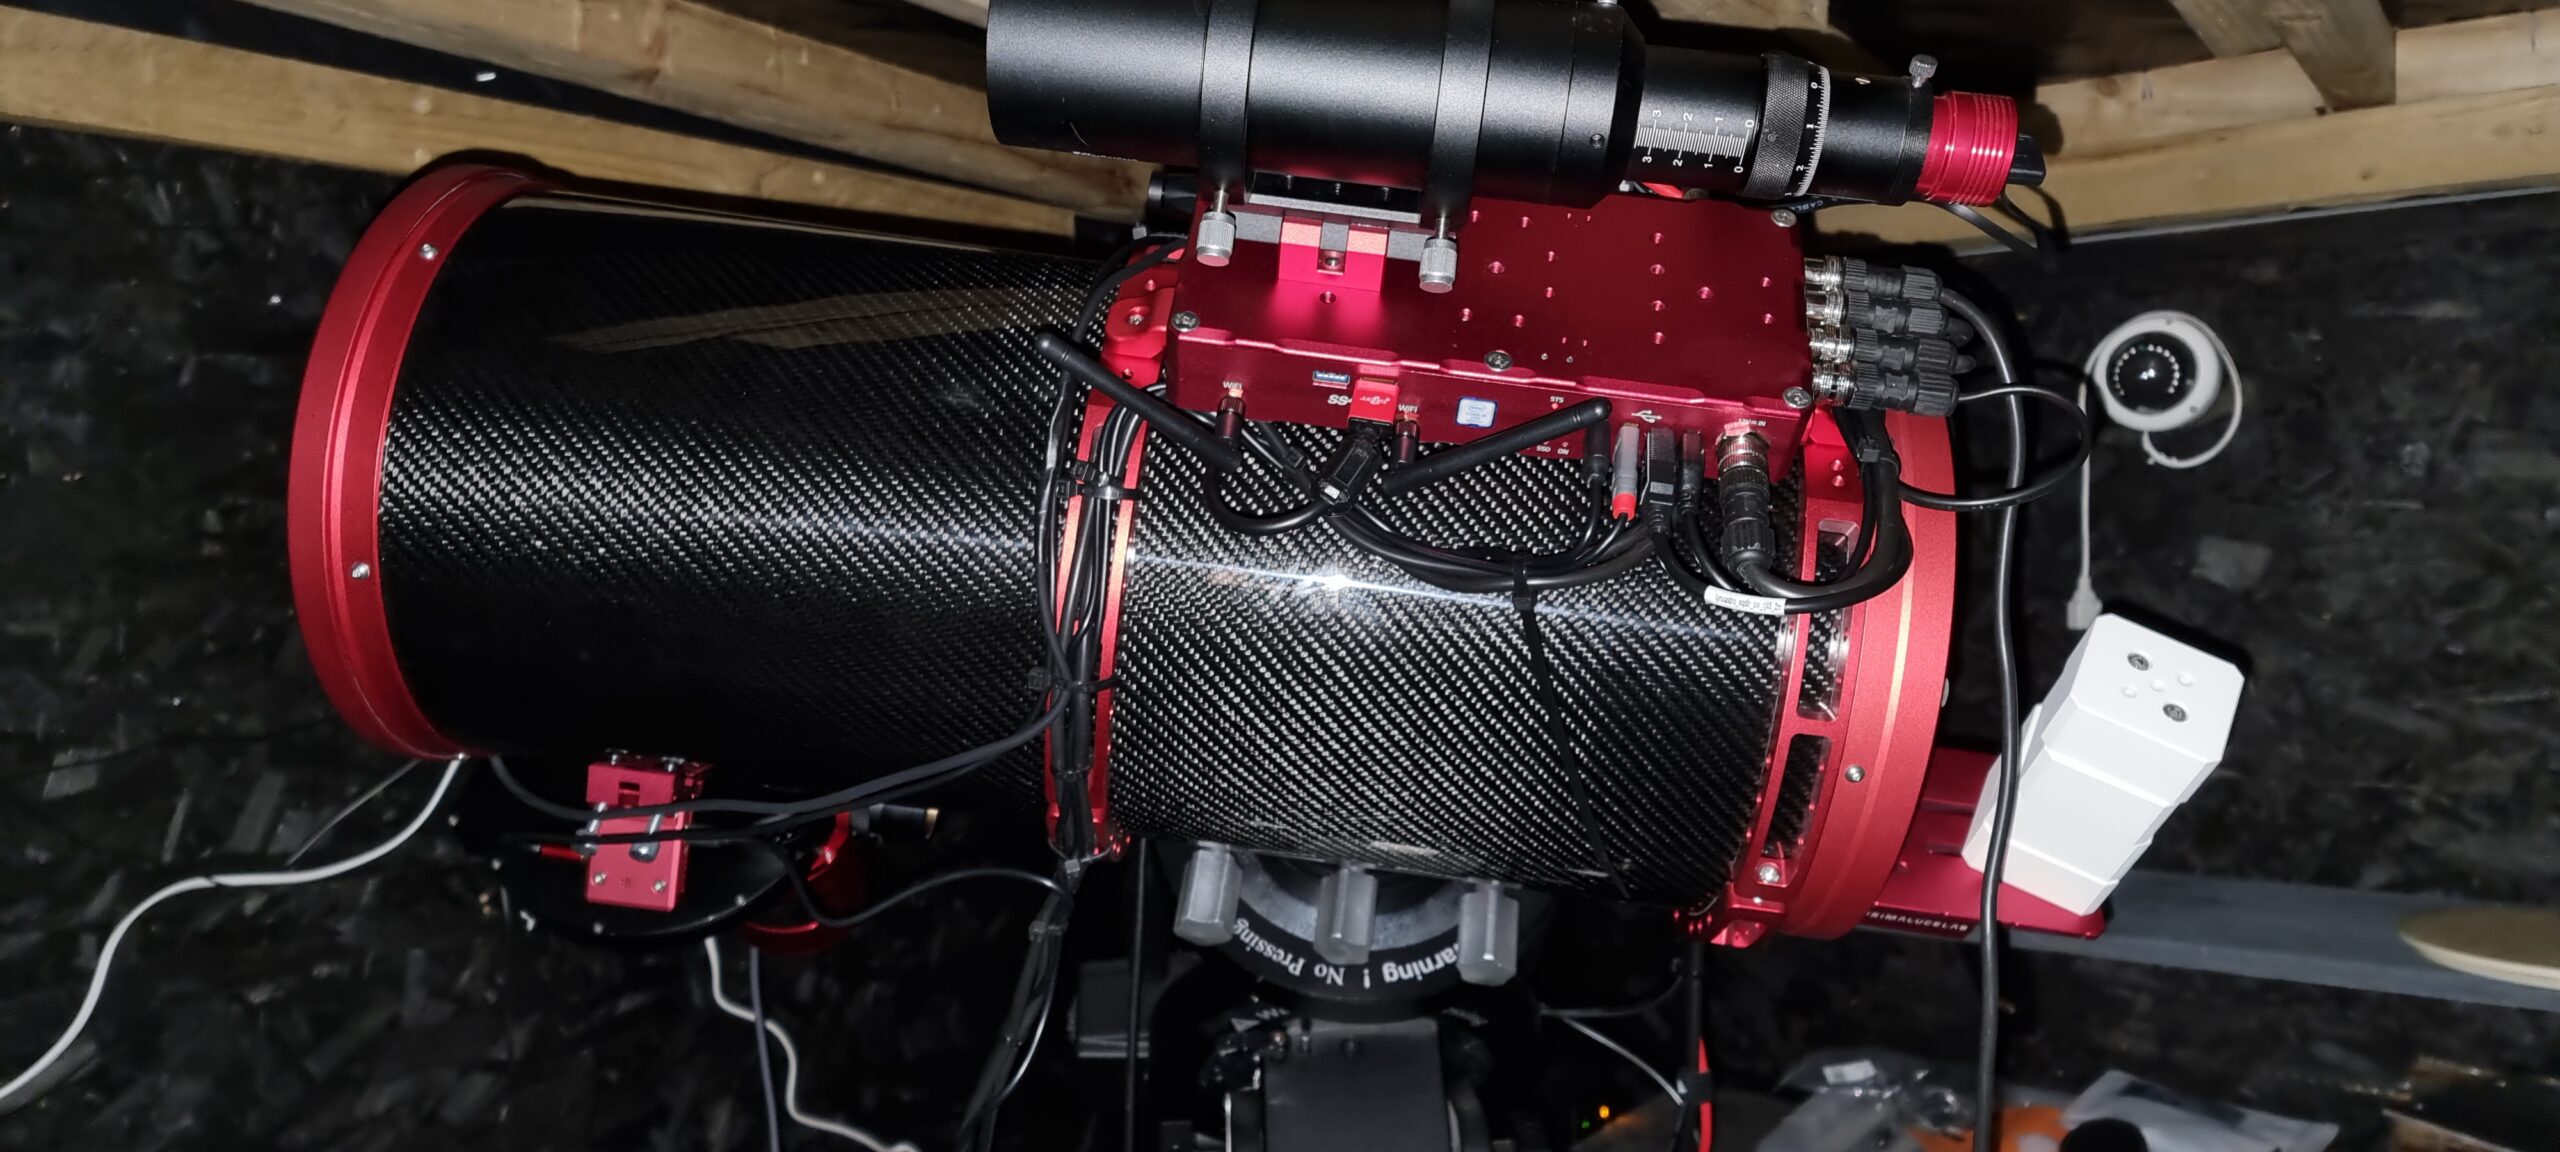
Once everything was back together, I mounted my Eagle4Pro onto the top bar, as well as added an extra long losmandy plate because I wanted the OTA as far forward as I could get it in order to have the camera in the right location without it hitting the mount at all.

And here is the scope on the mighty EQ8 Pro mount

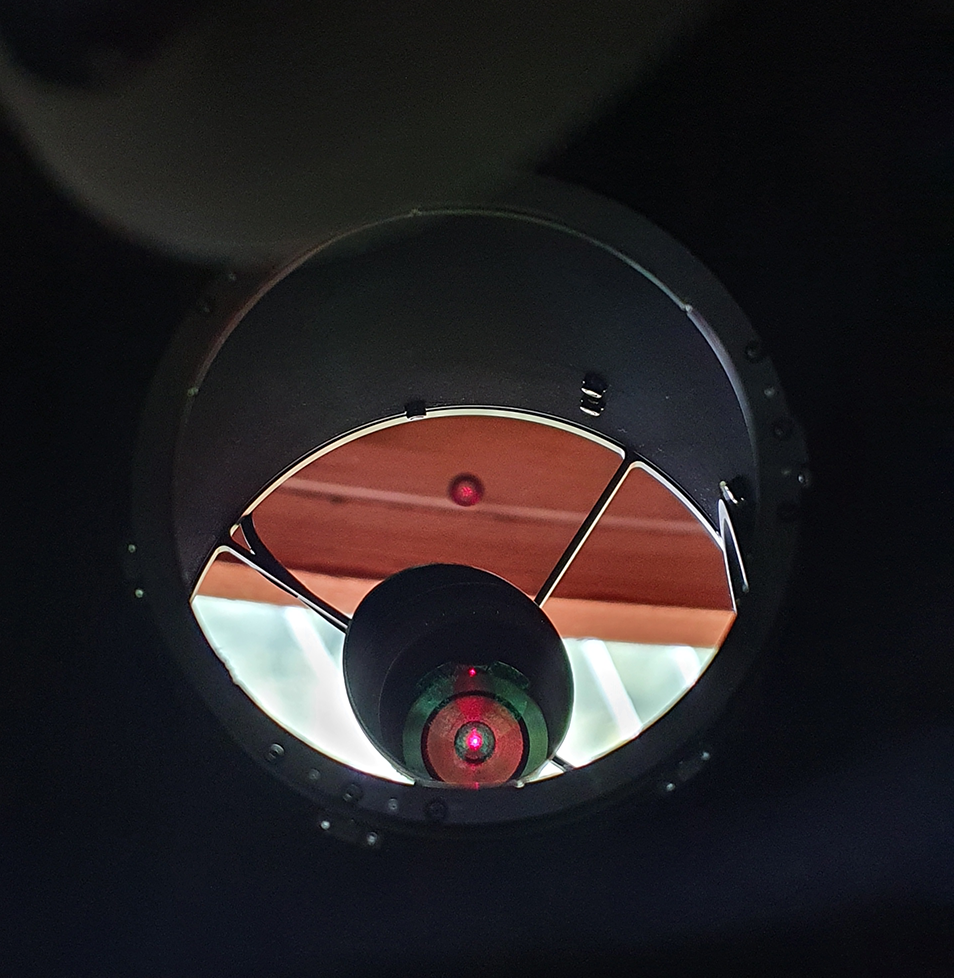
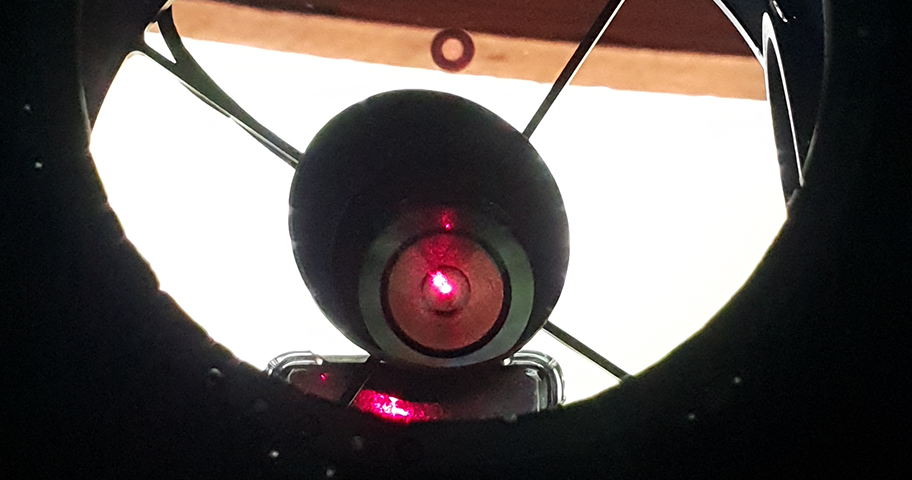
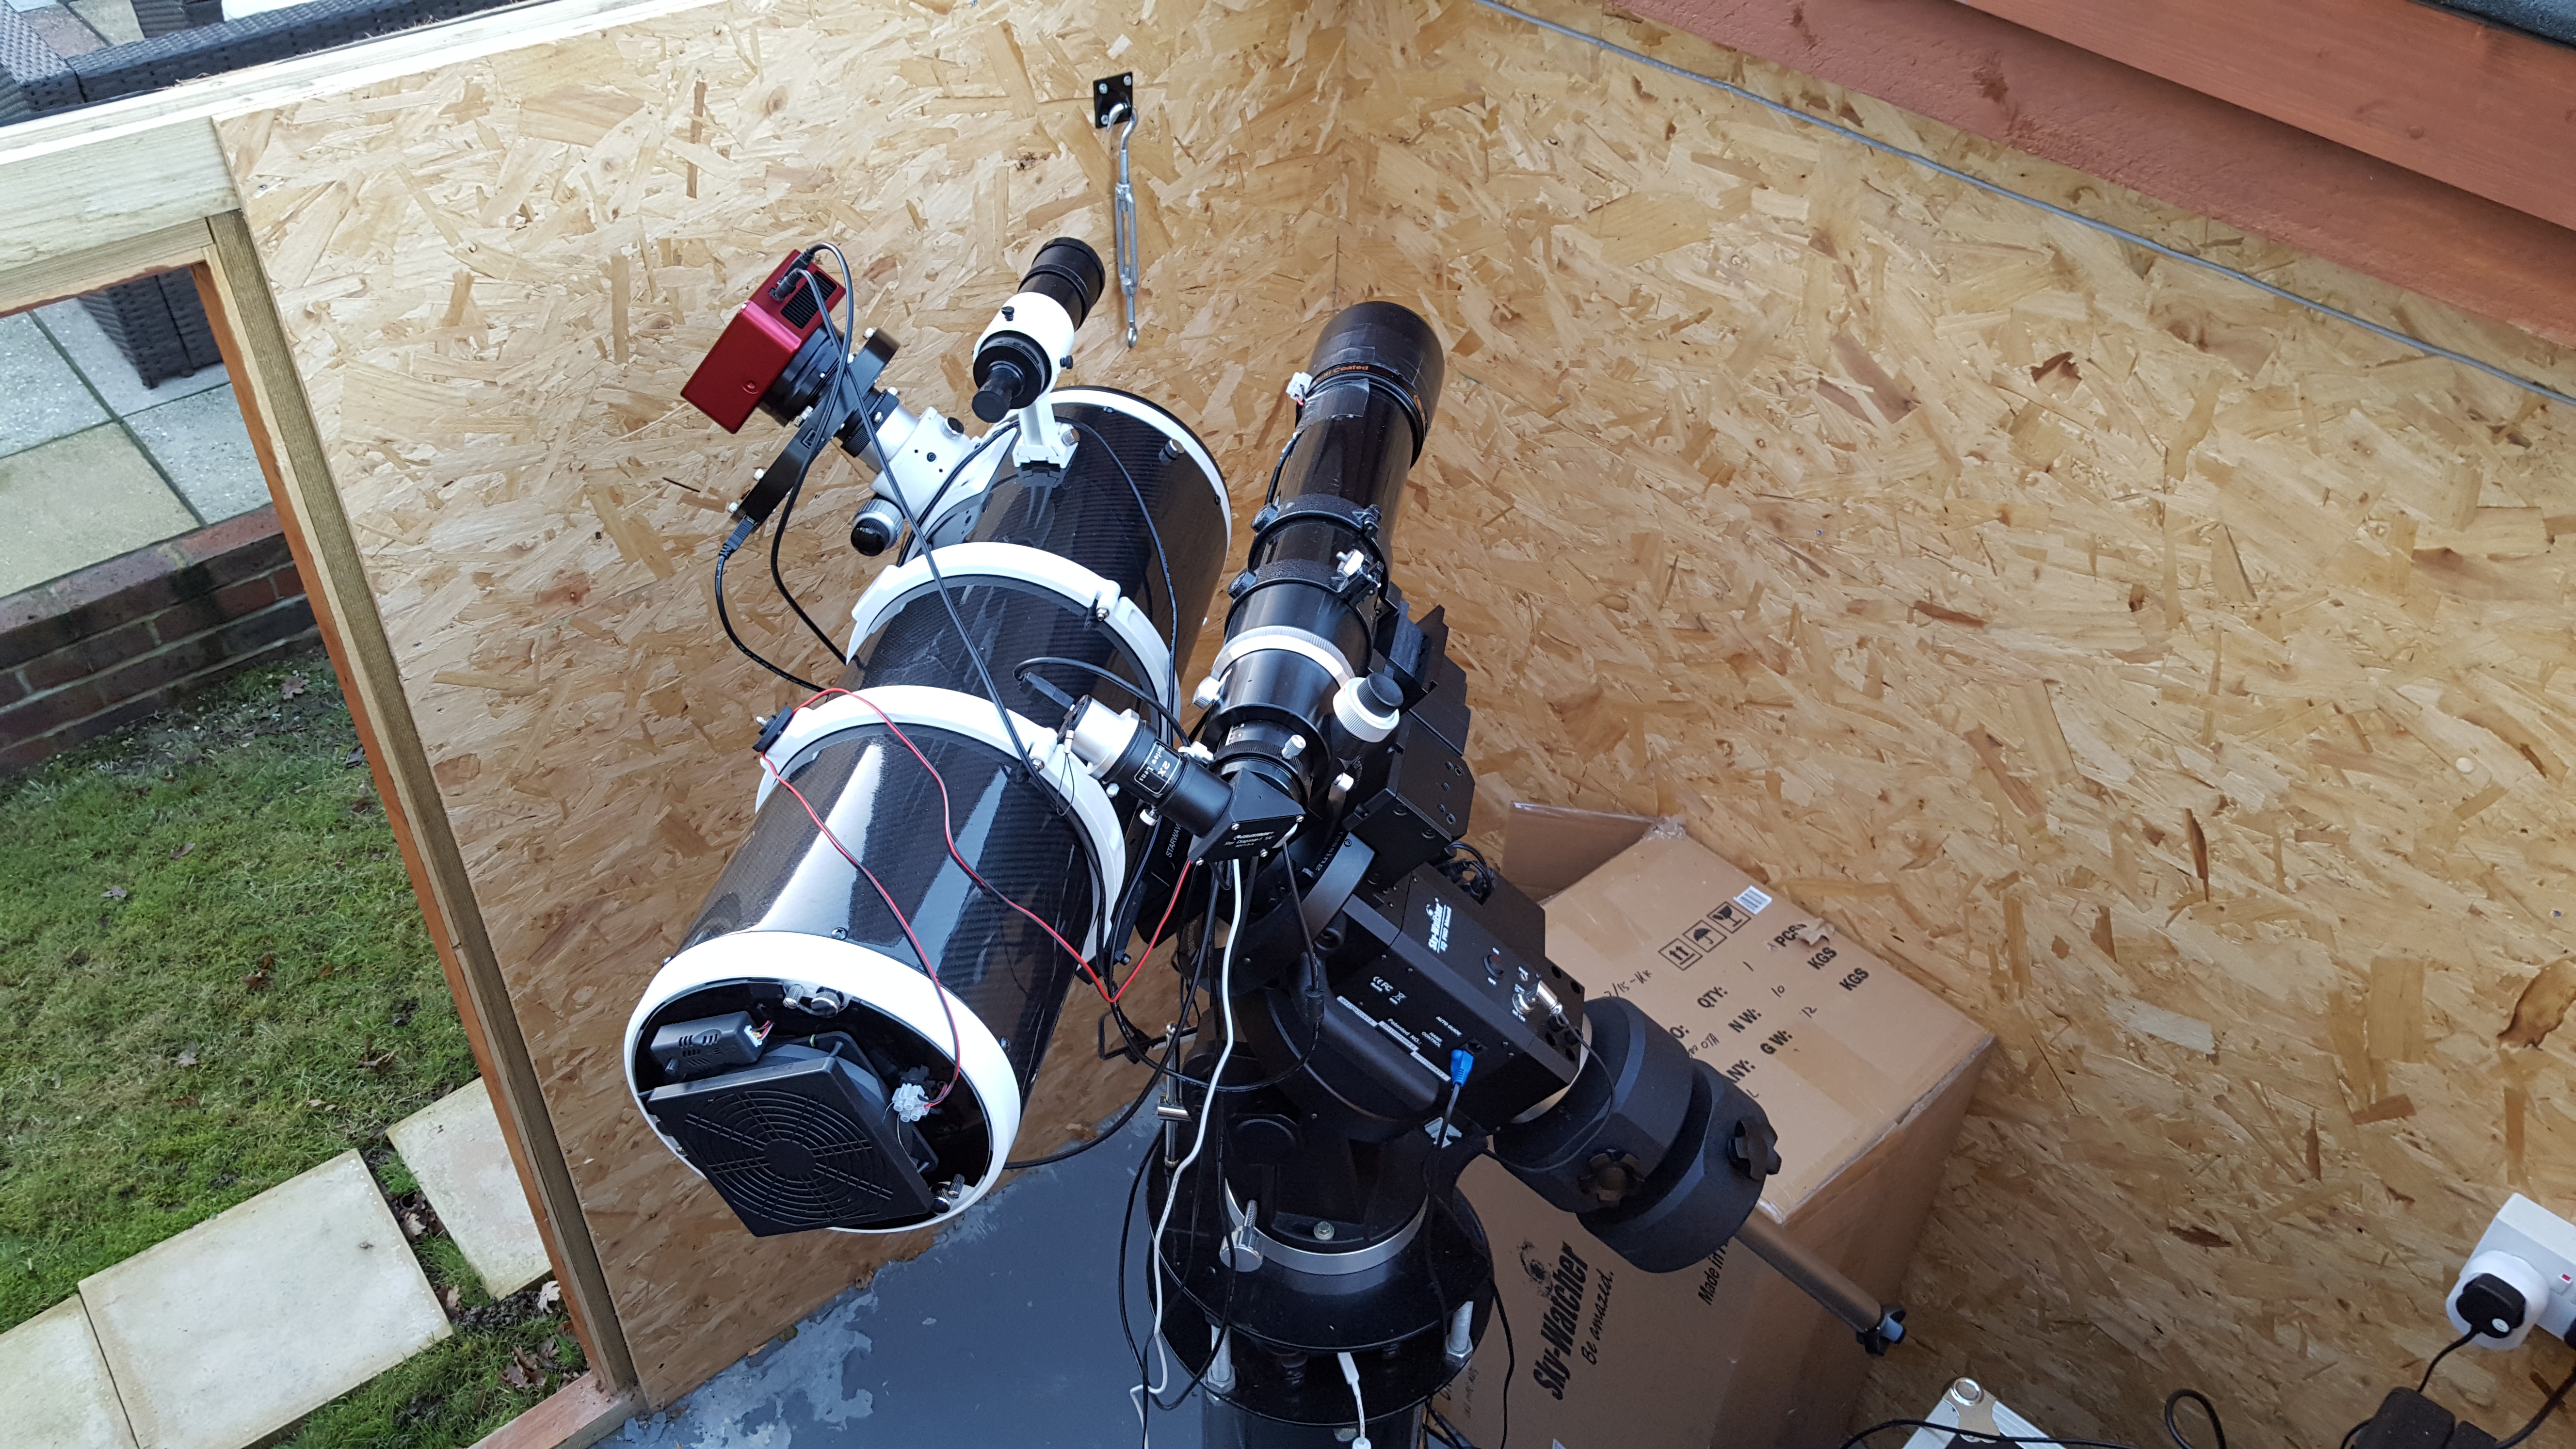
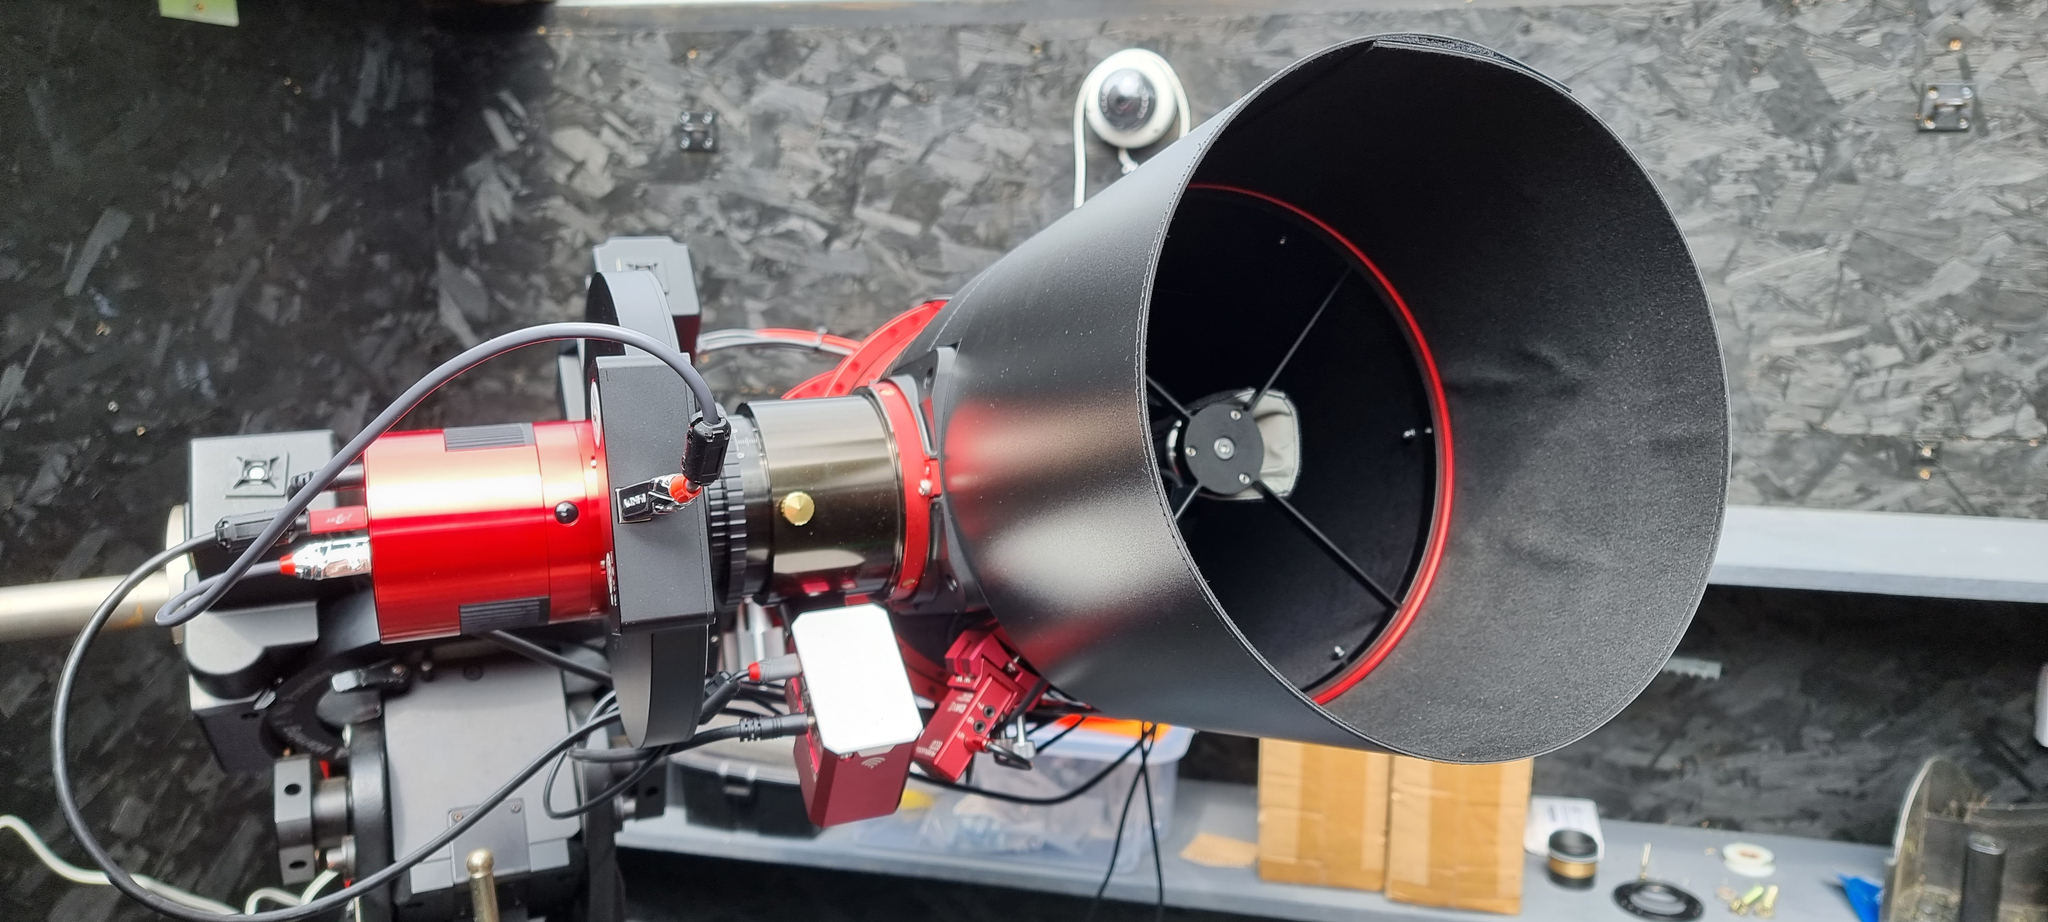
My first set of image testing did not go so well. My previous 15028HNT did not protrude above the walls of the observatory, so despite the fact that the secondary mirrors on both scopes are right up at the top of the tube, the 20032PNT was picking up stray light from my neighbour, so I had to adopt a dew shield that would extend the OTA by around 5 inches:

Scope with dew shield attached

Flats
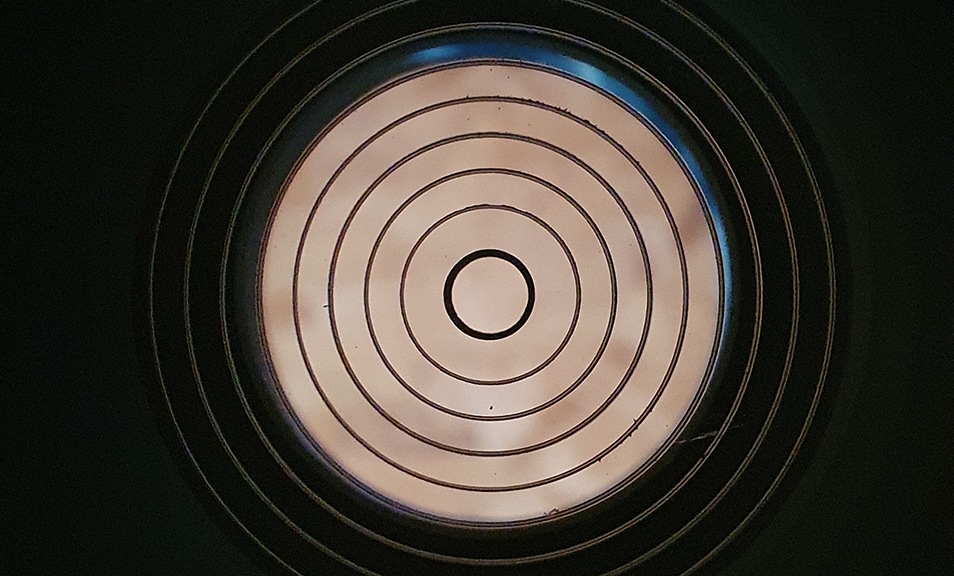
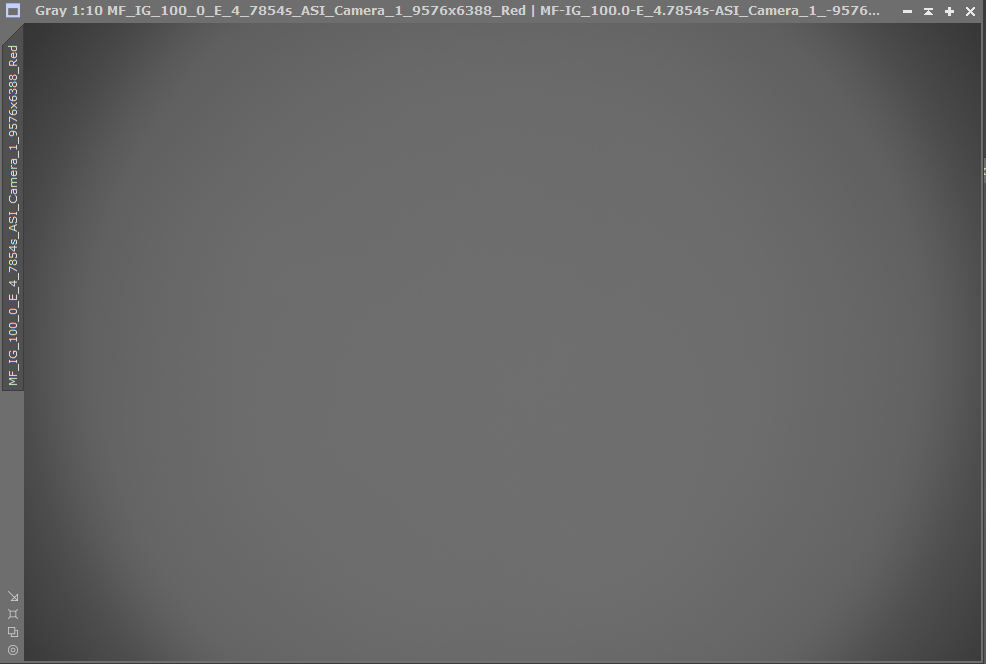
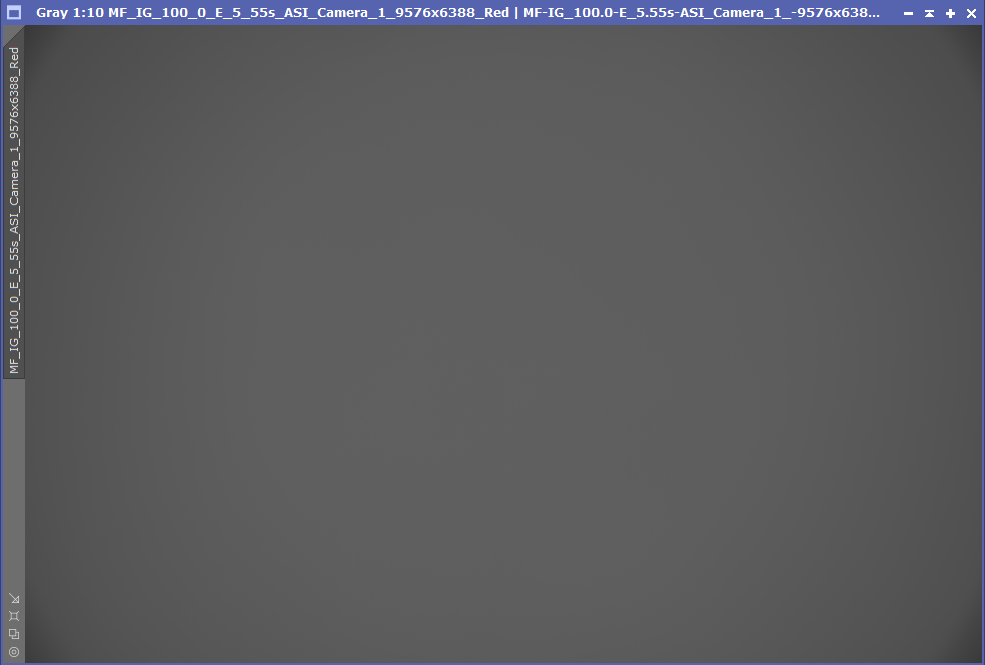
I first started to have issues with my flats that was taken with a flat panel, the flat frames would “Overcorrect” the images, but one thing I noticed that there was a lot of vignetting happening. Sky flats seemed to work better, but I was not happy with the vignetting. Now since I am using a full frame sensor on the ASI6200MM Pro, and the scope supports full frame, I was a little intrigued as to why I was getting so much vignetting, you can see from the master flat below that there was indeed a significant amount of vignetting.

Red Master Flat in PixInsight

I did some calculations and found what my problem was. Since my camera is full frame, it has a diameter of 44mm. The M54 connector on the telescope is 55mm away from the sensor, so a simple equation tells me that my light cone is larger than the M54 connector:

Sensor diameter + (distance from sensor / focal ratio)
44 + (55/3.2) =61.1875mm

The internal diameter of the M54 connector is around 51mm, so the light cone was being restricted by around 10mm. So I had a custom M68 to M54 adapter made which is 28.5mm in length, the reason for this is because the backfocus from the M68 connector is 61mm, so if we apply our formula:

44 + (61/3.2) = 63.06mm, this is way below the internal diameter of the M68 connector male thread, so vignetting should be minimised. Now because I do have some M54 in my image train, I know I would not completely elliminate vignetting and this is why, using the above formula, we can work out the light cone at varying part of the imaging train:

12.5mm (EFW mating to camera) = 47.9mm
18mm (50.4mm Filters distance from sensor) = 49.62mm
32.5mm (Light entrance to EFW distance from sensor) = 54.15mm

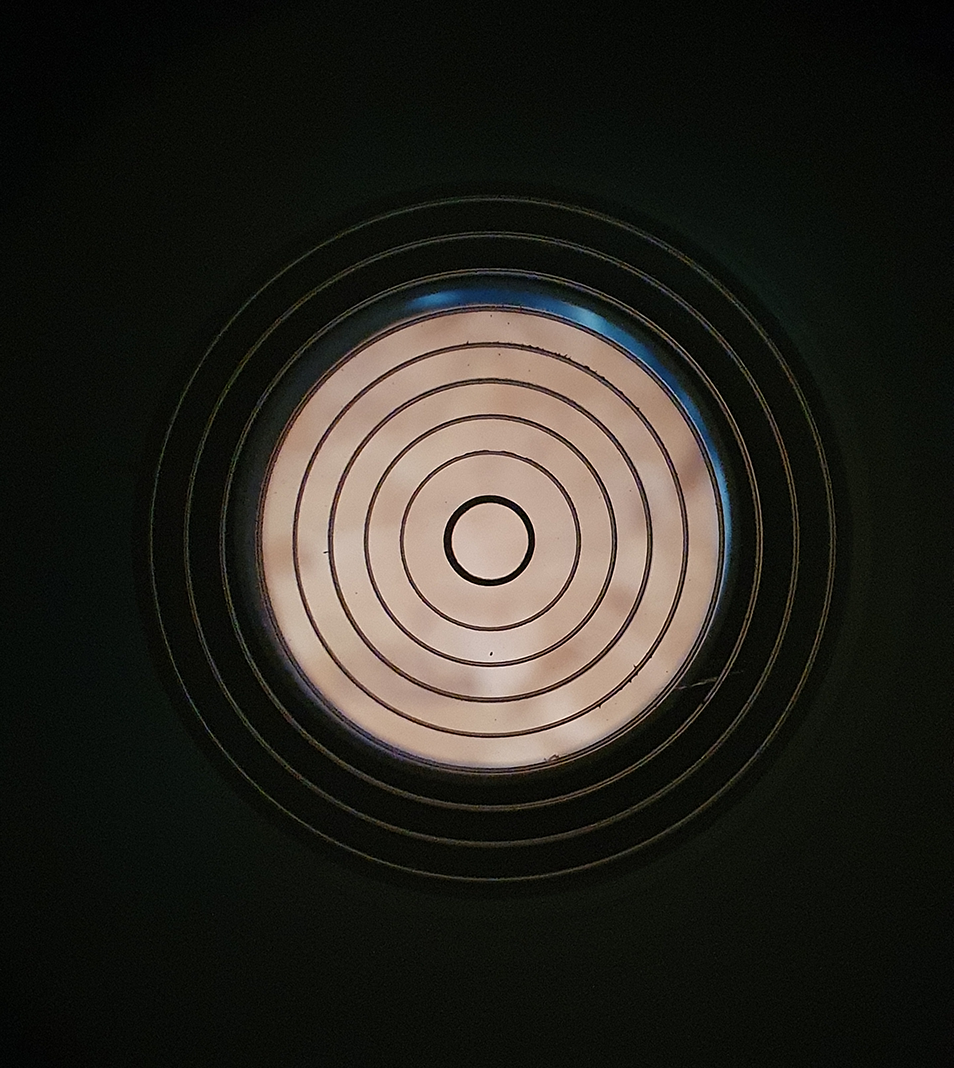
As you can see, I should expect some vignetting to occur because the light cone at the EFW M54 connector (with around 51mm internal) is 54.15mm, so I would be clipping the light cone slightly, but the result is as follows, again red filter, you can see that the vignetting is significantly reduced:

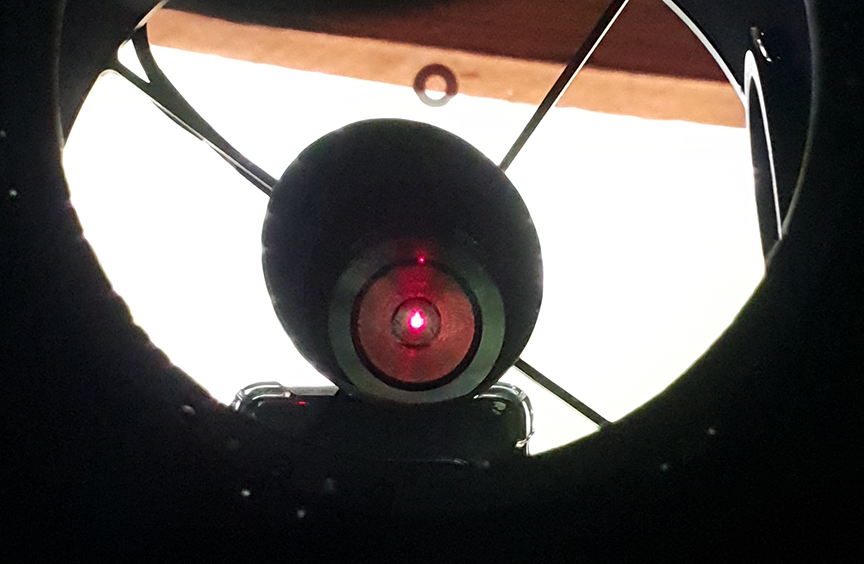
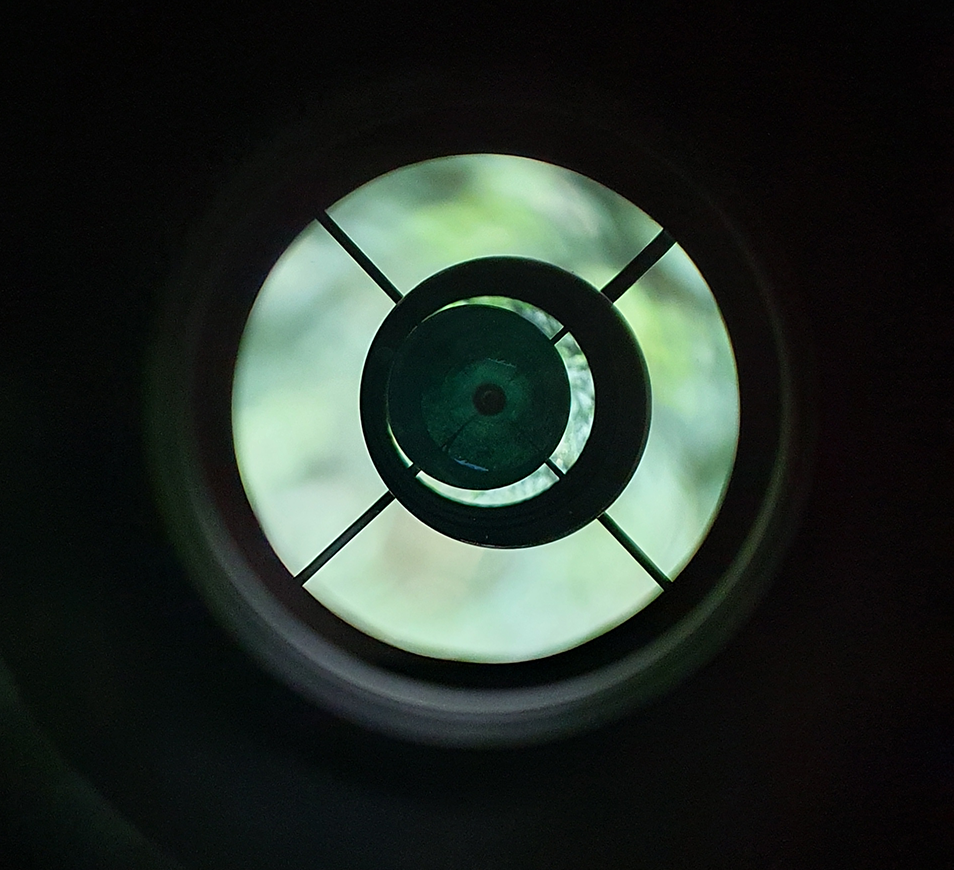
Collimation was done using the exact same process I used on the 15028HNT, you can read the guide here.

Conclusion:
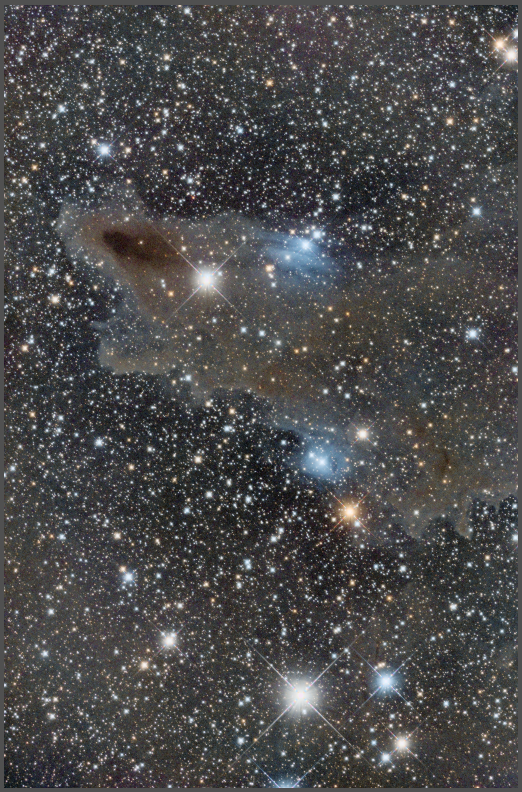
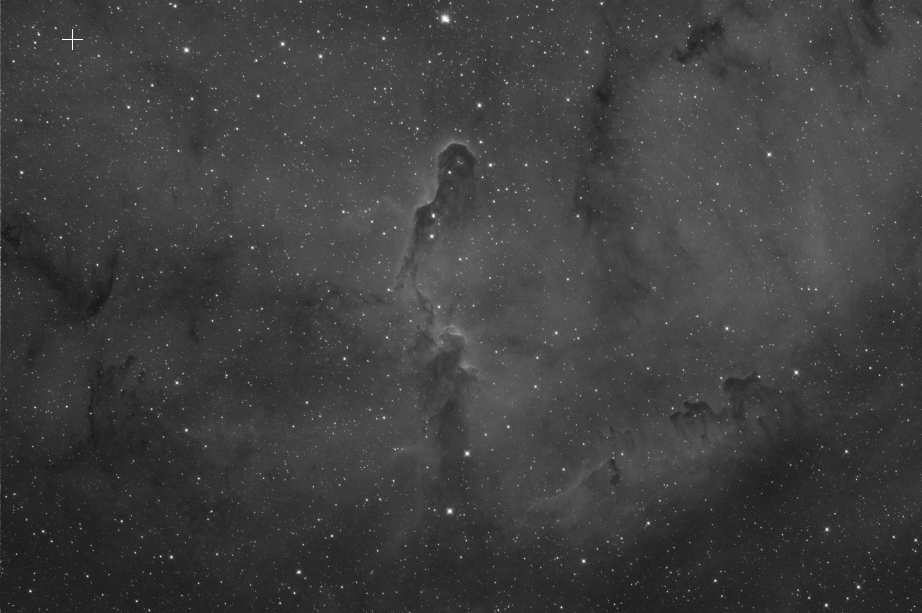
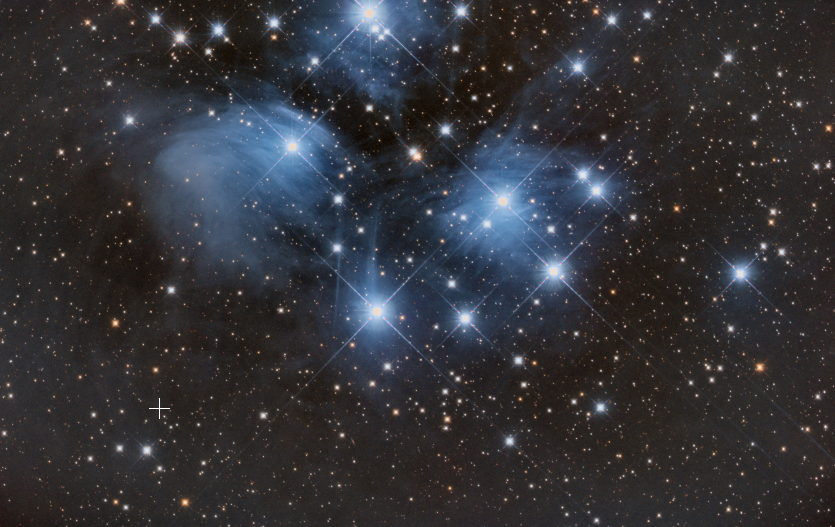
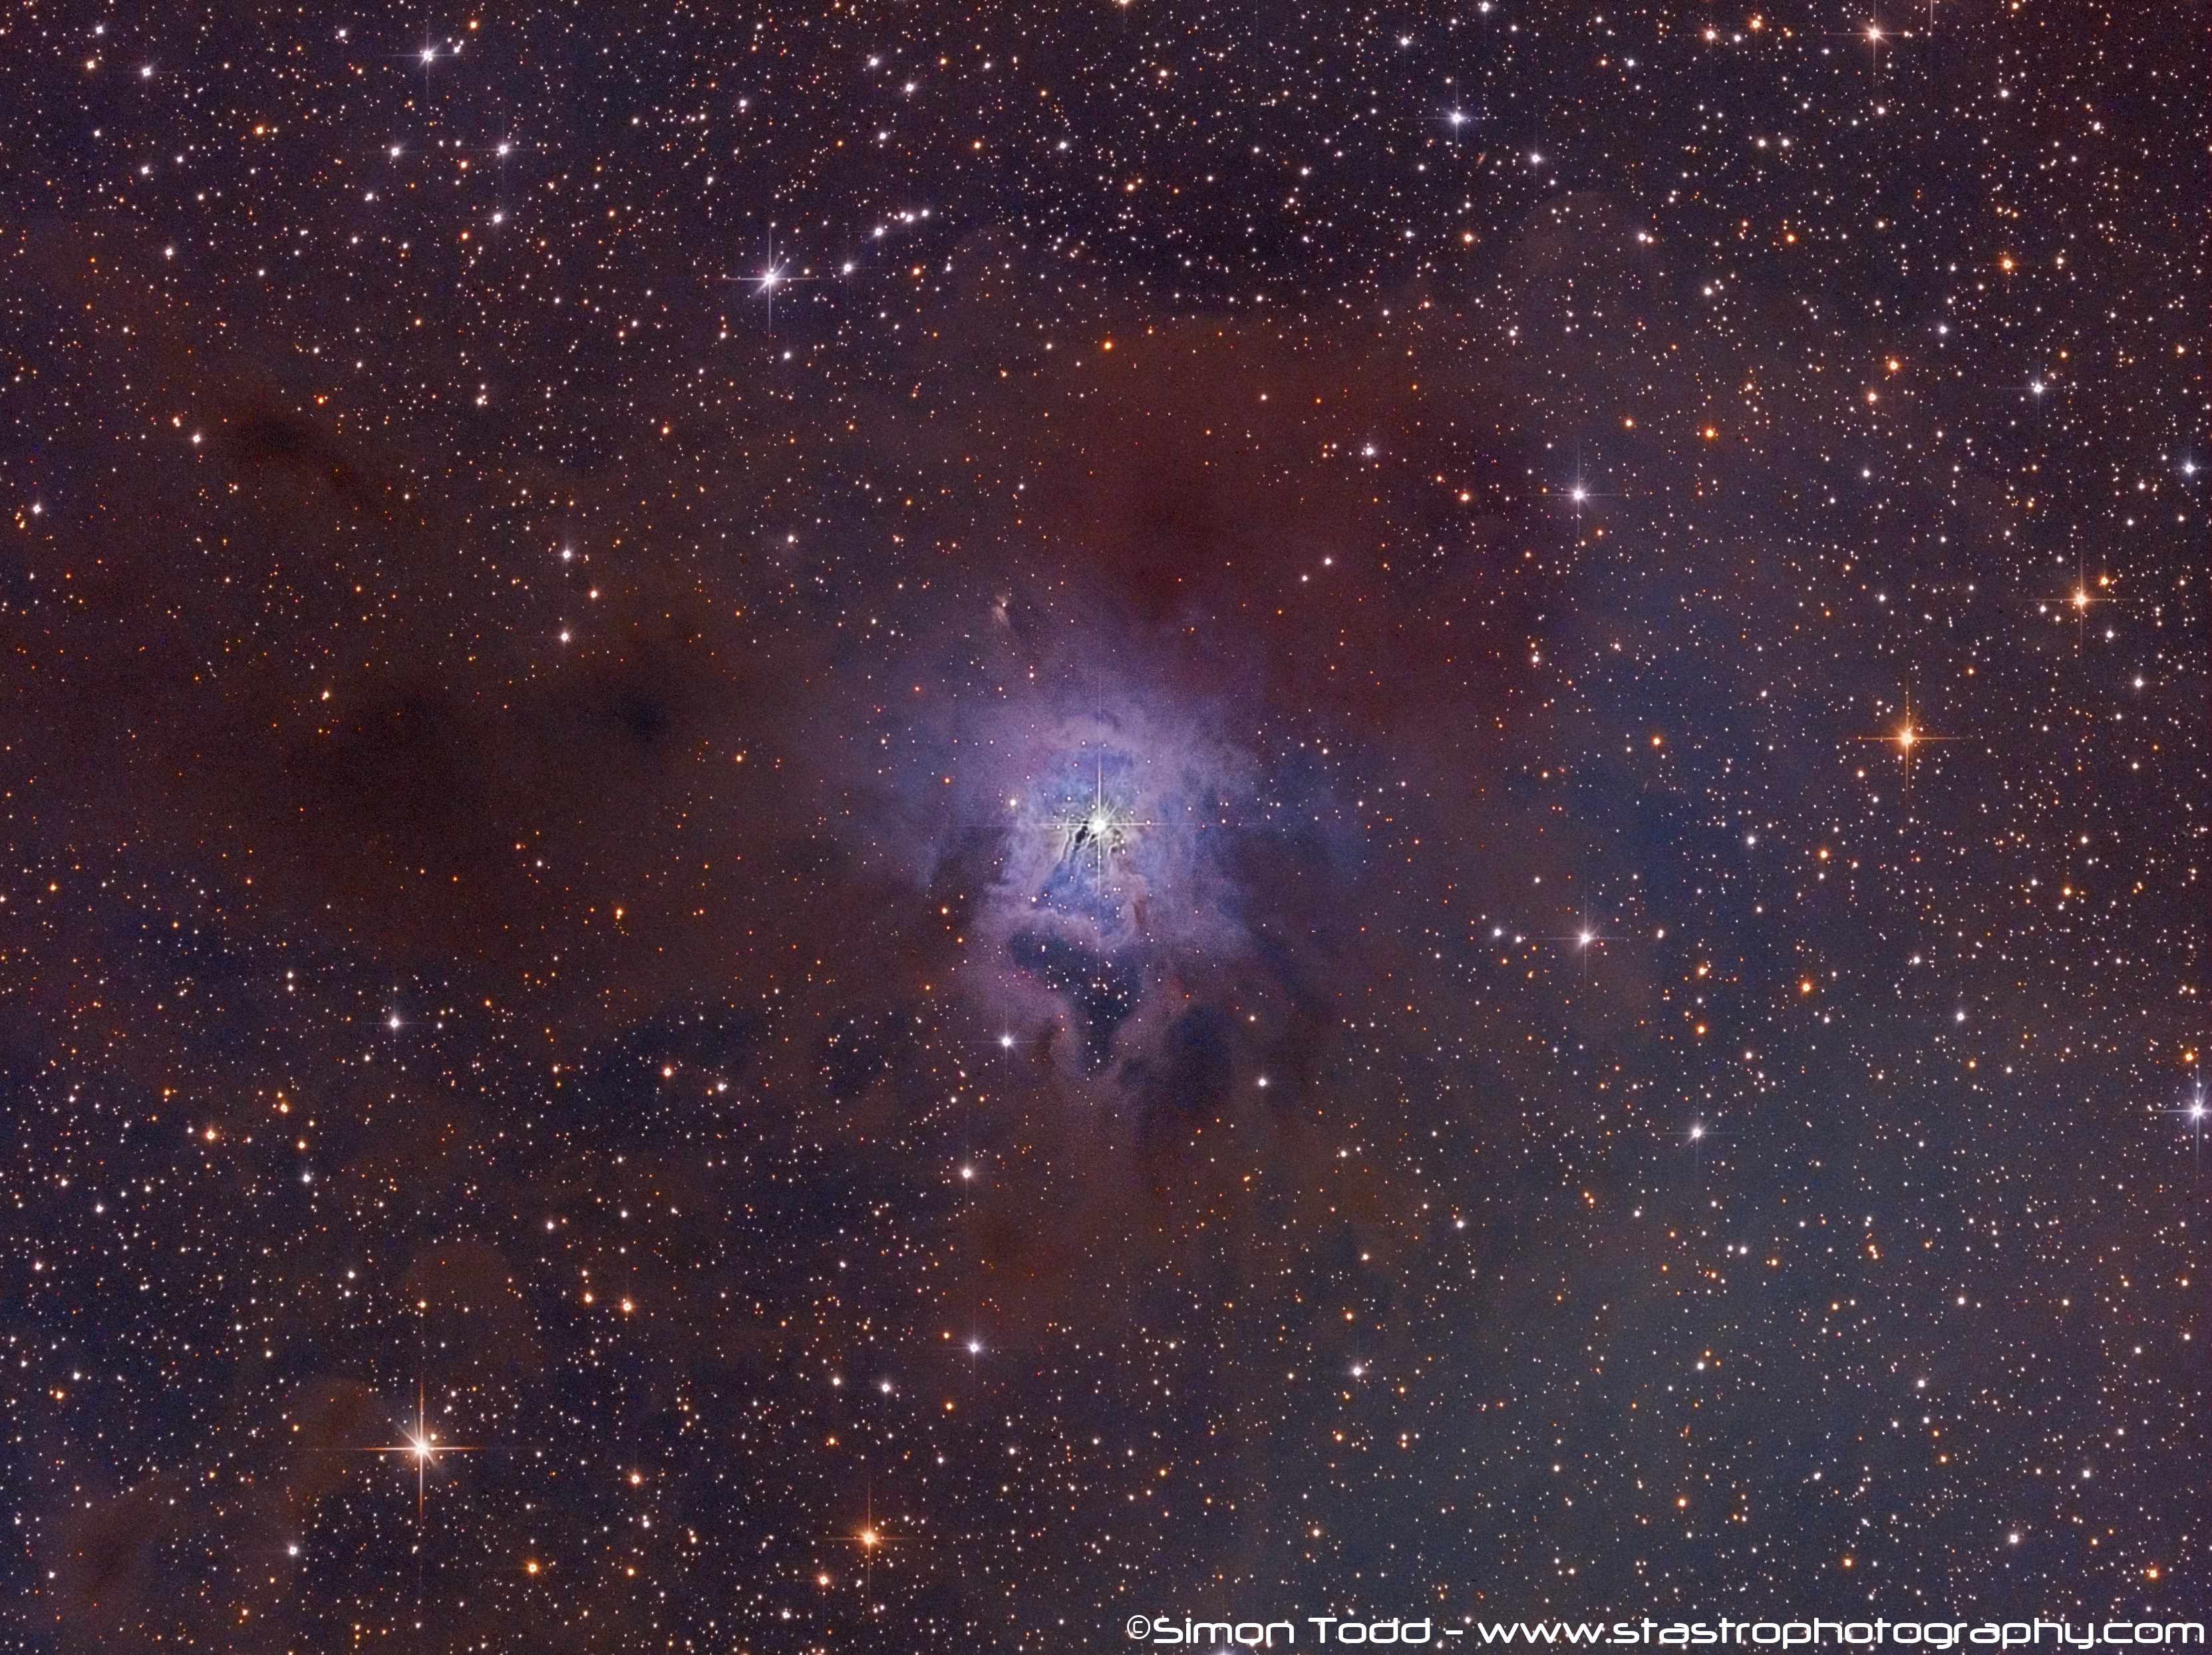
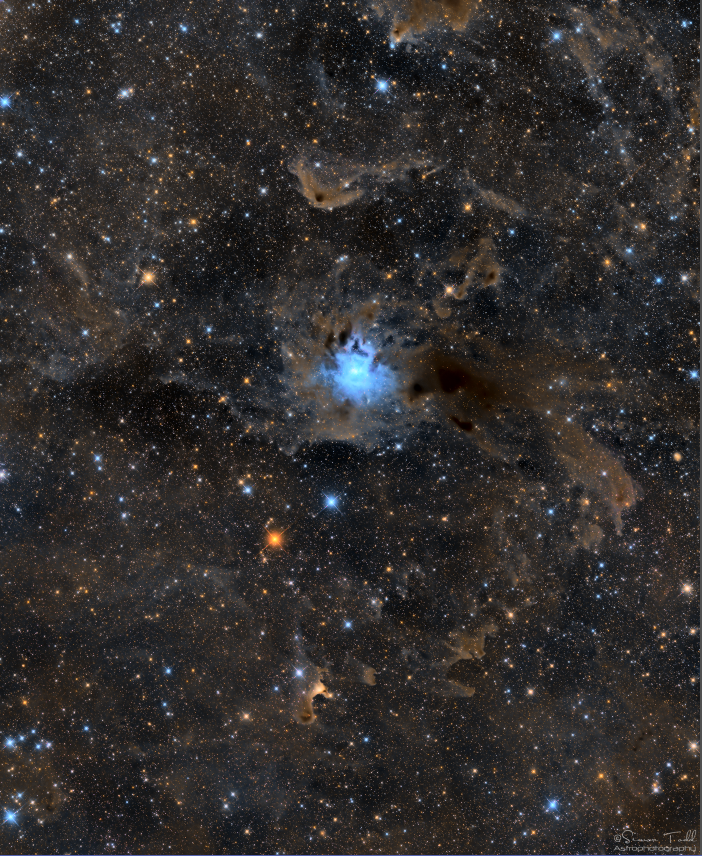
SharpStar have again produced an outstanding quality astrograph, with a massive focuser to take on the largest of imaging trains, as well as finishing off the product with high quality annodised OTA rings. I am extremely happy with the performance of the telescope, below is my first image which happens to be a 2 panel mosaic:

Iris Nebula, 2 Panel Mosaic, Each Panel consists of 151x60S frames at Gain100, for L, R, G and B, for the full resolution image please use this link

Backfocus information:
M42 connector: 53mm
M54 connector: 55mm
M68 connector: 61mm

Focal Length (With Reducer/Corrector): 640mm
Focal Ratio: F3.2
Newtonian Type: Paraboloid
Focuser Size: 3″

The only complaint I have is with regards to the fan, which I have made a suggestion to SharpStar on that. Good job again SharpStar!

A step by step guide to Collimation

If like me you own some sort of reflector telescope, whether this be a Newtonian, Dobsonian, Ritchey Chretien or as I have a Hyperboloid Astrograph then you’ll know that there is a very strong importance on collimation, the faster the optics the more critical collimation becomes, especially for imaging. After recently removing the rear mirror assembly for cleaning, as well as changing from the QHY183M to the QHY268C-PH amongst onther stuff in the imaging train, I wanted to share my experience and knowledge around collimation. Let’s start off with the details on what I use

Part 1 – Aligning the Secondary Mirror with the Focuser

Now on my SharpStar 15028HNT, they recommend you unscrew and remove the corrector from the focuser, however I have found no difference in collimation with or without the corrector in place and because it is part of the optical train I’d rather include it in the collimation, so the first step for me since my primary mirror was currently removed was to check the secondary alignment with the focuser, as well as the rotation of the secondary in relation to the focuser, in order to do this, I use the Teleskop-Service Concenter eyepiece, the eyepiece itself has a set of rings engraved into the plastic apperture like so

Teleskop-Express Concenter Eyepiece markings on lower end of barrel

I ensure that my focuser is at the most inward position and since my SharpStar has an M48 thread on the focuser, I used a 2″ extension tube that has an M48 thread on it, and placed the concenter eyepiece in there:

M48 threaded 2″ Extension tube with Teleskop-Express Concenter Eyepiece

This serves well to get the rotation and alignment of the secondary with the focuser by ensuring that the mirror appears as a perfect circle between the rings, now you can adjust your focuser position in order to get the edge of the mirror to appear on the lines, this is what the view looks like through the concenter eyepiece:

Here you can see the secondary mirror appears circular and in line with the concenter eyepiece markings showing a successful alignment with the focuser

The blue at the top right of the image is a piece of card I stuck behind the secondary in order to show the edge of the mirror better.

As you can see my secondary mirror is pretty much perfectly aligned with the focuser and square with the focuser also, if your mirror shows up as more eliptical, this means the mirror needs to be rotated, if the mirror does not fit in within the circle itself, for example if it is over to the left or right, you will need to move the mirror forward or backwards by means of loosening or tightening the central screw that holds the secondary.

You can see from the following image, I have a central screw which is used for moving the mirror up or down the tube away from or closer to the primary, as well as rotation of the mirror, but then there is also the three collimation screws that are used to adjust the mirror direction itself which we will talk about in the next section

Here you can see the central adjustment screw for adjusting the mirror rotation and centering the mirror with the focuser, the three outer scres are used for adjusting the tilt of the mirror to align with the primary

Part 2 – Aligning the Secondary Mirror with Primary Mirror

Now that we have our secondary mirror lined up and square with the focuser, the next step is to align the secondary with the primary, now for this I will use my FarPoint Astro Laser collimator, which itself has recently been collimated by FarPoint Astro, now you can re-use use the 2″ extension tube and place the laser into the tube, but for the SharpStar I will use the M48 to 1.25″ lockable adapter like so:

FarPoint Astro laser collmator in the SharpStar M48 to 1.25″ Adapter

Now the point of this part is to ensure that the laser hits the centre spot of the primary mirror, if it does not, then this is where you would adjust one or more of the three screws on the secondary, as you undo one, you should tighten the other two, as you can see from this image, I need not make any adjustments as the laser hits the centre of the primary perfectly:

Here you can see that the laser hits the primary mirror centre spot

Part 3 – Aligning the Primary Mirror

Now since I do not have to make any further adjustments to the secondary mirror, it is time to focus on the primary mirror, the trick here is to get the laser beam to return to the point of origin, here’s an example of the primary not being correctly aligned:

You can see two dots here, one is the laser aperture, the other is the reflection of the laser from the primary mirror, this reflection needs to meet the aperture

You can clearly see the red dot to the top left of the laser apperture, this means that the primary needs some adjustment by means of the three collimation screws which are situated on the rear of the primary mirror assembly:

Here you can see the primary mirror collimation screws, the larger push/pull the mirror, the smaller are locking screws to secure the mirror in place after successfully collimating.

Most telescopes have a push – pull method here, turning anti-clockwise will push the mirror further up the tube, whereas turning clockwise will pull the mirror towards the bottom of the tube, it is very important not to keep turning anti-clockwise because this could result in the screws becoming disconnected from the primary mirror. After an adjustment on a couple of the collimation screws, my primary is now aligned properly as the laser beam returns into the laser apperture:

Here you can see that there is no additional dot, the dot is centered right on the laser aperture indicating primary alignment is complete

Once the laser collimation has been completed, it is easy to verify this with the FarPoint Auto-Collimator, the eyepiece has a mirror inside which allows you to see where the centre spot of the mirror is and will form a slightly pale dot in the middle, if the dot appears in the middle then you have your collimation pretty much spot on after following the above, maybe a very slight adjustment on the primary collmation screws is all that is required, you can see here what the view looks like:

It is also normal on faster telescopes to see the mirror appearing offset as opposed to central to the OTA itself. Once completed, I would typically then perform a star field test and I prefer to use the Multi Star Collimation in CCD Inspector for this, you can of course use the de-focused star method.

I hope you found this useful, I just thought I would share my process in performing collmation to help others who may be on that journey also.

SharpStar 15028HNT

After months of trying to get my trusty Sky-Watcher Quattro F4 to work with the ASA 0.73x reducer I decided to go all in on an F2.8 astrograph. After doing some research I stumbled across the SharpStar 15028HNT F2.8 Hyperboloid Newtonian Reflector from my local supplier 365Astronomy.

After toying with the idea and speaking to my good friend Nick from Altair Astro and with the idea of going back to a refractor, I decided that I could not go back to slower than F4 and I wanted something that in essence would work with a bigger sensor than my QHY183M, and the Sharpstar looked like it could work for me, so I placed my order with Zoltan from 365Astronomy and collected it the following day.

Unboxing the scope, I was like a young child at christmas, the scope came with a very sturdy protective hard case and removing the scope out of the case you could immediately feel that a lot of time and effort had gone into producing the 15028HNT.

Aperture: 150mm
Focal Length: 420mm
Focal Ratio: F2.8
Weight: 6kg
Tube Material: Carbon Fiber

With the scope unboxed I started to fit my equipment onto the scope. In order to fit my Sesto Senso I had to rotate the focuser 90 degrees clockwise due to the telescope mounting rings, this is when I noticed an isue that one of the grub screws on the focuser would not tighten and I needed to stop the backlash, fortunately there’s another grub screw on the other side that tightened and stopped the backlash.

Before I attached my imaging equipment, I had to ensure that the telescope was collimated, so I stumbled across the collimation guide which after speaking with my good friend Terry Hancock over at Grand Mesa Observatory who was also evaluating the same scope, we both agreed that the colimation guide wasn’t very well written as it mentioned nothing about collimating the primary. One thing that it mentioned is to remove the corrector, Sharpstar include a tool for you to remove the mounting plate and corrector, but here is a word of advice……..remove this when the telescope is cold, take that advice from someone who tried to remove it whilst it was warm!

I performed a laser collimation with my Concenter Eyepiece to check the secondary, and then a laser to check the primary, now the collimation guide says to remove the corrector, I have done validation with both the corrector removed and the corrector in place, and it made no difference whatsoever, so my opinion is to leave the corrector in place.

With the scope closely collimated, I mounted my StarlightXpress Filterwheel and Camera which with the 15028HNT is an M48 thread for the gear to screw onto.

I will post some images as soon as I have completed some, the weather has been pretty poor (probably because I bought a new scope), but the frames I have got so far are very sharp, pinpoint and I can honestly say I have never seen images come directly off the camera so sharp.

My field of view with the QHY183M is around 1.21 Arcsec/Pixel which gives me a FOV or around 1.81°x1.2° and I love the difraction spikes being at 45 degrees compared to the 90 degrees on the skywatcher and I already have a pretty full target list for this scope ready to go this season.

Apart from the couple of product issues I have experienced (Grub screw on focuser and tube clamp thumbscrew being threaded) I am extremely happy with the scope, it is performing really well and here are a couple of work in progress images that I have started

Dark Shark Nebula Moscaic Panel 1 – 51x300S in Red, 25x300S in Green and Blue
Elephant’s Trunk – 51x300S in 6nm Ha
M45 – Mosaic Panel 1 – 12x150S in R, G and B

After a few weeks, the telescope has held collimation very well, I have not had to perform any re-collimation, I will re-evaluate this in the much colder months of winter.

I am so happy with the scope that I am actually considering a second one for an OSC Camera with a bigger sensor.

Skywatcher Quattro 8-CF Imaging Newtonian

After much deliberation and conversations back and forth with Bernard at Modern Astronomy, I finally decided to go for the Skywatcher Quattro 8-CF 8” F4 Reflector, there was a number of factors that helped me reach this decision, most of it was the British weather being so unpredictable that I needed to get as many photons for my images in the shortest available time.  I was used to imaging at F7.5 that the F4 was going to give me significantly faster optics, I also opted for the Carbon Fiber version purely from a thermal expansion perspective as it was going to perform better than the steel tube version.  I also opted for the 8” as the Native focal length of 800mm suited me perfectly, and I plan on getting the Keller reducer to bring it down to 560mm at F2.8.

Setup and Collimation
When I received my telescope and optically matched Aplanatic Coma Corrector, I was impressed with the build quality of the scope itself, internal baffles to boost contrast as well as eliminate stray light, and the focuser is pretty sturdy for a stock focuser, and quite easily handles the weight of my CCD and Filterwheel.  I mounted the telescope next to my Guide scope on my Skywatcher EQ8, I wish they had provided a Losmandy plate with the telescope, but the Vixen style bar still worked out well.  After balancing the scopes on the mount I was ready to check the collimation, for this I used my Farpoint Collimation Kit, firstly the laser to ensure it hits the centre spot of the primary, and the laser return reached the centre point of the laser collimator itself, the adjustments required were very minor.  After this I verified the collimation with the Farpoint Cheshire and it verified that the collimation was correct, only thing left to do was a star test, for this I used a 10mm Eyepiece and a fairly bright defocused star, the star was spot on, I could see all the concentric rings.  I then proceeded to perform the same star test with the CCD and the Aplanatic Corrector to verify, which of course it did.

Scope Details:
Focal Length: 800mm
Apperture: 8 Inch
Focal Ratio: F4
Tube Composition: Carbon Fiber
Focuser: 2″ Dual Speed Linear Power Focuser

First light
My first target for 2016 is the Iris Nebula, my first set of frames came through and for a 5 minute exposure I was impressed with how much data I had collected, data that would have taken over 15 minutes to collect on the F7.5 refractor I now use as a guide scope, I managed to finish a target off within a few days of imaging rather than over a multitude of nights

I have also not had to re-collimate the scope or adjust the focuser on the scope over the few weeks I have had it, so overall I am above and beyond happy with my decision and I am now able to image targets in a shorter timeframe which in the UK you have to grab every clear sky you can

A few months on
I have had to re-collimate the scope 0 times, even after removing the primary mirror assemply for cleaning, the focuser is still rock solid and holds the camera gear extremely well.   I have made an addition to the scope, I have added a fan system to the rear of the primary mirror, the fan also has some nichrome wire which allows the air being blown around the primary to be just above the dew point which prevents dew forming on the primary and believe it or not the secondary also, even in high humidity sessions.

Build Quality: Extremely pleased with the build quality of the scope, even the focuser is sturdy and holds all of my gear really well

Collimation: Extremely easy with the right tools, it has required no further collimation in the months that I have now owned the scope

Improvements: Could have come with a fan assembly, most of the other F4 scopes from other vendors do

Conclusion
After months of usage, I have produced some really good images in short timeframes due to the fast F4 ratio, I am looking forward to using this scope again next season with 3nm NarrowBand filters and possibly the Keller Reducer to bring it down to F2.8